
0
$0.00
0 items
Originally published on Substack.
But in the digital photography era, while heaps of the terminology (such as lightbox and loupe) have remained, asset management requires either a specialist app, or a combination RAW editor/asset manager.
There are some solid free options, such as XnView, DigiKam and Adobe Bridge, and full-blown pro apps such as Photo Mechanic and Cyme Peakto.
But in the middle there is a range of apps pitched at the hobbyist or semi-professional that serve as a bridge between a folder full of photos and a RAW editor.
PixlPath is a Mac-only asset manager with a highly competitive single purchase price of $15 USD. It’s pitched squarely at photographers who want more than a folder full of RAWs, but don’t need the industrial strength (or price tag) of Photo Mechanic.
I’ve been testing PixlPath to find out if it punches above its $15 price tag, or if you’re better off sticking with the free options and spending that fifteen bucks on a couple of coffees instead.
PixlPath is a surprisingly unique product, taking an unashamedly rigid stance on asset management, with no post-processing capabilities whatsoever. I must admit that I find that approach quite refreshing since the bolted-on editing tools you often find in asset management apps are nearly always a load of shite. This app isn’t pretending to be some one-stop-shop for your photos, it’s about providing a central location to index them, to view them and to then edit them in a third-party RAW editor.
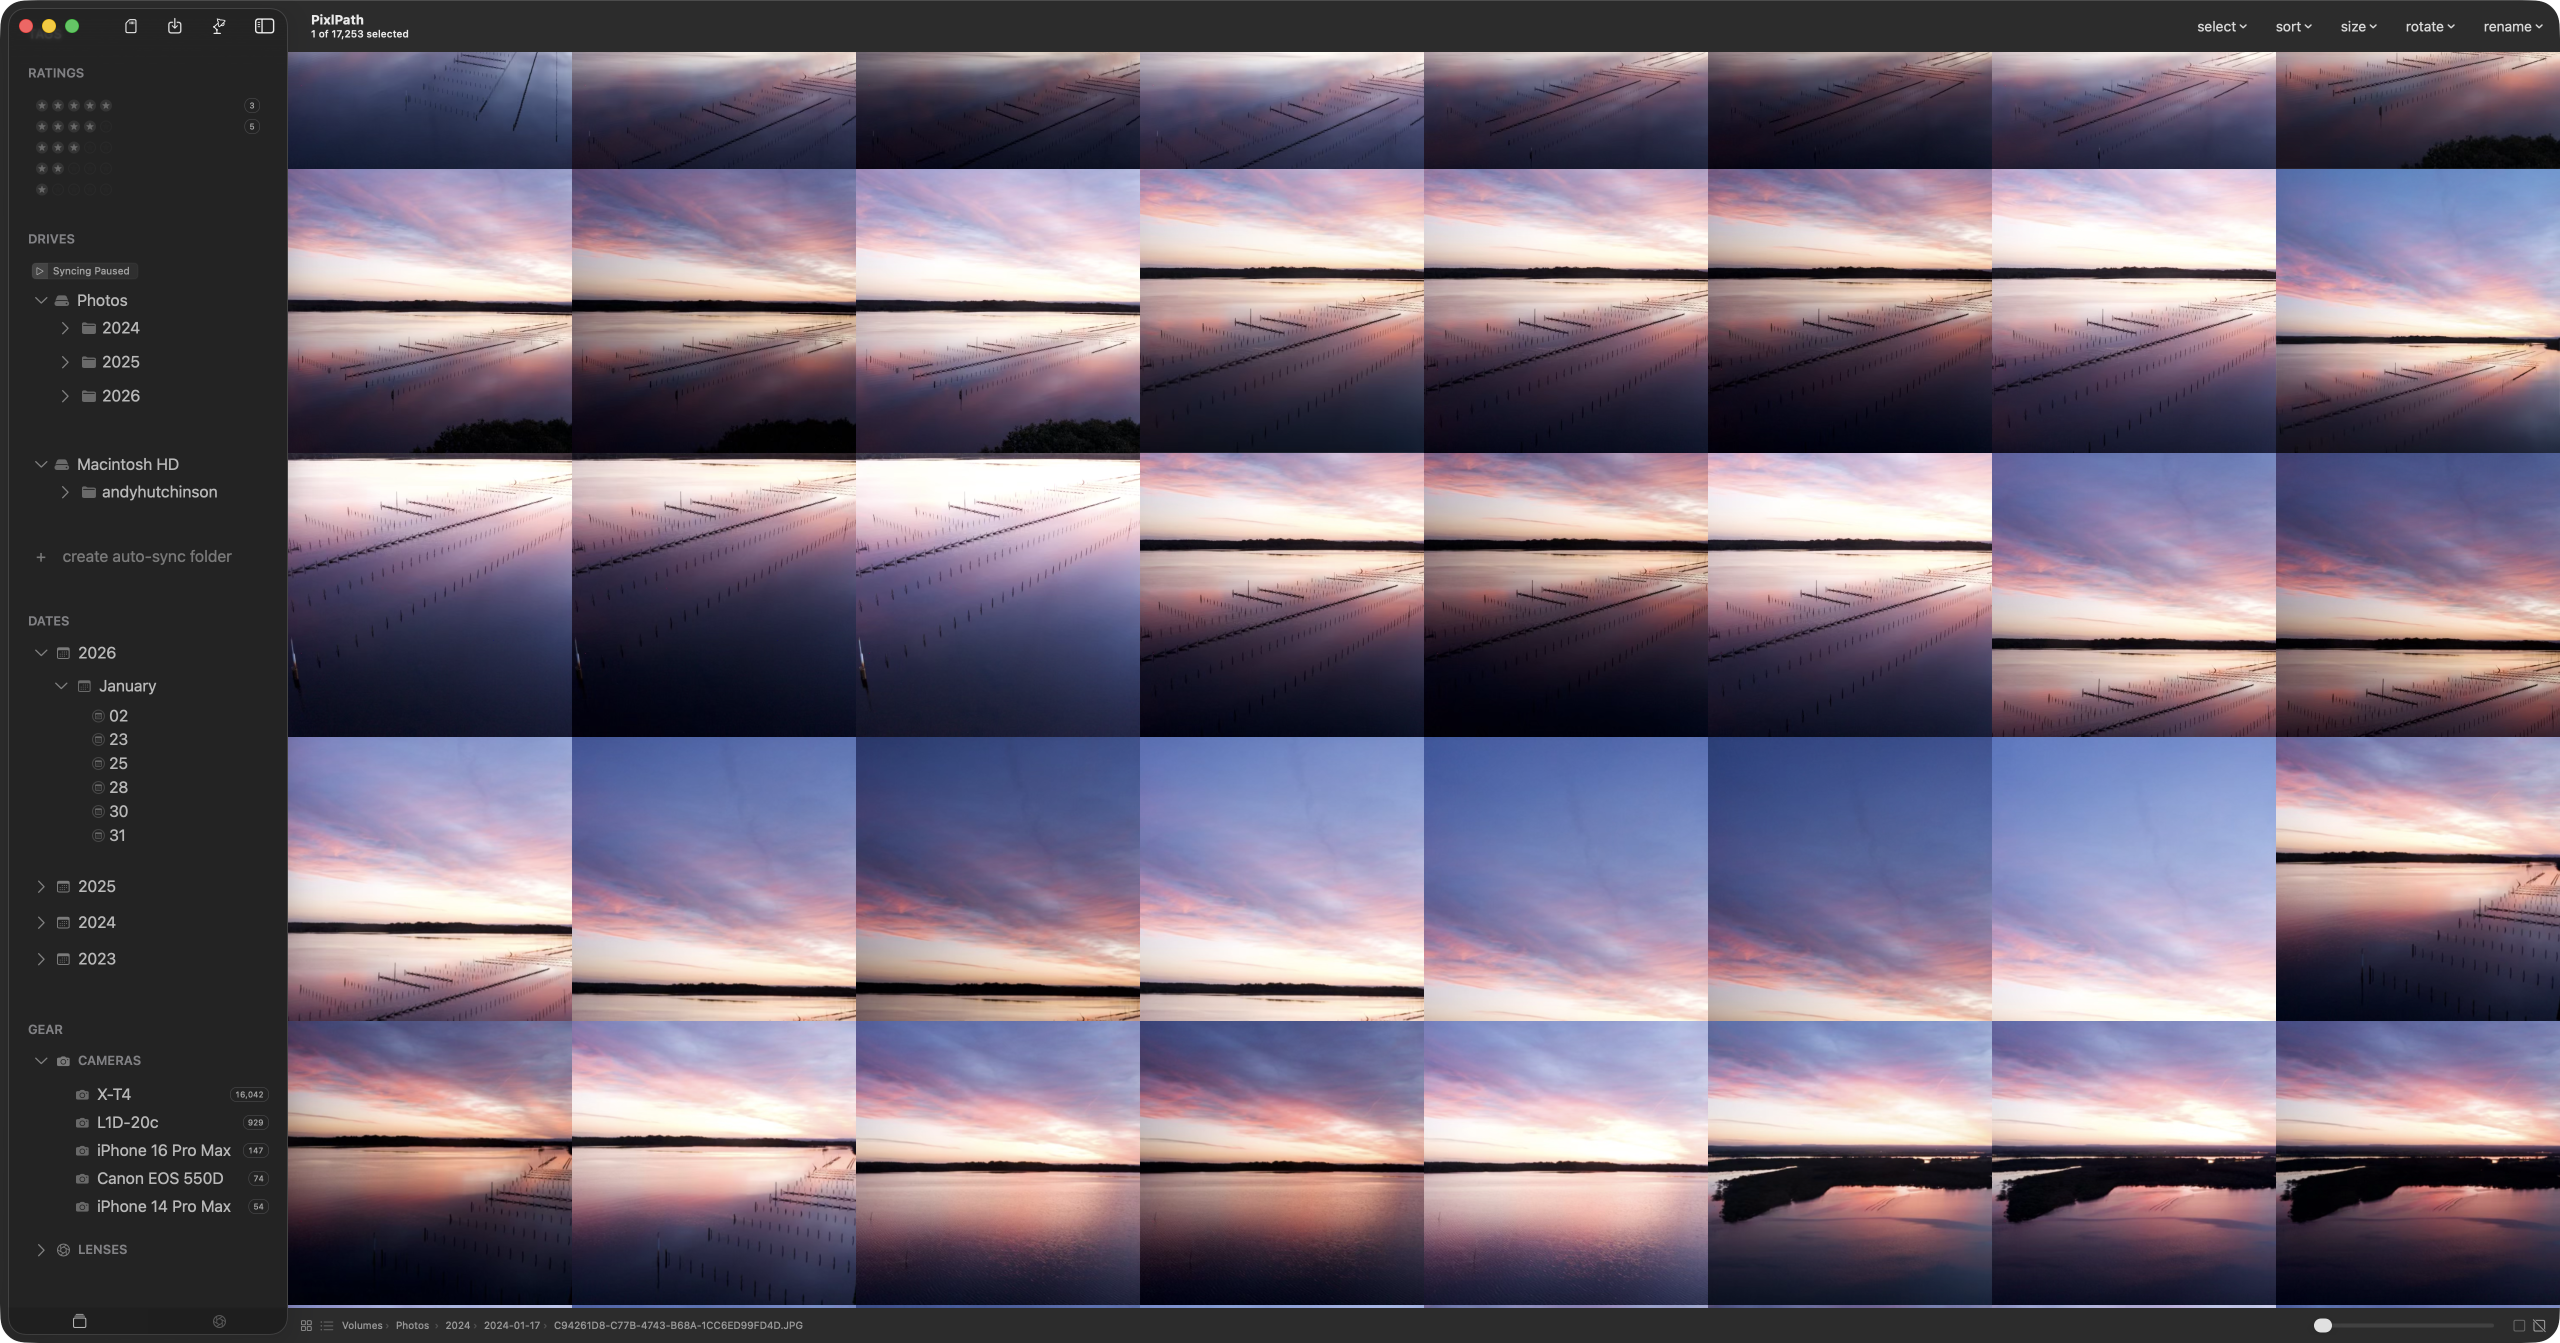
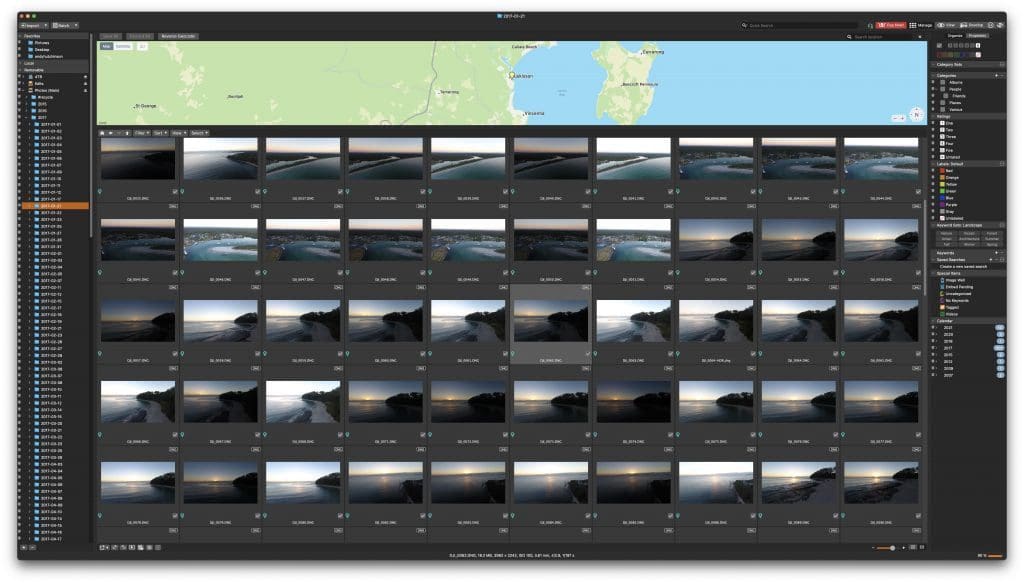
It uses a reference-based system (files stay in place, catalogs store previews), which means you can have multiple catalogues catering to specific projects, events, timelines or whatever other group you choose. It utilises a traditional sidebar and thumbnail design with all the controls, filters, sort modes and folders listed on the left and a flexible thumbnail view on the right.
All of the essential tools are close at hand and the developer hasn’t tried to get clever with naming conventions. Everything is labelled precisely how you’d expect, meaning this is an app you can just start using.
The interface is highly configurable in the settings. Everything from the transparency on the sidebar to the thumbnail font size can be tweaked according to your taste. Every menu item and category can be enabled or disabled. Every keyboard shortcut can be modified. And in the main window, thumbnails can be presented in an extended form showing date, size, filename, or in a clean masonry view with no text information displayed at all.
As I mentioned, PixlPath is a streamlined app perfectly focused on the task of asset management of photographs and the sidebar’s tools echo that intent. Turns out this is both a good thing and a bad thing.
For example, the search box is located right at the top of the sidebar, but it is restricted to searches for filenames only and is therefore of limited use. You cannot search for aperture, exposure, location, keyword or indeed any kind of metadata at all.
You can classify your photos by using the built-in tag, label and ratings, but disappointingly, none of these can be imported from existing embedded metadata or sidecar XMP files, which is highly likely to be a deal-breaker for many potential users of this app.
More frustratingly, there is no cross-platform keyword tool either. Tags serve the same basic purpose as keywords, but cannot be used in any external app.
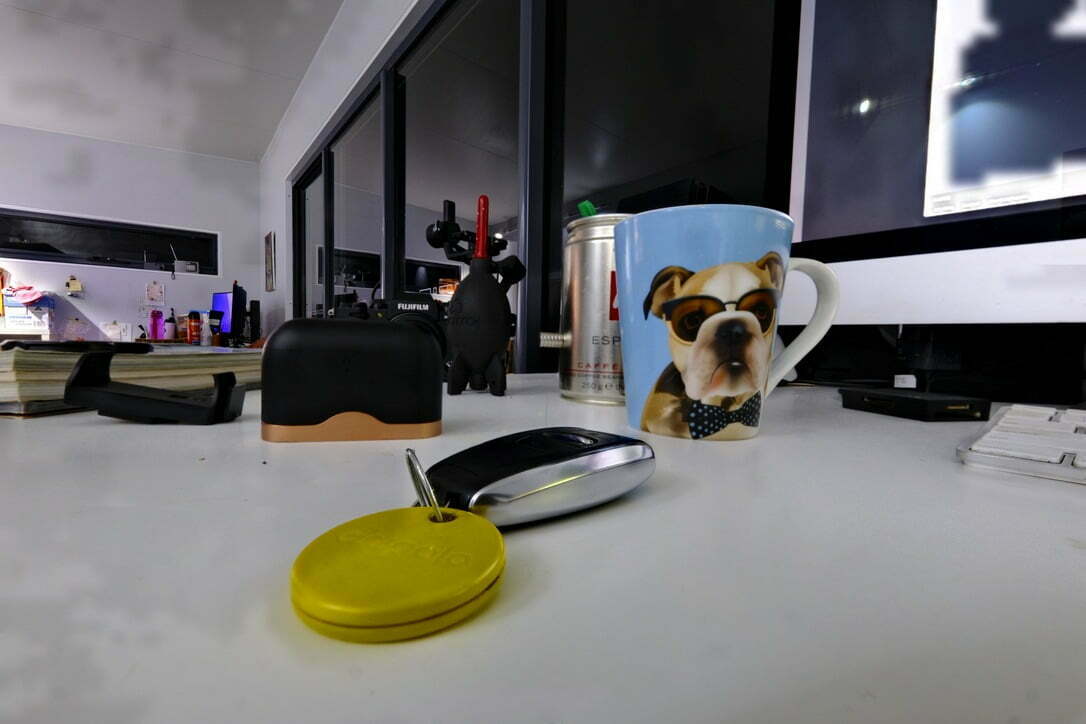
In the latest version the developer has added AI-generated tags which utilises Apple ‘Intelligence’ to analyse photographs and generate candidates automatically. It works, but the resulting tags are too broad and generalised to be of any great use. Suggesting the tag ‘liquid’ for a photo of the ocean might be strictly accurate, but it’s not very helpful in a photographic sense. Perhaps this will improve markedly once Apple add Google Gemini to the operating system in a few months’ time.
Once a folder has been imported into PixlPath you can view by date, camera or lens, and thumbnail refreshes when you switch on that filtering are near-instantaneous. But with such limited options in terms of drilling down into photo metadata, you’ll spend more time scrolling than searching.
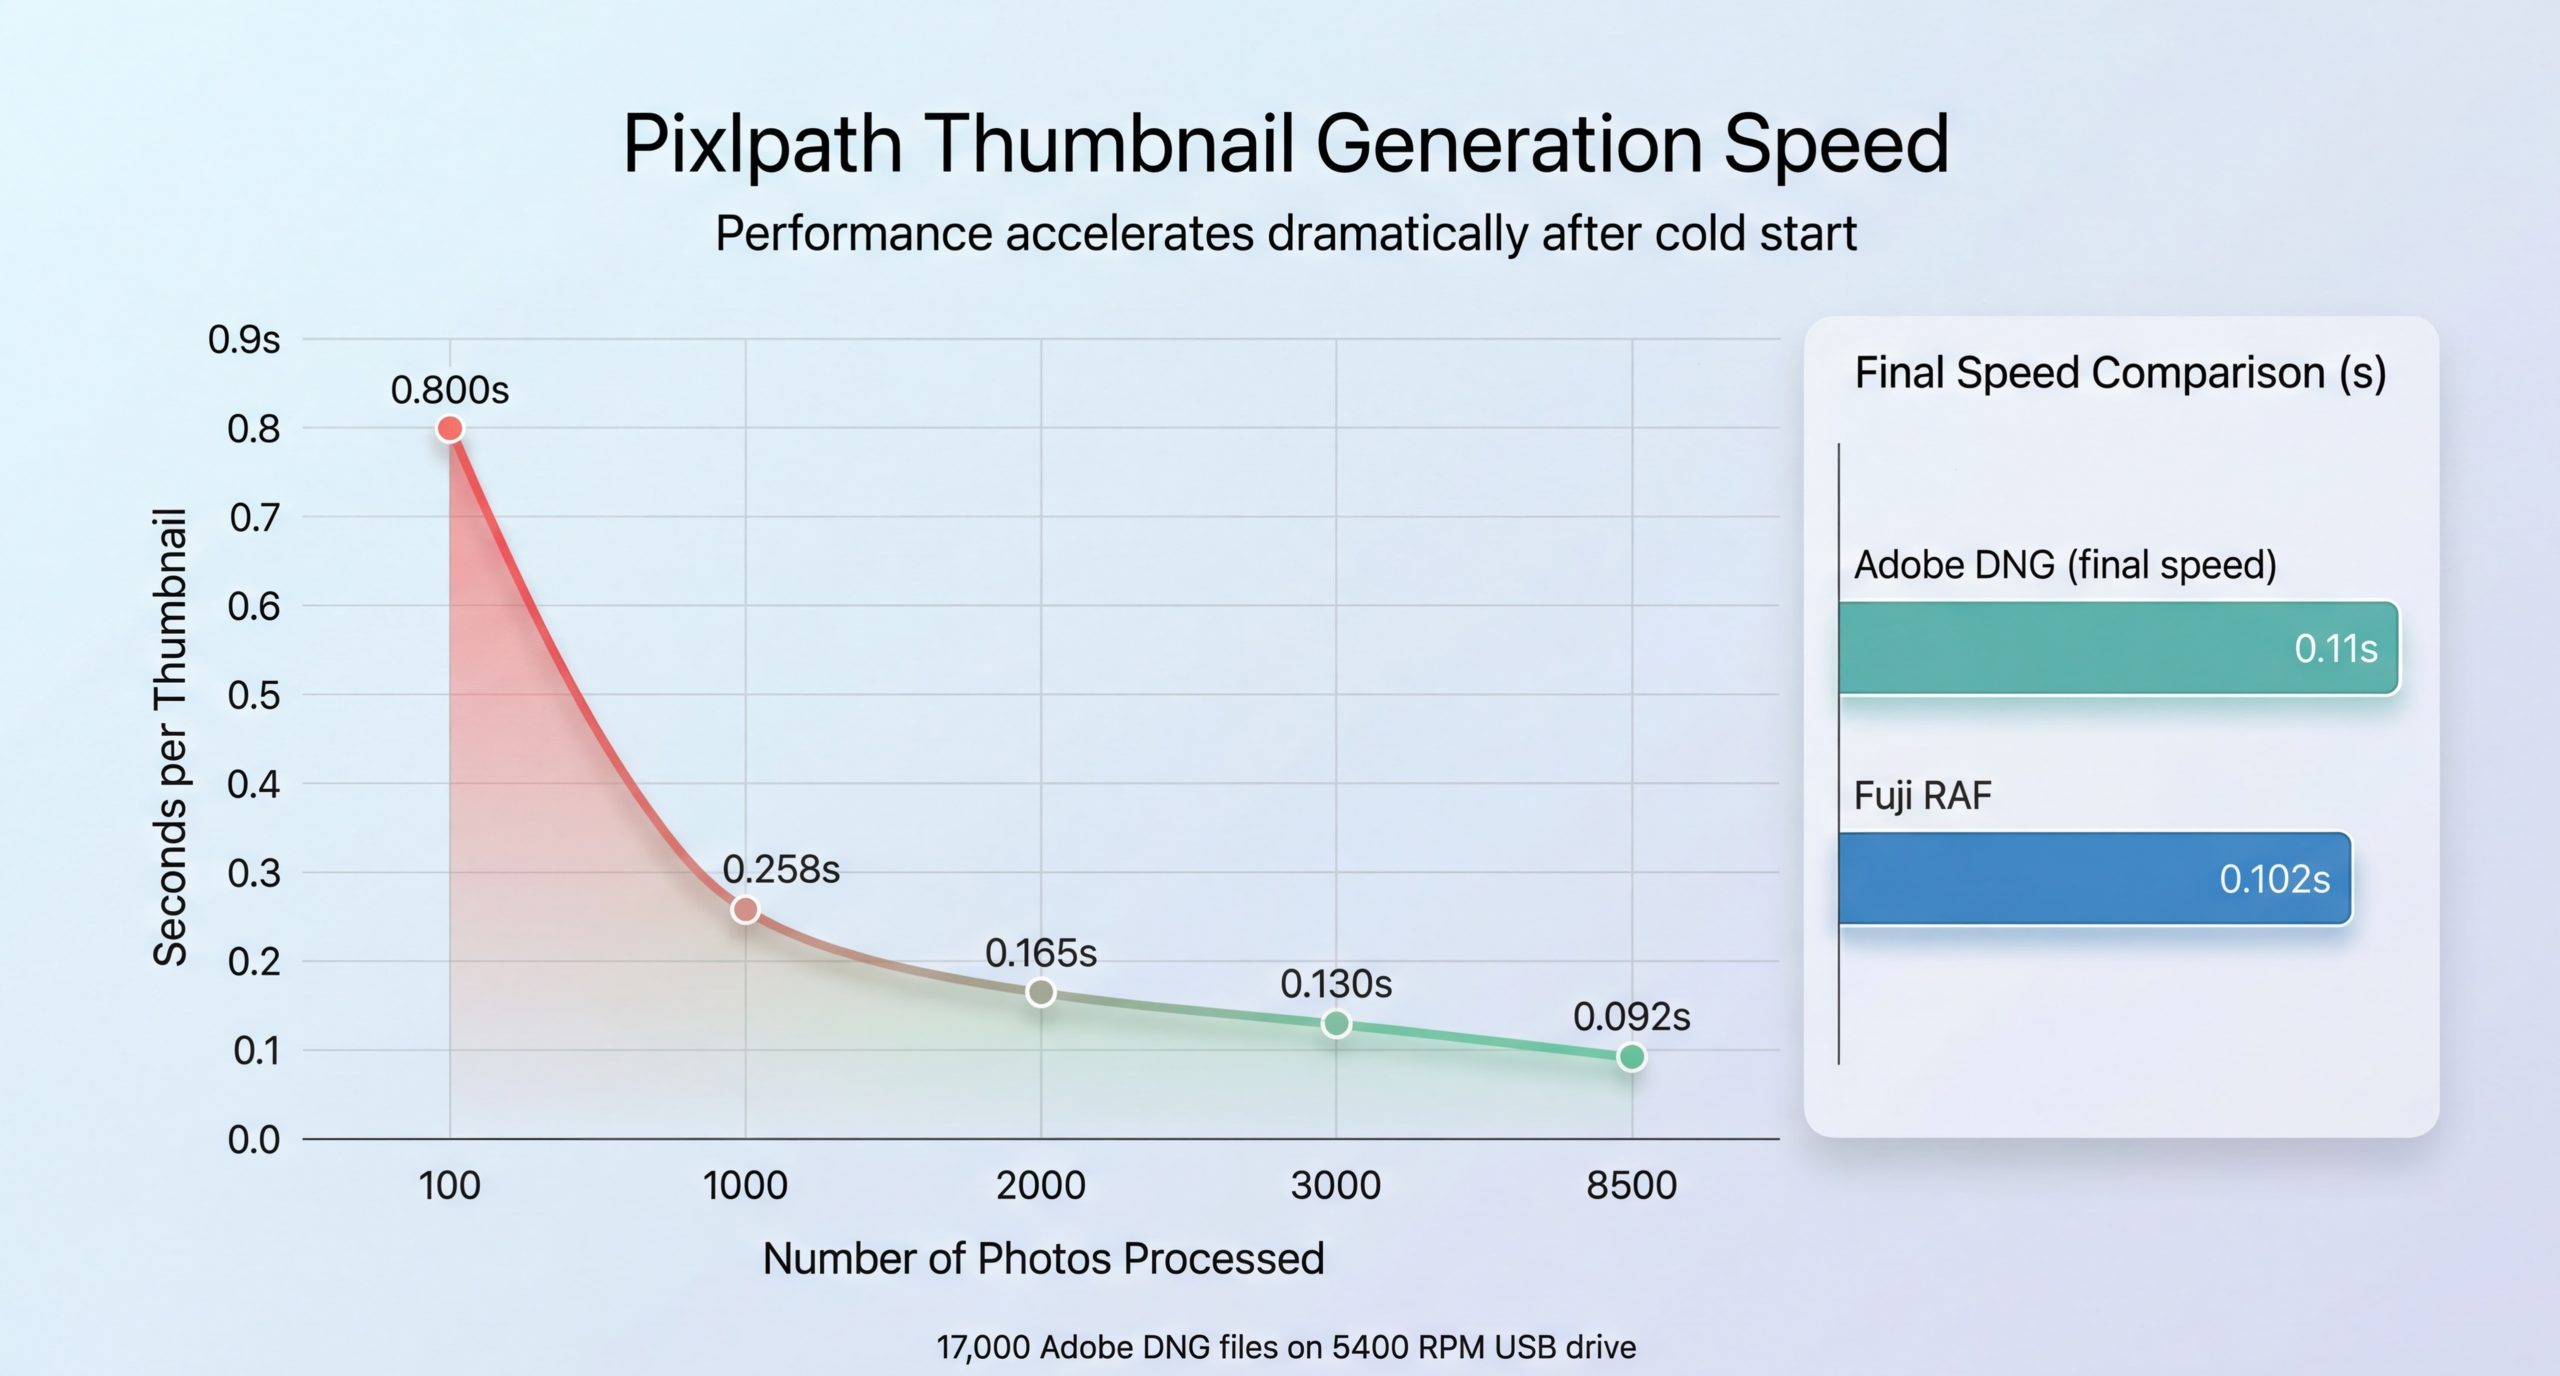
I tested the photo import tool on one of my year-based folders of images, containing just over 17,000 shots.
Thumbnail generation began at a slow 0.8s/photo, but accelerated to ten times that speed once warmed up. In all those 17,000 files took 31 minutes to import and generate thumbnails. My photos are on a fairly aged Western Digital Elements USB hard drive and that performance will improve if you’re using faster storage media such as SSD drives.
Once ingested, thumbnail scrolling in the main window is among the fastest I’ve ever seen. There is basically zero lag across 15,000+ photos, which is incredibly impressive, particularly if you’re used to the stuttering mess when scrolling in library mode in Adobe Lightroom Classic.
There is also zero lag when resizing thumbnails. It basically works in real-time with no stuttering or delay when resizing the grid.
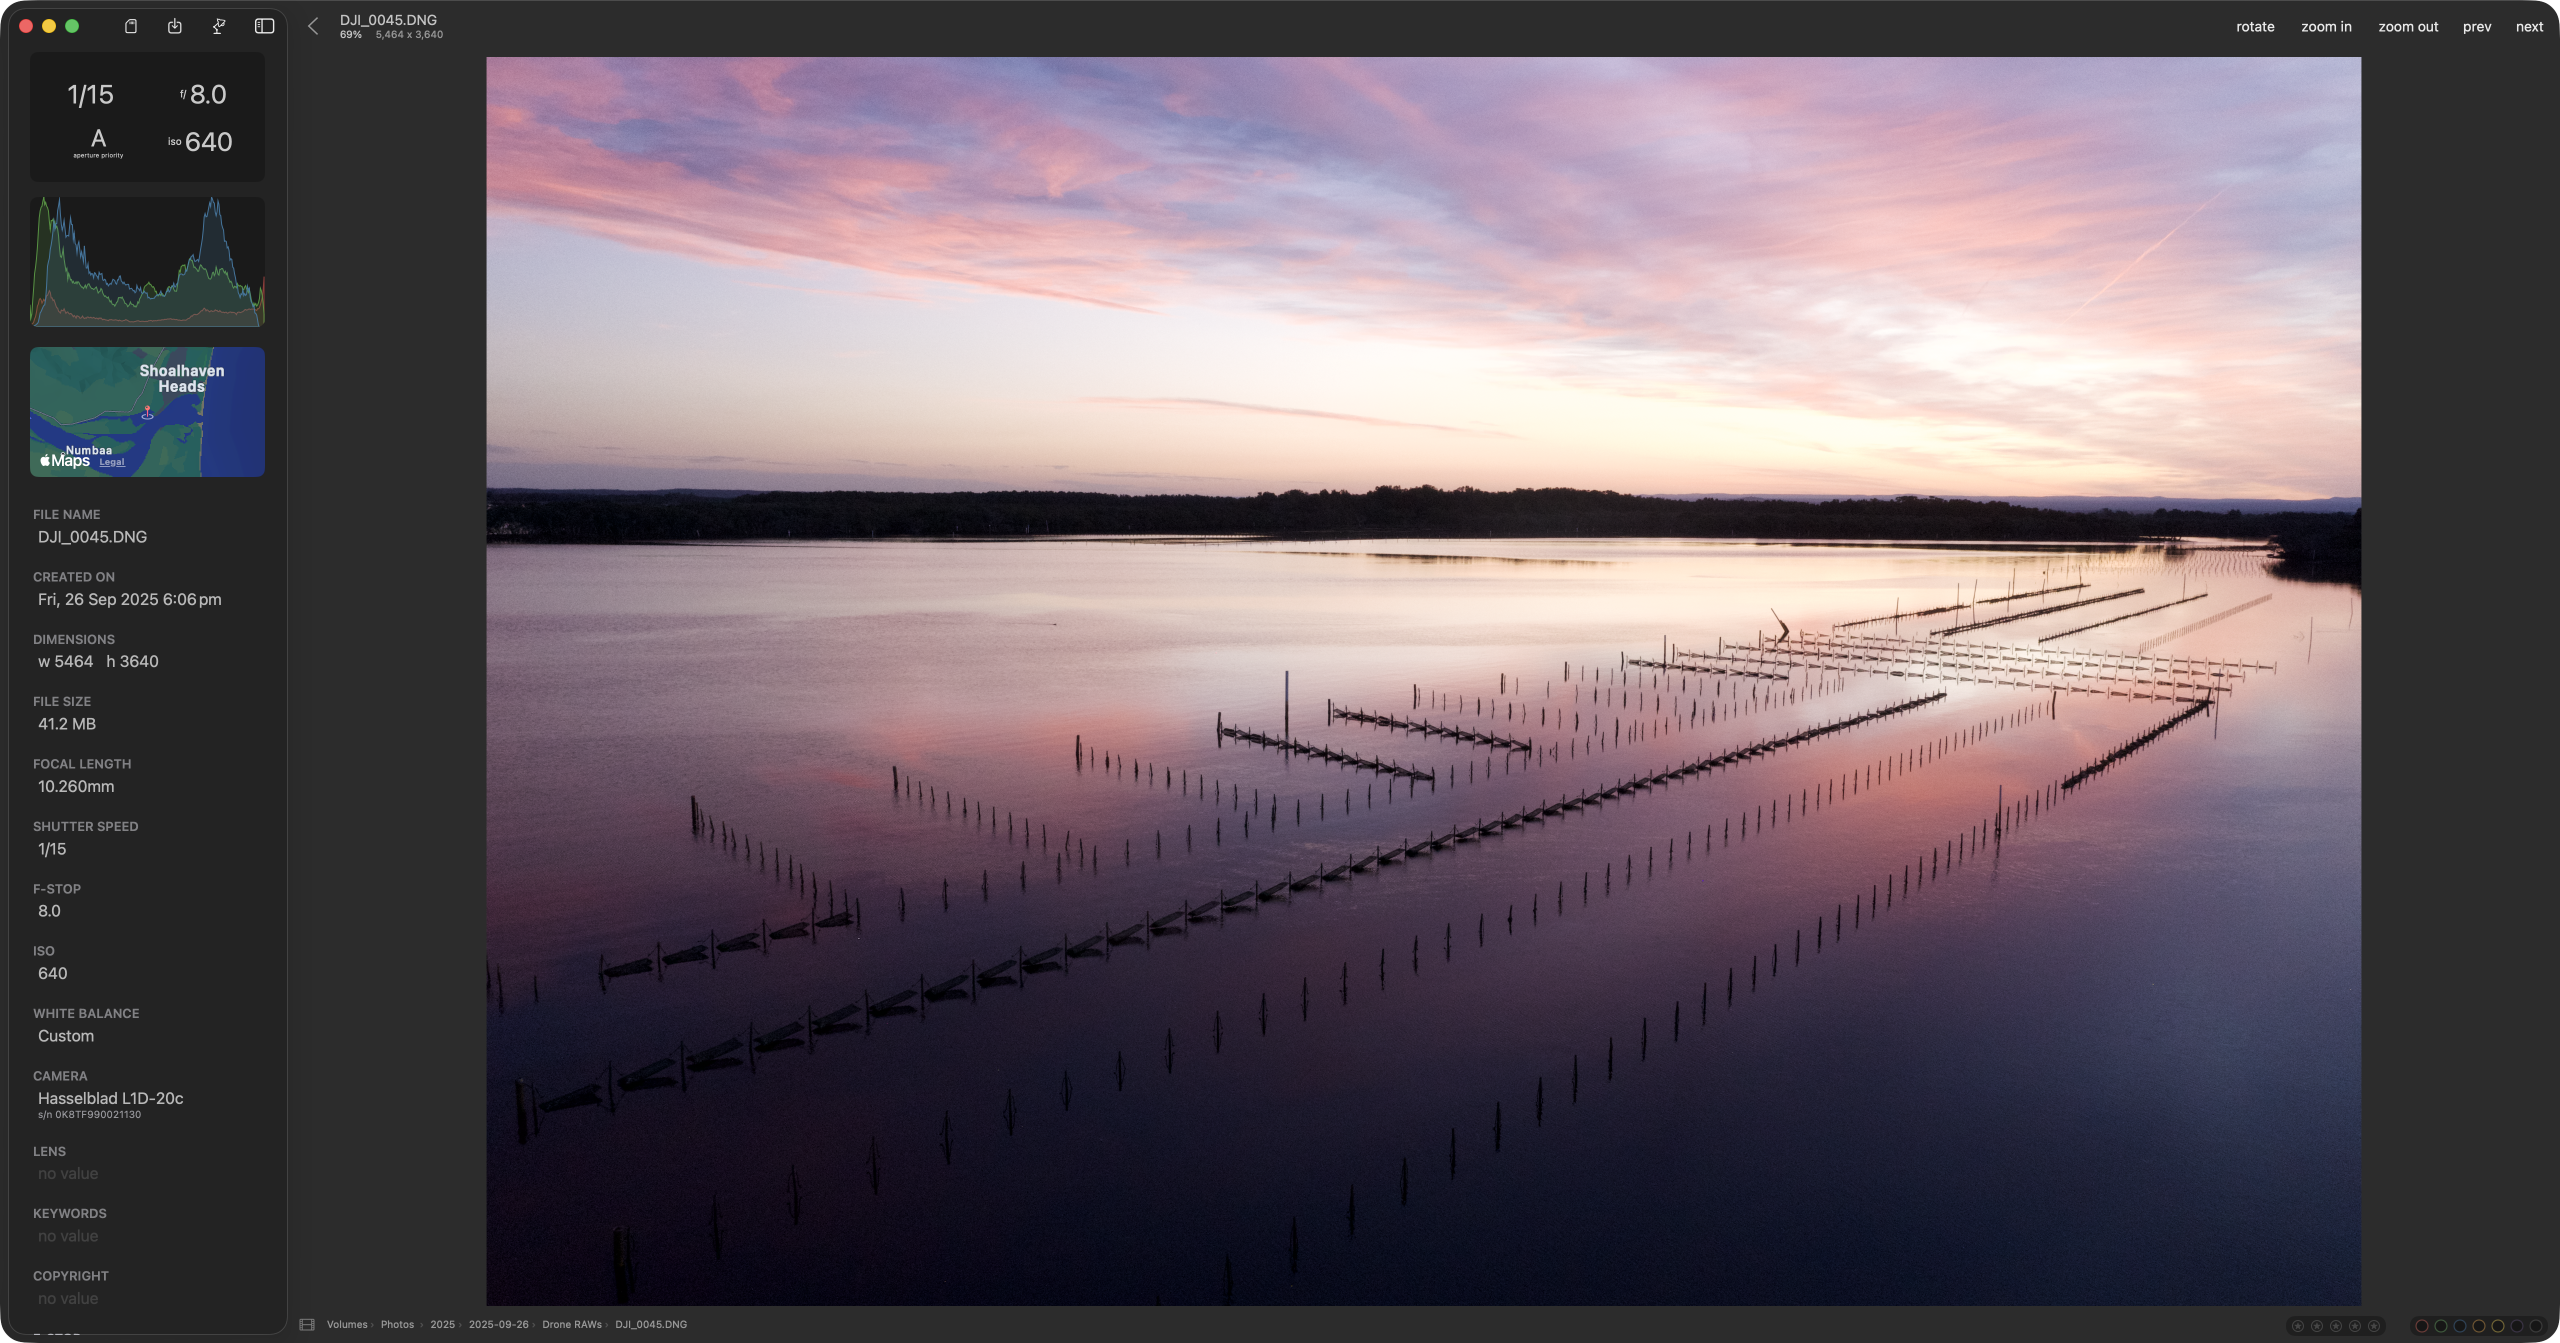
Filtering by camera or lens provided instant results, however there is a short lag of about a second in single image view, as the app renders in a high-res preview.
Tagging mode performed well too. I added a tag to a subset of 1,605 photos across multiple folders and the update took about five seconds to apply to all selected images.
The key strengths of this app are its speed and its focused asset-management design.
If you simply want a fast and efficient catalog to display your photographs, something that is more sophisticated than the Finder but not as complex as Digikam, then it will serve you well.
It has an excellent interface that sticks well to Apple’s design philosophies and every facet is highly configurable, including proper light and dark modes.
Ingesting photos from drives or SD cards is fast and efficient and the thumbnail view doesn’t often stop to catch its breath even on catalogs with tens of thousands of shots in them.
On the down side there are a couple of strange development omissions that are likely to put off anyone moving from another asset management app, particularly the complete lack of support for existing XMP sidecar data.
The app can only read EXIF data embedded in the photos, not any additional data such as ratings meaning that if you were downsizing from something like Lightroom you’d lose all of your star scores and would have to start from scratch using PixlPath’s built-in option.
I also find it strange that the developer decided not to include any traditional keyword functionality. Yes, you can use the tags which work along similar lines, but it’s a fairly primitive setup in comparison. It also seems strange that you can’t even search for any tags you created using the app’s own built-in search tool, although you can use the boolean filtering.
There was a feature to enable EXIF editing in previous builds, but due to some unexpected issues with compressed image formats, it is not available in the current build.
Another issue is that any photo directories, drives or folders you’ve added to a catalog need manual syncing if you add or remove photos from them afterwards.
You can enable auto-sync on a per-folder basis by right-clicking a drive folder and selecting “Make Auto-sync Folder”, which monitors that folder for changes. However, the developer explicitly recommends backing up your catalogs before using it and warns against enabling it until you’re familiar with the sync process. If auto-sync detects a missing file, it removes it from the catalog along with all associated metadata, so you need to tread carefully.
Despite my misgivings about this app, I have little doubt that it will find an audience with photographers looking for a very particular set of skills.
If you’re not moving photographs over from another system in which you’ve carefully tagged, rated and keyworded, then the lack of XMP sidecar compatibility isn’t an issue. And since the import speed is excellent, it’s fine for photographers who value speed and simplicity over sophisticated metadata handling.
The very Apple design of the app and the extreme speed with which it operates makes using it a lovely friction-free environment. I can scroll from the bottom to the top of a folder of photos and the thumbnails appear instantly. On Lightroom I could go and make myself a coffee while waiting for it to update.
The app hides surprising levels of complexity behind the simple interface and it’s well worth reading the manual fully in order to get the most out of it. For instance, one neat feature I discovered is that when creating a folder you can add sub-folders in brackets and the app will generate the nested folder structure for you.
So should you buy it? If you’re starting a fresh catalog, shooting regularly, and just want something fast to organise and find your shots without the bloat of a full DAM suite, then yes. If you’re trying to migrate an existing library with years of careful metadata work, probably not.
For fifteen bucks you get fast imports, instant browsing, and a clean interface that stays out of your way. That’s it. If that’s all you need, you’ll be delighted. If you need more, then you already know this isn’t for you.
So let me kick things off by stating one thing right from the outset. Believe it or not, the current version of the Arsenal 2 Pro firmware and app combination has marginally improved.
If you want the elevator pitch it's this - the basic functionality is slightly better, but the headline features of the device, the things that people are buying this device for in the first place, yea, they’re still about as useful as tastebuds in your bung hole.
In terms of basic functionality, the last time I gave the Arsenal 2 a serious test it crashed constantly, shat itself mid-operation and failed to choose anything even close to a sensible set of camera settings. And believe it or not, there have been some modest improvements in this area.
For starters, it only crashed four times in the two hours I was testing it down at my local beach. This might seem like a lot, but the first time around it was only successfully completing its shots about one time out of twenty.
In its most basic mode, which is basically just a remote trigger, the app-based touch-screen focus worked correctly on most occasions as long as I didn't push things too far by changing my mind and tapping onto several different areas of the screen. When I did tap around a bit, thereby causing the app to re-focus, it refused to do any more focusing until I restarted the Arsenal and the camera.
It also, and I can’t quite believe I’m saying this, chose relatively sensible settings when taking photos in the basic Deep Colour mode. The point of this mode is to enable photographic novices to take good photographs. The Arsenal device is supposed to leverage its so-called A.I. in order to select sensible aperture, exposure and ISO settings for that time and location. Previously it would opt for some ludicrous settings such as f/4, ISO6400 and some bat-shit crazy exposure time. This time round, when I tested on the beach in the middle of the day, it opted for settings such as ISO160 or ISO200, f/9 or f/11 and 1/500s exposure.
Don't go thinking this story has a happy ending though.
Unfortunately, Deep Colour mode is still deep doo-doo. Now that Arsenal is selecting better exposure settings, the images taken in Deep Colour mode are not awful, they're just not any better than you can achieve by simply sticking your camera in Auto mode. Once you've taken a shot in Deep Colour, you can preview it and use the slider to 'enhance' the shot. But all this appears to do is add some saturation, a vignette and a bit of clarity, something you could just as easily achieve using any photo editor on smartphone or computer.
In short, Deep Colour is a load of bollocks and if you're looking to get Arsenal primarily for this feature, then save your money and simply stick your camera in full auto mode - it'll do a far superior job.
Focus stacking is a powerful tool for landscape photographers since it enables you to create a blended image which is sharp from back to front. Most decent cameras have a focus bracketing mode built in, but it's not always easy to use. The implementation on my Fujifilm X-T4 is awful and I usually just bracket manually. So I was excited by focus bracketing with the Arsenal 2 Pro.
Unfortunately, this is another deeply flawed mode. Now that the Arsenal's not shitting itself every 30 seconds and is making more logical choices for settings, I was at least able to test this mode properly now.
There are two flaws with focus bracket mode - the settings and the merged image.

The settings for focus bracket mode are controlled by two sliders - one for the number of shots and one for the step size. Unfortunately there's no obvious values to set these to and so you have to spend half an hour fucking about with the sliders until you arrive at something that gets close to the end result you're after. However even if you manage, by sheer perseverance and perhaps some latent psychic abilities, to arrive at values that work, the merged image that Arsenal spits out is, usually, shite.
If there is anything moving in your scene, such as grass, tree branches, water or people then the merged image is highly likely to look awful. You will see ghost elements all over the photo wherever the movement is. And yes, you could always just import the original images into Adobe Photoshop and use its focus bracket feature to blend the individual frames into a single composite, but that's not the point. Arsenal is supposed to do this for you and spit out a good looking focus stacked image. The Arsenal has all the image compositing skills of a confused highland terrier.
There's not as much need for exposure blending these days as most cameras have good dynamic range and you can usually do everything with a single exposure. However if you've got an older camera or are photographing a scene with a crazy large dynamic range, then exposure blending is useful.
Unfortunately, the same issues that affect focus blending, affect exposure blending too. And I use the word 'issues' in the same way that a high court judge might describe the character of an accused axe murderer.
While I'm happy to report that Arsenal did take the required number of shots and while it did choose relatively sensible settings, the resulting exposure blended images are shite. If there's anything moving in the scene then Arsenal will do a woeful job of blending them. And even if by some miracle there isn't anything moving in the scene, the resulting image looks weird and washed out. Like Haley Joel Osment in the Sixth Sense, the Arsenal 2 Pro has a (spoiler alert!) serious problem with ghosts.
The long exposure mode is actually nothing of the sort. It is supposed to use a series of shots, blended together, to give the impression of a long exposure. Unfortunately, photos taken this way usually look terrible, like someone with no clue how to use Photoshop accidentally merged a bunch of images without bothering to blend them in any useful way.
It's possible you might get a vaguely decent looking shot if you were photographing something like a flat body of water with a few ripples on it, but for anything else, it's dogshit.
I have an app on my iPhone called Spectre which uses the iPhone's Live Photo option (basically a short video) to create pseudo long exposures and it does a far superior job to Arsenal for 2% of the price.
Crowd control was one of the only modes that sort of worked sort as advertised when I first reviewed Arsenal. The idea of this mode is to produce a shot of a location with all the humans and/or traffic magically removed. It does this by overlaying a series of images on top of each other and then removing anything that's different between shots, such as a person walking through the frame.
It was choosing stupid settings back when I originally tested it, but it's making more logical decisions these days. This is another mode you can accomplish just as easily without an Arsenal 2 Pro as with it, using a composite averaging mode in something like Photoshop. But this way you get an image with people and traffic removed, delivered straight onto your smartphone. And on that basis, in order to bring a rare glint of light to this otherwise downbeat review, I'll chalk this one up as a win.
One of the modes that created a lot of interest in Arsenal 2 Pro was the so-called 'smart' timelapse. Timelapses can be a real pain in the arse to shoot because you rarely get from one end to the other without having to change the settings. And when you render your timelapse this can result in an unattractive flickering effect. So Arsenal is supposed to intelligently transition from one setting to the next in such a way that flicker is, if not removed, then greatly decreased.
The most difficult timelapse of all is the so-called 'holy grail' timelapse which involves transitioning from day to night. I tested the Holy Grail timelapse mode for an hour around sunset on my Canon 550D. I set the camera going 25 minutes before sunset and left it running for more than half an hour afterwards.
The timelapse that Arsenal produced suffered badly from flicker, but at least it didn't shit itself during the hour in which it was running. However if we take a look at the EXIF settings that Arsenal selected for this timelapse then we can see that it's up to its old tricks.
For an opening aperture it decided that f/25 was the best bet. I didn't even know the aperture on the kit lens on my old Canon 550D went that small. In fact I had to double-check the camera because I thought it was a mistake. But no, f/25 is, apparently, a thing - and Arsenal decided it was a great choice. It wasn't a super bright sunset by any stretch of the imagination and pretty much anything other than f/25 would have been a better option. It stuck with f/25 for the next 20 minutes slowly increasing the exposure time before suddenly deciding to fuck f/25 off, in favour of f/13. And it stuck with f/13 until the bitter end, by which time the exposures had stretched to one and a half seconds.
Now there are sliders in the app that enable you to restrict Arsenal to a specific range of apertures, exposures and ISOs. But I wanted to give it free rein because this is a device that's pitched at people who don't know much about photography and who probably wouldn't have a clue what to set those sliders to.
And just because I tell the Arsenal that it has the entire aperture range at its disposal, doesn't mean it should gleefully accept and choose an aperture with a diameter smaller than a dust mite's dirt box. It's supposed to leverage machine learning for this stuff and not perform a stress test of the camera lens.
Last time I put the Arsenal 2 Pro's night mode to the test it didn't even make it past the calibration shots. This time around I am happy to report that it did make it past the calibration shots. Once. I couldn't quite believe my luck. But can you predict what happened next? That's right - it shat itself, again. In an hour's worth of testing I managed to get it take one single shot. Unfortunately this was before I picked a target star for the app to focus on and so the shot's a blurry mess. When I did pick a target star to focus on, the Arsenal shat itself, disconnected the app and dropped me back to the connect screen.

I did take notice of the settings the app chose when it was hyping itself up to take that single shot and they were actually good settings - f/3.5, ISO1600 and six seconds. If the Arsenal could hold itself together long enough to successfully take a shot, it might have even turned out okay. So, to summarise - it's not so much night mode, as shite mode.
One of the reasons I've been holding off writing this longterm review was the possible release of the Arsenal's pano mode. At the very start of October, Ryan Stout said in the official Arsenal blog that, "As far as launch [of pano mode], we’re looking at mid-to-late October to be fully productionalized and released to the general public". So, I sat and waited and here we are in the second week of November and still no sign of the fabled, the legendary, the rarer than rocking horse shit, pano mode.
Arsenal 2 began shipping in early January and so we find ourselves, nearly a year after release, with no sign of one of the marque feature modes of the device. The no-show of pano mode is a load of bollocks, but at least it's in keeping with the consistently miserable experience of using this god awful gizmo.
So, seven months on, has the Arsenal 2 Pro improved? Yes.
Is it worth buying yet? Absolutely not.
Will it ever be worth buying? I highly doubt it.
As a remote trigger Arsenal works okay and having a preview on your smartphone can be useful particularly if the camera is positioned some fairly inaccessible, such as very low down to the ground or up a pole or something.
The Deep Colour mode is pointless and you can achieve similar results by simply sticking your camera in full auto mode and then cranking the saturation slider up to 100 on your photo editor of choice.
The stacking modes are let down by the merging software which does simply not have the computational chops to do a decent job. 9 times out of 10 you will end up merging the individual shots from an Arsenal created bracketed sequence yourself using third party software. Which kind of defeats the whole purpose of the Arsenal 2 Pro.
The timelapse functionality is flawed on two levels - the Arsenal makes bad choices for camera settings - and the resulting merged video file suffers from distracting flicker.
So my advice is this.
If you want to take great photographs and share them immediately to your social media, get an iPhone 14 Pro Max, an S22 Ultra or a Pixel 7 Pro. These smartphones can take impressive photographs and you won't have to dick about with a bulky camera and an add-on gizmo. Google, Samsung and Apple have the budget to ensure that their cameras' machine learning technology works reliably.
If you want to get serious about Timelapses and want to automate the process, then get an LRTimelapse PRO Timer 3 intervalometer. They're not cheap, but they do have the advantage of working.
If you want to take long exposure shots, just buy a good ND1000 filter and knock out 'fine art' shots of wharfs, piers and lonely trees on the water's edge, to your heart's content.
If you want to take better night sky photos and you keep ending up with blurry shots, then get yourself a sturdy tripod and either a Bahtinov Mask or a specialist accessory such as the Focus on Stars filter. The latter costs about $125 and enables you to take tack-sharp night sky photos.
Alternatively simply switch to video mode, turn the ISO right up, ensure autofocus is disabled, press the zoom button and then focus manually with the focus ring, before switching back to photo mode.
So that's it. As the saying goes, if it looks too good to be true, then it probably is.
The Arsenal 2 Pro is a tempting device to anyone looking to improve their landscape photography, but it is, unfortunately, a deeply flawed device that fails to deliver on its marketing pitch. It's more stable now, but the inherent flaws of the device - specifically its lack-lustre ability to merge photos - are unlikely to ever improve substantially. There's no magic bullet to taking better photographs and very few shortcuts. You'd be far better off spending the cost of Arsenal 2 Pro on a lesson with a landscape expert or putting it to the cost of a new lens or a photo bag or a filter or literally anything fucking else in the universe.
I missed the original Arsenal kickstarter, but it was by all accounts a big hit and so its success made a follow-up somewhat inevitable. When it was announced, the development team scored funding to the tune of $4.2m from over 22,000 eager backers with $230 in disposable funds lying around. With that level of interest it seems evident that there is a strong market for this sort of device.
I know my way around a camera and you're probably wondering why anyone who is more than moderately proficient at operating a modern camera would buy a device like this. And my super-quick tl;dr answer to that question is that I was simply intrigued by this device and its possibilities. It also had a relatively modest $230 buy-in and I figured - fuck it - why not - if it's shit at least I'll still be able to review it.

I pulled the pin on my purchase back in August 2020. Clearly a lot of crap happened between then and now and I don't think anybody really blames the Arsenal team for missing their projected release deadline(s). Ryan Stout, the designer and brains behind Arsenal provided regular updates on progress and the challenges he faced in getting Arsenal 2 out the door as the supplies chains of the world ground to a halt. Nonetheless I was happy (and surprised if I'm being completely honest) to finally receive my own Arsenal 2 Pro in the post 18 months after I bought it.
I've had it for a month now and have tested its various modes with several different cameras. And, in the spirit of full disclosure, I should say that I kept putting off reviewing Arsenal 2 because I didn't think it could be as useless as it turned out to be. So I kept testing it and trying different stuff. I gave it the benefit of the doubt and kept thinking that I was doing something wrong, but it turned out that this wasn't an issue of operator ineptitude.

Now, given how advanced cameras are these days, you might wonder what the purpose of a device like this is. And the answer is that it aims to level the playing field with smartphones. Apple, Samsung, Google and the other phone manufacturers spend an ungodly amount of time and effort on the cameras in their devices, because cameras have become the single most important feature to consumers. And because smartphones cannot compete with the larger lenses and sensors on DSLR and mirrorless cameras, the phone manufacturers use machine learning and highly complicated software to improve the quality of the photographs.
So the intention behind this device is to bring the kind of sophistication that goes into making an iPhone or Samsung smartphone's camera technology to your Nikon, Sony, Fuji or Canon camera. When you think about the billions of dollars that a company like Apple undoubtedly spends on their smartphone cameras - in terms of both hardware and software - it's seems obvious that expecting a KickStarter project and a few passionate camera geeks to get close to that level of sophistication is expecting a bit much. That is the reality.
And now that I've spent some time with the Arsenal 2 Pro I can categorically state that, while it was a valiant effort, if getting close to a smartphone's camera system was the aim, then they failed. An heroic failure maybe, but a failure nonetheless.
The Arsenal package includes the device itself, two cables (one for data, one for power) and a smartphone holder, although the latter is an extra that you have to pay for on top of the actual device. The welcome card sends you to a Quick Start section on the Arsenal website that walks you through installation and setup.
I'm an iPhone user and I downloaded the Arsenal app directly from the App Store. My device came with an 80% charge, but I fully charged it before beginning the set up process.
Based on the feedback I've seen online I had it pretty easy getting my camera, Arsenal 2 and smartphone all talking to each other. For the most part the system connects to my iPhone 12 Pro Max without too many issues. It usually fails to connect the first time, sure, but after that it connects and shows a live preview streamed via wifi straight to the app. The first time you use the device you'll get notified that there's a firmware update and the app will then upload this to the Arsenal 2 and reboot it.

The app itself is well designed and relatively intuitive to use. You can quickly switch between the various modes, operate the Arsenal and camera in manual mode and also manage the photo storage options, including formatting the SD card in the Arsenal 2 itself. The app works in both portrait and landscape modes and can flick between the two without any issues. The control slider system works well and the design of the app is modern and functional.
The modes are the reason most people will buy this device because their aim is to either a) improve your photographs or b) automate an otherwise tedious photographic technique.
One of the tentpole features of the Arsenal 2 is Deep Colour mode. According to the marketing claims, the aim of this mode is to take the guesswork out of taking a photograph on a camera, such that someone with no knowledge of the effects of aperture, exposure and ISO, can score a great image. To achieve this the Arsenal 2 team apparently leveraged a machine learning system to train the device on hundreds of thousands of high quality photographs.
So when DeepColour mode is active, the Arsenal 2, in combination with the app on your smartphone, analyses the data it's receiving from the camera's sensors, uses A.I. to work out what sort of a scene you're photographing, and makes an informed decision about the best settings to use in that situation. All of which would be great if it worked with any degree of reliability.
Reliability is actually the real curse of this device.
Put simply Deep Colour is deeply disappointing. I have a couple of images that I shot in this mode that I would regard as ok, but most of the time the settings that Arsenal 2 chose for any given situation were odd at best and downright stupid at worst. On most occasions the camera would set the ISO to 6400 for reasons known only to itself. It would usually choose an aperture at the extremes, either ludicrously fast or ridiculously slow - f/2 one minute, f/22 the next. Oh, and it apparently uses a random number generator for the exposure time.
Now the simple fact of the matter is that I didn't buy into the Arsenal 2 Kickstarter because of this Deep Colour mode. I know my way around a camera and I had no intention of using it any more than I'd ever put my X-T4 in full auto. But it's one of the main selling points of the device and so I tested it. With my X-T4 and an iPhone 12 Pro, it absolutely sucked. It did slightly better with my Canon 7DII and 550D, but even then it was unreliable and erratic. I've had a good look at the other Arsenal 2 videos online and it seems like the results you get with this device are down to pure luck. Some people seem to be getting moderately decent photos with Arsenal choosing logical camera settings, some people have the same experience that I do.
Deep Colour is a standalone mode designed for taking single shots of a scene, but Arsenal also has a series of modes that use brackets and stacks to streamline the process of taking more advanced shots.
Of these modes, I was particularly interested in the focus stacking because, while my X-T4 has a built-in focus-bracket option, it is terribly designed and awful to use and so when I do stack an image, I usually do it manually.
The great news is that the focus stacking mode is one of the least-worst features on the Arsenal 2. It's a hit-and-miss mode that takes a lot of guesswork, but when (when!) it works it works well.
You configure the focus stack using the smartphone app. The mode has two sliders - numbers of shots and focus step size. No guidance is provided on what constitutes good options for these settings so you just have to piss around a lot and find out what works through trial and error. What does the Focus Step Size figure actually pertain to? Is it a percentage of the total focal range of the image? Should I set it to a small step or a large one? I eventually found that a figure of about 75 for the step size and between 5 and 7 shots was a good starting point, but of course it varies enormously depending upon the size of the camera sensor and the lens you've stuck in front of it.
Prior to taking a focus stack you select the closest point you want in focus by tapping the live preview on the smartphone app. It takes a second or two to find the focus and when it's successful the selection box turns from red to green. Then you simply press the shutter button on the app to begin the focus stack and occasionally it takes a successful series. However in my testing I found that the stacking mode basically gave up on life - usually after a couple of stacks - like some sulky teenager being forced to visit a museum.
It would either shoot everything at ISO6400 and f/2, or it would throw up an error message or it would crash half way through and I'd have to reboot the device, my camera and the smartphone app. When all the different settings come together, and the device doesn't suffer from an existential crisis in the middle of a sequence, it works well and spits out a blended image straight to your phone.
And while I'm happy to chalk the focus mode up as sort-of win, that's not the end of the story because the blended images produced internally by Arsenal 2 are not great. I found that if there was anything moving even moderately in the scene I photographed, such as tree branches - it did a third-rate job of blending it and I ended up with ghosts in those portions of the photo. Obviously I can take the original RAW images and use Photoshop's far superior stack blending feature, but again - one of the selling points of this device is that you're supposed to end up with a finished product on your iPhone that you can share to your social media feeds immediately. I wouldn't be happy about sharing images that look like I don't know my arse from my elbow.
The same issues blighted the other stack modes I tested - exposure bracketing, long exposure stacking and crowd control. Of these three modes the only one that produced anything close to a decent image for me was crowd control. But even then, when I tested it in the centre of town during the middle of the day, the settings the camera chose were frankly bizarre - ISO6400 and f/4. I've tried but I can't think of a worse choice than that. After several reboots I managed to get Arsenal to shoot at ISO200, but it stuck by f/22 for the aperture like its life depended upon it. It's a testament to my X-T4 that it managed to produce images that weren't a solid block of blown-out white. My X-T4 is a supported camera model and I configured it according to the setup instructions on the Arsenal website - so why is it incapable of controlling the camera correctly?
The blended images produced in exposure blending and long exposure stacking were, for the most part, shit. The exposure blending mode in particular seems to produce weird washed out images that are a million miles away from the social media-ready eye candy that's promised in the marketing. The only good thing about these stack modes is that at least you have the original RAW files on your camera's SD card so you can edit them yourself in Lightroom or Photoshop.

The 'smart' timelapse function was another of the reasons that I backed Arsenal 2 - and in particular the holy grail timelapse mode. Unfortunately the weather here on the east coast of Australia has been unrelentingly awful for the last few months and I haven't had a chance to shoot a day to night timelapse yet. I'll probably do a separate video about the various timelapse modes, so watch this space.
The standard Smart Timelapse mode worked for me on most of the occasions I tested it. And when I say 'worked' I mean it took a series of still images one after another. What it didn't do was make very sensible choices about aperture or exposure - much like all the other A.I. based modes. The video it produced also suffered from the kind of flicker you get in most timelapses and so I had to render the whole thing in LR/Timelapse using the original RAW files anyway. I will say that the timelapse preview is awesome and enables you to quickly evaluate whether it's worth persisting with a particular sequence rather than after you've been sitting there puzzling over the day's Wordle for an hour.
Another of Arsenal 2's special functions is an astrophotography mode. The intention behind this was apparently to make it easier to focus on stars to ensure that you get beautiful crisp images every time. And while I'm sure the logic behind this process was sound - Arsenal crashed on me every single time I tried it.
In this mode the Arsenal takes three calibration images at very high ISO to enable you to pick a focus point. On my X-T4 using my 10-24mm wide angle lens, this part of the process worked fine. The problems started when I picked a focus point. I got an on-screen alert saying that it was taking focus calibration shots and then it shat itself and dropped me back to the connection screen. It did this every time and rebooting the Arsenal, the phone or the camera made no difference to the outcome. I decided to try this mode with my Canon 7DII and it didn't even make it as far as the initial calibration shots. In three nights of trying to get this mode working I managed to take one single crappy out-of-focus night shot. Not exactly the, "sharp, detailed night photos" they promote on their website.
I was having such a lousy time trying to get the Arsenal 2 to behave itself that I decided to try it on a couple of my old cameras. So I dusted off my Canon 7DII and 550D, purchased a couple of special USB-C cables to connect to the Mini USB on the 550D and whatever the fuck that weird thin connection is on the 7DII and charged up their batteries. This meant I got a balanced view of how the device performs on my one year old Fujifilm X-T4, on my seven year old Canon 7D Mark II and on my 12 year old Canon 550D.
And the weird thing is that actually, Arsenal 2 did work far better on my old Canon DSLRs than it did on my X-T4. Yes, it still shat itself regularly, and dropped its connection all the time, but when it did work it seemed to make logical choices regarding aperture, exposure and ISO settings. I even managed to shoot an entire timelapse sequence with my prehistoric 550D, in which I left the Arsenal 2 shooting for over an hour without any dramas. I used LR/Timelapse to render the RAW images to video and the results are good. I would have compared it to the 1080p video render that Arsenal is supposed to produce, but it never managed to work up the enthusiasm.

One of the features I was most looking forward to using was the panoramic mode, but Arsenal 2 shipped without this feature. Apparently they've been having problems getting this working consistently (what are the chances?) and decided to ship it missing this primary functionality. Ryan Stout did admit that Arsenal 2 would ship without pano mode in one of his email updates, but that doesn't make the absence of the feature any less shitty.
Amongst the other long list of disappointments on this device is handheld mode. Arsenal 2 is designed to be used while on a secure tripod but they included a handheld mode so you can free your camera and use it in run-and-gun mode. Unfortunately handheld mode is not support on my Fujifilm X-T4 - a fact I only discovered while browsing the FAQ on the Arsenal website. And while handheld mode did work on the Canon cameras, I found the images to be no better than ones shot in auto mode. The resulting images were more saturated and had higher contrast levels than a native JPEG image, but it's hardly the groundbreaking A.I. based camerawork they allude to in the advertising.
So is this device any good or a load of old Arsenal? Is it a complete write-off? That all depends on what forthcoming firmware updates are like, but right now I'd say it was barely up to beta release quality. It's possible that the Arsenal team can slowly iterate a version of the firmware that works reliably on their list of supported cameras. It's possible that the pano mode will be released and it will work as advertised. It's possible that in a year's time all these issues will be fixed. I'm an optimist at heart and so I'll choose to believe that they will eventually manage to make the Arsenal 2 Pro more reliable. And if that ever becomes the case then I will happily release an updated review to reflect that.
It's also worth pointing out that there is a huge number of hardware combinations supported by the system. And, as I mentioned earlier, it may well be the case that a particular camera/smartphone/lens combination works flawlessly with the device. Who fucking knows? Perhaps some lucky person out there using a Sony A7III with a Samsung Note or a Nikon Z9 with a Pixel 5, is enjoying the full feature range without any issues. I can only tell you that when used with my X-T4, 7DII and 550D it was hopelessly unreliable, erratic, bug-ridden, slow and prone to crashing.
I take no joy in saying this - I wanted this device to work and be excellent.- I paid for it with my own money after all. But the truth is, as it stands right now, Arsenal 2 Pro only has two useable modes if I want to use it with my Fujifilm X-T4 - as a remote camera trigger and for manual mode timelapses. If I want to actually use my Arsenal 2 and its many automated modes, I find myself in the somewhat bizarre situation of being forced to pair it with an ancient DSLR I retired over a decade ago.
If I was weighing up a purchase of this device knowing what I do now - I would most definitely not buy it. I cannot put it much more plainly than that.
There has long been room in the market for a competitor to enter this growing software niche and deliver an image management suite for a reasonable one-off fee that the hobbyist photographer would consider fair. In most instances they have come up short - the RAW processing is usually excellent - but they are found lacking on the image management side of the equation. So I eagerly anticipated the release of the latest version of ACDSee Photo Studio and the possibility that someone might finally do a better job than Adobe. Spoiler alert - they haven't. Not completely, anyway.
The venerable ACDSee suite first came out in 1994, a full 13 years before the first release of Lightroom, so it's not like they haven't had some time to work out the wrinkles. ACDSee have done a better job than most other companies, but there are some key differences between this and Lightroom that remain a deal-breaker for me. My requirements are fairly specific though and you may find that this software is the perfect addition to your photography workflow. Let's talk about all the good stuff first.
Firstly of course, this is a one-off purchase of $100 here in Australia and $70 in the US. If you subscribe to Adobe's Photography plan, which gets you Photoshop, Lightroom and Lightroom Classic, then you'll pay $171 for the first year alone, so for just over six months of fees to Adobe you could own this software outright. That's a pretty sizeable advantage any way you look at it. And it's not like you're buying software from some start-up that might drop off the face of the earth after a year - ACDSee have been in this software sector since its very beginnings.
This is a streamlined bit of software that ran fast and smoothly on my two year old iMac. This appears to be mainly due to the use of a hierarchical database instead of a relational one in Lightroom. You can use it as a full-blown workflow suite, importing images directly off your SD-card, copying them to an archive somewhere and tagging, categorising and keywording them along the way. Alternatively you can simply fire it up and point it at your photo archives and it will catalog them. There is even an import tool for Lightroom which will transfer your metadata including ratings and keywords. Unfortunately it won't import your .xmp sidecar files from Lightroom so you'll lose any edits you made to the RAW file. I did a test save of metadata in Lightroom and it had no impact on the Photo Studio file at all but it did grab content, keyword, contact and IPTC image metadata.

Keywording and rating images in Photo Studio is fast and simple and can be automated if you want. The library view, which sits under the 'Manage' tab shows you thumbnails of your images and you also flick to the 'View' tab which has a large image/filmstrip layout similar to Lightroom's Develop module. One welcome addition to the software is the inclusion of a map, which is one of the key features I use regularly in Lightroom and which makes my life considerably easier. It's not as flexible as Lightroom's but does include stuff like reverse geoencode and the ability to drag a set of images onto a location on the map to add GPS data to those files. All things being equal, PhotoStudio's digital asset management capabilities are amongst the best I've tried, but they are not in the same league as Lightroom and its Sqlite database.
The develop module is where you create all those non-destructive RAW image edits. It includes a pretty standard selection of tools that enable you to manipulate RAW image data and a couple of fancy light and colour tools that raise this software up a couple of levels. Edits are categorised into Tune, Detail, Geometry and Repair sliders and these can be applied globally or using brush, linear or radial masks. It all worked well, though I did find the equivalent tools here much stronger than their Lightroom equivalents.
In terms of one-click functions such as presets, there is a colour LUT tool that can load .cube files and some basic built-in presets. You can also save your own presets which is handy if you have a set of base-line tweaks that you tend to apply to all of your images. It's a basic but well-rounded set of tools, sliders and features, but there was nothing in here that could in any way be considered innovative or unique.
That's the good stuff, let's talk about a few negatives. My first surprise on that front was that I couldn't actually edit any of my Fujifilm X-T4's raw files. This is because the software only supports the uncompressed RAW format on all of Fujifilm's cameras which is unfortunate. I don't tend to use the uncompressed format because it takes up more space and has no huge benefits in terms of quality. It's a bit of a shame, but in ACDSee's defence, Lightroom sometimes does a less than spectacular job of rendering my X-T4's .RAF files.
The latest version of Lightroom has some terrific new masking capabilities, including AI selections but Photo Studio uses a more traditional linear/radial approach. It's a much more basic toolset, but it's possible to achieve similar results if you're prepared to finesse your masks. The software's also missing all of Lightroom's more advanced tools, such as enhance, HDR and pano and mean that you will need an external editor if you want to combine shots in some way.
In terms of the library management there is no stacking feature. This is something I use all the time in Lightroom as I usually shoot bracketed images and Lightroom automatically stacks those bundles of files into their own virtual folders so you can get a better overview of all the images in that folder. You can select multiple images in Photo Studio and add them a separate sub-folder, but it's not a useful facility when you have several hundred images in your import.
I guess the single biggest drawback with this software is that it feels a few generations behind Lightroom. All of the basics are in there, but there's none of the marque tools that make my asset management and RAW processing simpler and more effective - stuff like being able to filter using the map (the 'just show visible' filter) or the colour profiles, the smart collections, the plugins, the collections, the presets and the aforementioned HDR, pano and enhance tools.
The Adobe suite comes with cloud space and access to mobile versions of the desktop apps and ACDSee have taken on board. Your purchase grants you access to a Mobile Sync app that enables you to send photos and videos directly from your phone to your Photo Studio library along with any edits you made on-the-go. It's a neat value-add but I'm not sure how useful it is in practice since most iPhone users already use iCloud to store photos, but I guess it saves a middle-step of exporting your photos from Apple Photos to your media library.
I was impressed by this latest version of Photo Studio and I suspect that for many photographers it will do everything they want and more. It's a polished application that feels Mac-like and I found it to be both fast and stable. If I had to plump for any DAM application apart from Lightroom, then this would certainly be it. The lack of a subscription will be very tempting to many people and it's an actively developed application that will only improve over time. Recommended.
Filters have great advantage to landscape photographers, but they also have some drawbacks. The first drawback is that they are an added layer of complexity on the photographic process, they can be fiddly to use and they can slow the process down. The light on a landscape is usually in constant flux and any delays imposed by adding equipment to your camera might mean you miss the crucial moment and fail to get the shot you were chasing. So when it comes to filters - simple is good. The other drawback is the cost. The filter accessory market used to be dominated by a couple of well known high-end brands (Lee, Heliopan and B+W) and several (slightly) cheaper options (Cokin, Hoya and Tiffen), but some of the cheaper filters were well known for introducing the dreaded colour-cast on photos and were not seen as a viable option for the serious photographer.
Fortunately the filter market is very different these days and more competitive. Companies like K&F, Gobe/Urth, Neweer, Nisi, Moment and PolarPro produce great filters, including models for action cameras and drones. More importantly these budget filters do not suffer from the quality issues of the previous generation of cheap filters and they offer a great opportunity for any photographer not hung up on brand names. All of which brings me around to the K&F Nano series.
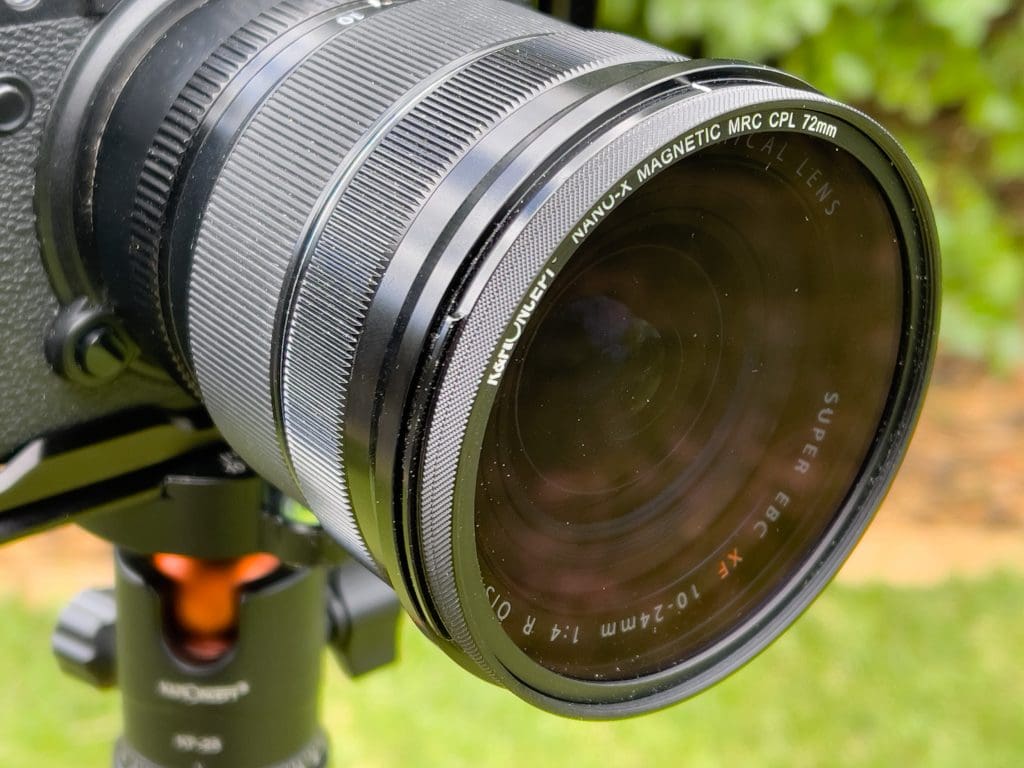
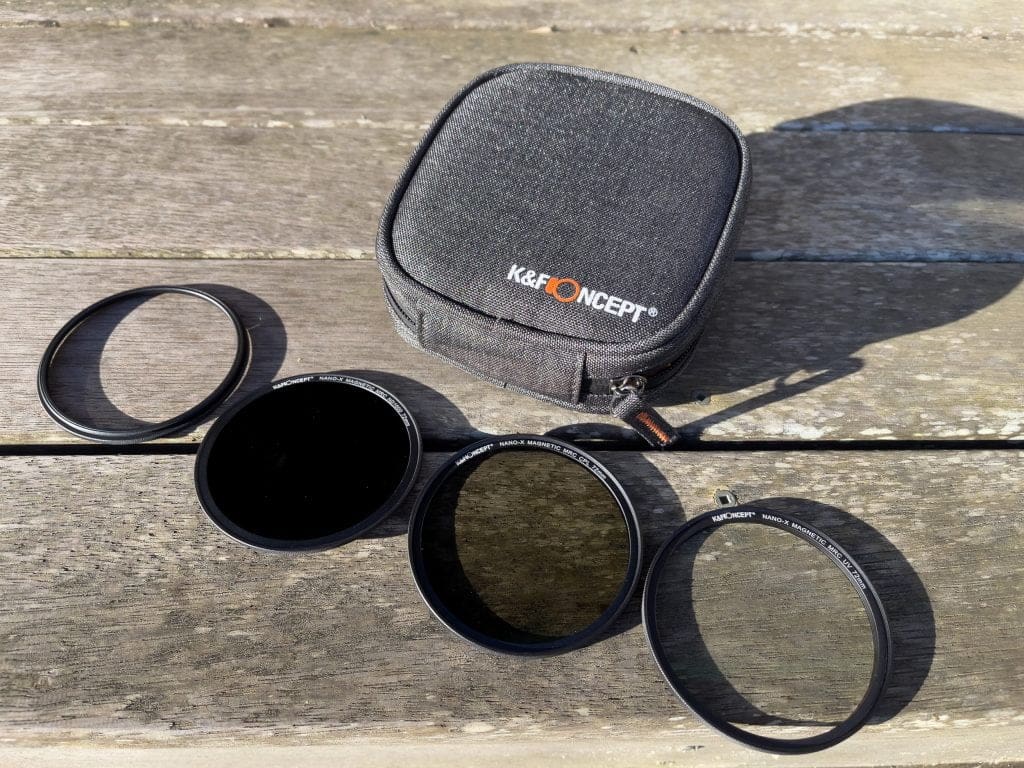
There are several ways of mounting a filter to a camera lens, all of which have inherent advantages and disadvantages. The K&F Nano kit does away with the traditional bracket and clamp style or screw-in type and instead uses a magnetic system. The package I was sent for review is the 72mm Nano Filter Kit which includes a UV filter, a Circular Polariser and an ND1000. These attach to a slimline mounting bezel which you screw onto the lens in the usual way.

The principle advantage of a magnetic filter system like this is the speed with which you can add or remove them. This ease of use and speed means you're more likely to experiment with your photographic compositions since you're not weighing up the hassle of screwing on a bracket, inserting a filter and lining it up and then taking it all off again. If the mood takes you, you can just clip an ND1000 onto the filter in a second and take it off again as easily.
As with previous K&F filters that I have tested, I had no problems with colour cast or distortion. The Nano coating that K&F used is a protective one that is resistant to scratches and fingerprints. This is a big deal for me as I do not have a great track record for looking after my photographic kit and I am certainly not one of those photographers that babies their kit and handles it with clean-room gloves. The ND1000 supplied with this kit performed as well as the K&F Concept Square Filter System and ND1000 Pro Filter that I previously reviewed here.
When I tested the circular polariser I was briefly puzzled that there was no inner bezel to twist for alignment to the sun. Then I slapped myself on the forehead and simply rotated the filter on its magnetic mount to achieve the desired effect. (Sidenote: there aren't currently any ND-grads in K&F's magnetic filter range, but I see no reason why they couldn't work the same way as the circular polariser). As with the ND filter I saw no colour cast in evidence and was thankful for the Nano coating, as touching the filter is inevitable when it's magnetic. The third filter in this pack is a UV filter which was optically clear, but of limited use. I only ever use UV filters to protect the main lens (from damage or splashes) not because I feel they make any significant difference to my photographs.
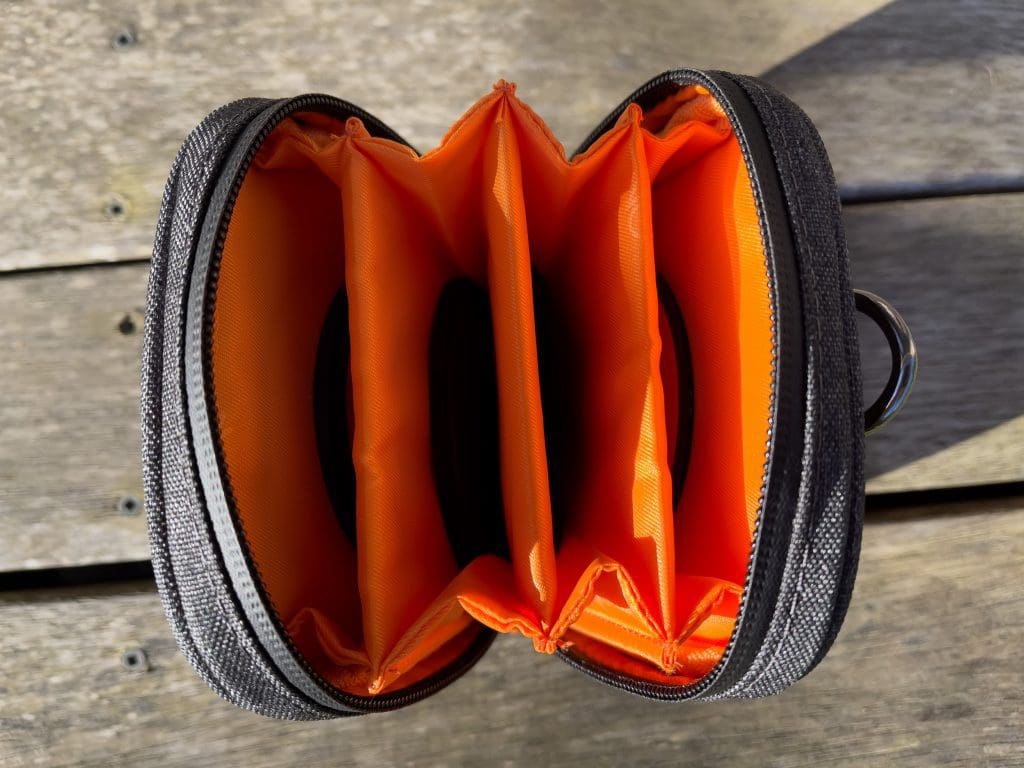
The filters are supplied in a neat little protective zip bag, which has four slots but could easily accommodate more of these filters if you decided to extend your collection beyond the three supplied with the kit.
The advantage of a magnetic mount system is its obvious simplicity and ease of use, but the disadvantage of this system is that it is not as flexible as a bracket system. You can only use this set of filters on the thread size its specified for and would therefore need to buy additional sets for any other lenses you use for your landscape photography. Theoretically you could use a step-up/down ring but there might be issues with vignetting.
For someone like me who has one main landscape lens (I use the XF10-24mm for the majority of my shots), then these magnetic filters are a great option. I can leave the mounting bezel on the camera and still attach the filters and the lens hood. I can even switch out between ND1000 and polariser without removing the lens hood which is another added convenience. The filters supplied in this kit would serve well as a great starter-filter set for someone who's beginning to explore more technical aspects of photography such as long exposure and are a lot less fiddly to use than the traditional bracket system.
The good news is that there is no shortage of photo editing applications, the bad news is that most of them are total overkill for the task at hand. Adobe Photoshop for instance is an incredible bit of software and one that I started using eight years before my 20-year old son was born. As good as Photoshop is, however - when it comes to drone photos - it is like doing your weekly grocery shop in a Bugatti Veyron. If you're a photographer that takes photographs with a drone then an application like Luminar AI (or the forthcoming Luminar Neo) are a much more sensible option.
Now the great thing about Luminar AI is that it offers one-click processing. So if you'd rather be out taking cool shots, than sitting in front of a computer, it's a good option. If you do want to drill down further into the image's processing settings then you can, but you'll often find that the software's Templating system does a pretty good job with no further intervention required.
By way of example, I thought I'd showcase a few before and after images, in which I simply used an appropriate template on one of my drone shots. I've chosen a selection of images covering regular day-time landscapes, seascapes and sunrise/sunset shots.
Let's start with a meat-and-potatos landscape shot. This is actually an image from a 360º pano I shot near Kangaroo Valley, which is perfect for our test since we have fields, trees, foliage, hills and some sky. When you open a photograph in Luminar it leverages its AI capabilities and comes up with a few suggestions as to which template you might like to use with it. In the case of this image the software suggested Easy Landscapes, Natural Scenery, Scenery and Moods of Summer. These are all default looks which come with the software, but you can buy add-on packs and these would appear here too if the software thought they'd be a good fit.
Within the Easy Landscapes template collection I have six options, catering to the kind of look I'm after. I was impressed with the fact that these aren't over-saturated Instagram-style filters that simply ramp up all the sliders to 11. In fact two of the templates - Clean Light and Forest Stream - actually desaturated the image slightly, to create a pleasing matt style shot with slightly crushed blacks.
In the shot below I went with the Long Exposure template. Comparing the before and after, we can see that the software's made a few changes to the image both in terms of colour and detail. For instance, it has increased detail in the clouds, such that they more much more defined now and it has also deepend the blues to really make those clouds pop. It's an effect similar to what you'd see if you used a polariser on your drone's camera. Similar definition and clarity tweaks have been made to the trees and there has also been some dehazing applied to the trees on the side of the hills in the background. Note also that there are no jarring edges in the image - the edge of the hills on the right already had some halo evident in the original RAW image and Luminar has done a good job avoiding ugly fringing.


All things being equal it's a great RAW conversion and I would be happy to leave the processing there. However if I did want to tweak any element of it, I can simply click on the Edit button and manually alter any of the settings in the Long Exposure template. For instance, to tone down the saturation applied to the fields, I can lower the Accent slider slightly. Alternatively I can tone down the whole template as one by using the main slider at the bottom of the editing panel until I arrive at the look I'm chasing.
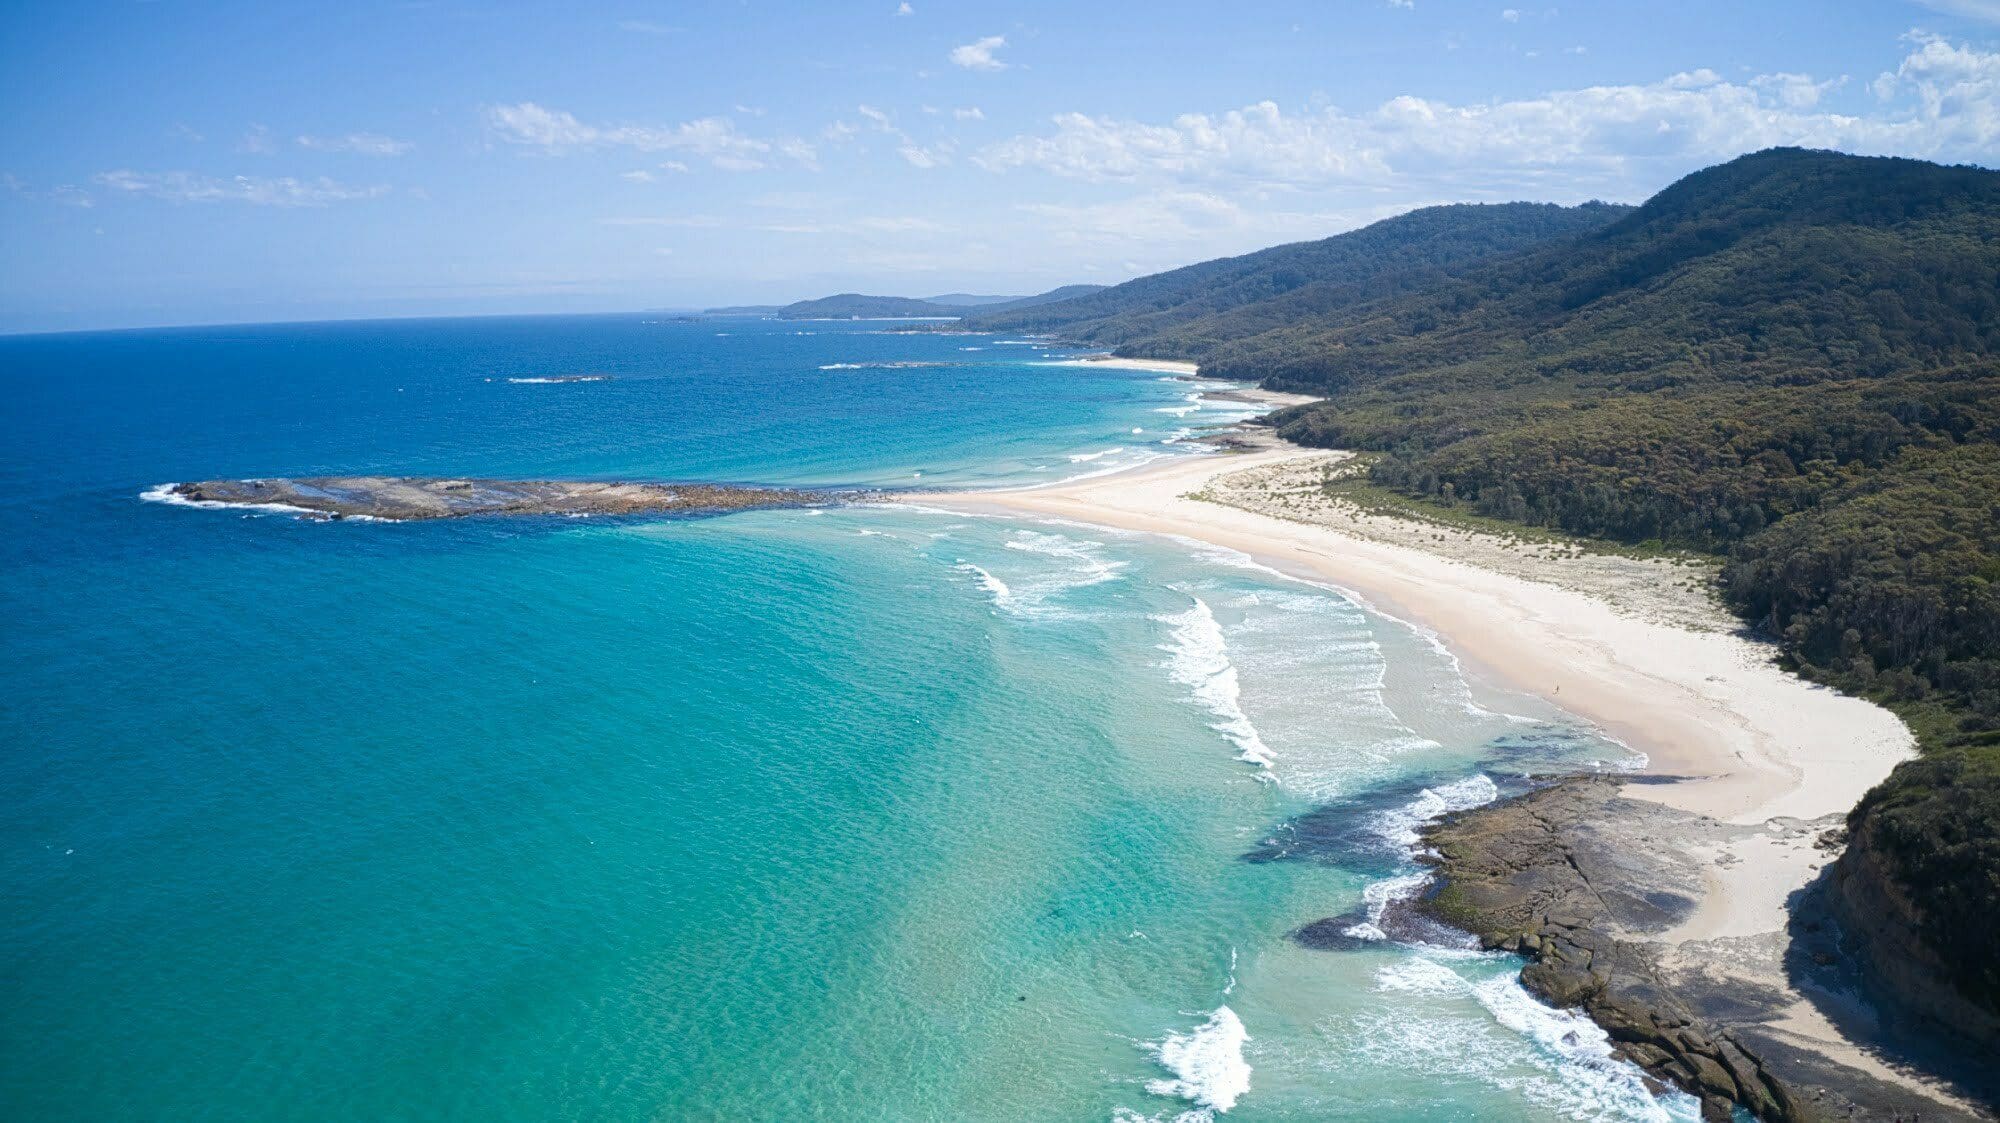
My next example image was taken in Jervis Bay above Currumbene Creek in Huskisson and features some beautiful turquoise water and a white sand beach. In this case Luminar's analysis of the image suggest templates from the Overcast Collection, the Waterscapes Collection and the Easy Landscapes. I was puzzled by the first choice since it's clearly not an overcast day, but I tried the templates within and actually several of them were ideal for this image.


Of all the templates suggested for this image, the cleanest and most sympathetic was 'Soft Fix' in the Waterscapes collection, but for a more processed look for an Instagram feed, the 'Backlit Clouds' template in the Overcast Collection would be a solid choice. If we look at the changes made with Soft Fix however, we can see that it has largely left the colour of the water alone and simply accentuated the ripples in the water and applied a light dehaze to the water and sky. It's actually a really great edit that would be suitable for printing although I'd probably remove the vignette.
I'm not a huge fan of that very contrasty heavy HDR look as it seems quite unnatural, however the Dynamic Result template actually works well with my next example - an image of the coastline of the Murramurang National Park. It's a dramatic scene and the heavier contrast in the template actually works well, further enhancing the separation of the bush, the beach and the ocean. There's on obvious halos or banding where the mountains meet the sky and it hasn't gone crazy with the saturation.

Moving onto the sunrise/sunset images and I really thought Luminar AI came into its own for these shots. The first image of Seven Mile Beach at sunrise is a tricky one to manually process due to the extremely vibrant colour palette and the wide dynamic range in the RAW file. The software suggested a landscape template and I felt that Long Exposure template nailed it pretty much immediately. The light dehaze worked well and didn't turn the small area of blue sky a violet shade as often happens when you use this particular slider in this software or any other. I cropped the image as well, to reduce the amount of beach and punch in on the sky and ocean.
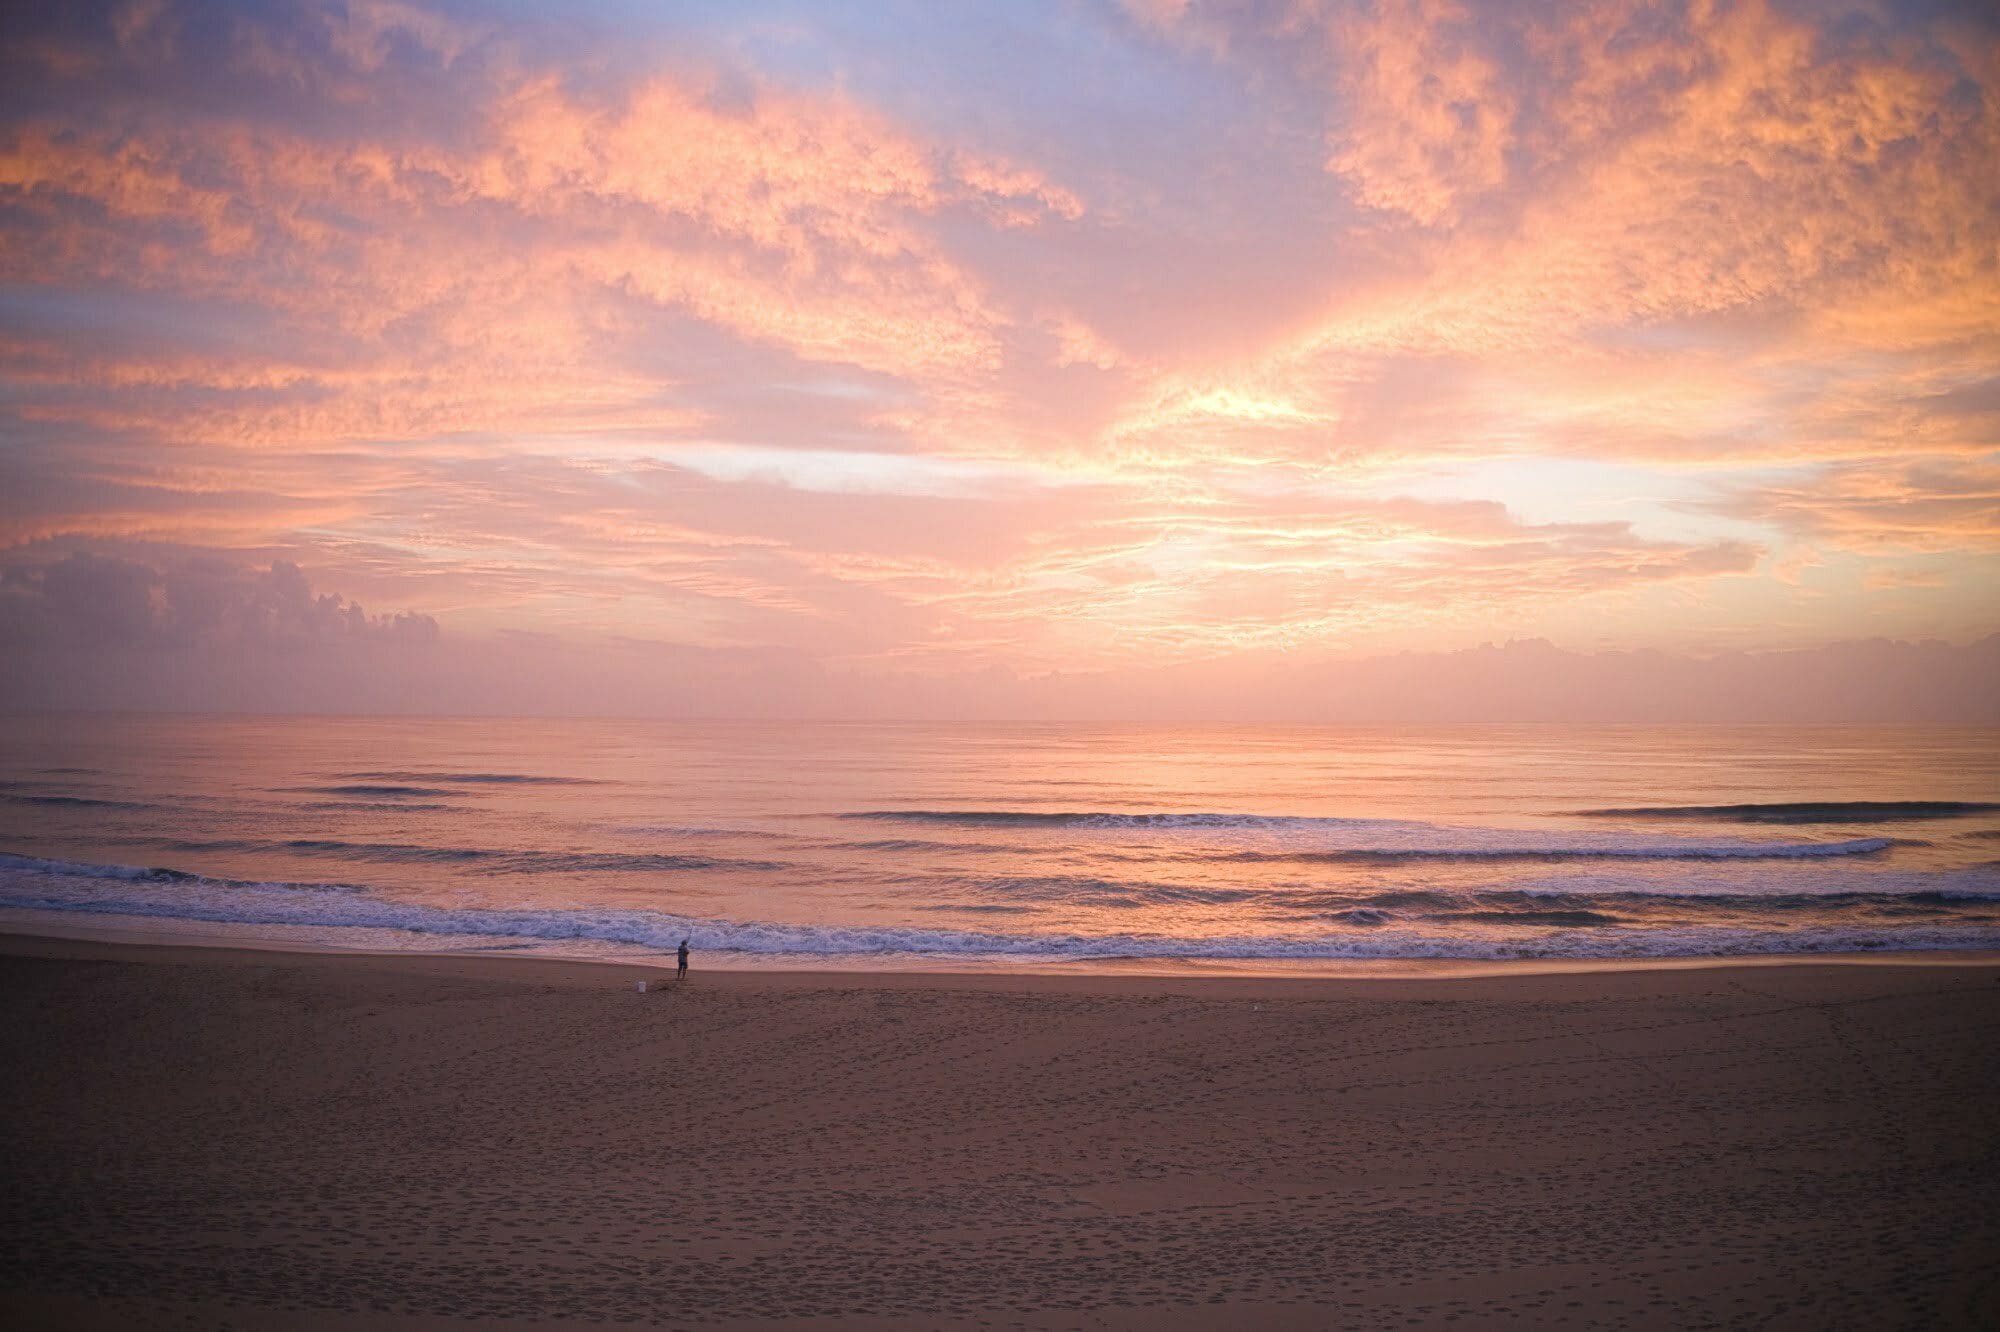

In my next example, a reverse sunrise shot, the problem here is about retaining the white in the surf, while enhancing the colour in the sky, without giving the whole image a lilac colour cast. Luminar suggested the Artistic Collection this time around and the Templates within were much more subtle than other options. My personal favourite however was the Forest Stream template in the Easy Landscapes collection as it accentuated the image in a natural way with a series of soft tweaks that would work well when printed.


My final image, a sunrise on Seven Mile Beach got a couple of interesting suggestions from Luminar. It suggested the Sunsets collection and all of the templates within required toning down as they were extremely saturated and, in two cases, swapped out the existing lovely sky for a bunch of boring cumulus clouds. The best result for this image was in the Scenery Collection and the Clear Skies template which accentuated the natural imagery without going crazy with saturation and clarity.

To conclude I'd say that Luminar AI was an excellent choice for drone photographers who don't have the time, inclination or money to spend on a package like Adobe Photoshop. If you just want to bring out the best of a RAW shot, then Luminar AI enables you to quickly hone in on a pleasing visual outcome which you can then tweak to meet your vision for that image. It takes a great deal of the hassle out of processing images and does so in a simple, linear way that, for the most part, avoids the often baffling terminology of the heavyweight photo editing suites. Skylum are preparing to release their new Neo editing software later this year with a feature-set that looks to further simplify the editing process with features like intelligent spot removal. Luminar AI is currently $64AUD and it's not subscription based so the software is yours forever.
Their 20 litre dedicated camera bag is one of a range of specialised backpacks by the company and one that borrows a few features from other packs and cleverly innovates as well. That is not to say that it doesn't have flaws, but at just $90AUD including delivery, it represents a compelling option for someone looking to buy a first pack or get something to accommodate a growing kit-list.

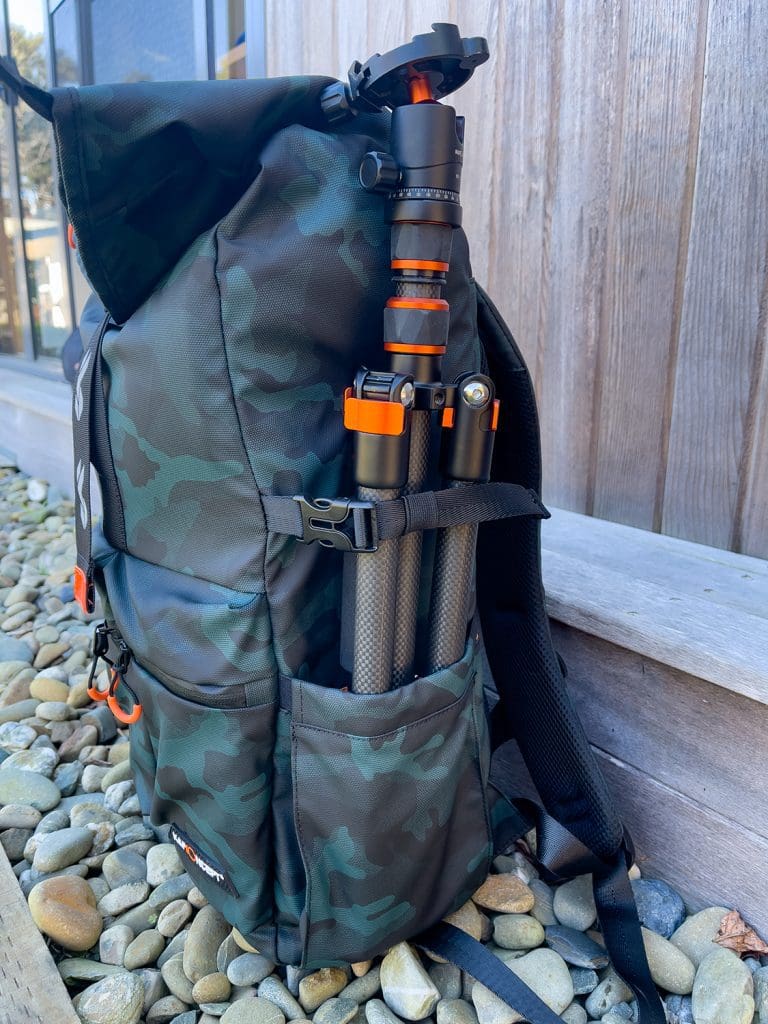
The bag is made from heavyweight 900D nylon that has been well stitched together. It features a removable drawer section with side access, a capacious interior with a laptop slot and a roll-top design that can be reduced or expanded according to the gear you're carrying that day. Two pockets on the front and an expandable side pouch for drink bottle or tripod make for a versatile design that can cater to most kit-list load outs.
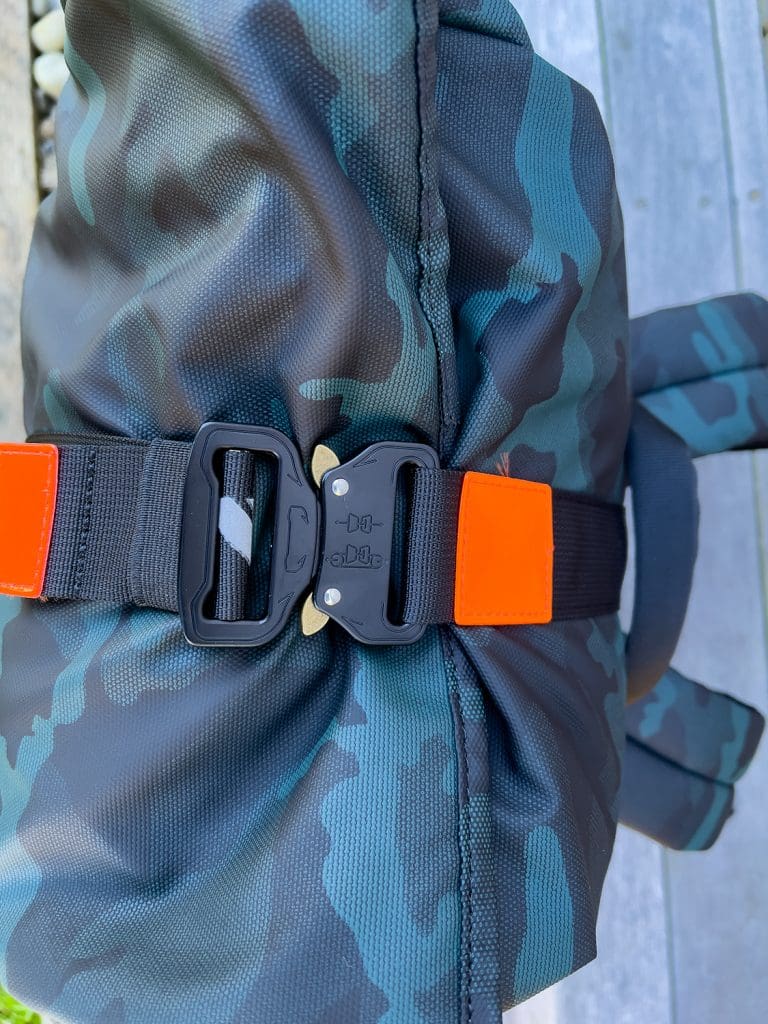
The top of the bag is secured with a zip and is then folded over itself before being clipped closed - this ensures that moisture can't get in the top. It's a good design and one that will ensure your camera stays dry in the rain. The bag is water resistant (not waterproof) but does come with a rain cover that can be easily fitted over the pack for those heavy downpours. Special mention goes to the anti-theft clip on the top of the bag which is made from heavy metal and will securely hold the contents inside the bag even when over-loaded.
The camera feels comfortable on the back, has wide straps for shoulder comfort and a chest strap to keep the pack sitting well on your back. It lacks the rigidity of larger bags, but for a run-and-gun bag that you'll be using for shorter periods of time that won't be an issue. Both my wife and I tried the pack out and we both managed to find comfortable strap lengths despite the fact that I'm 6ft tall and she's a bit over 5ft.
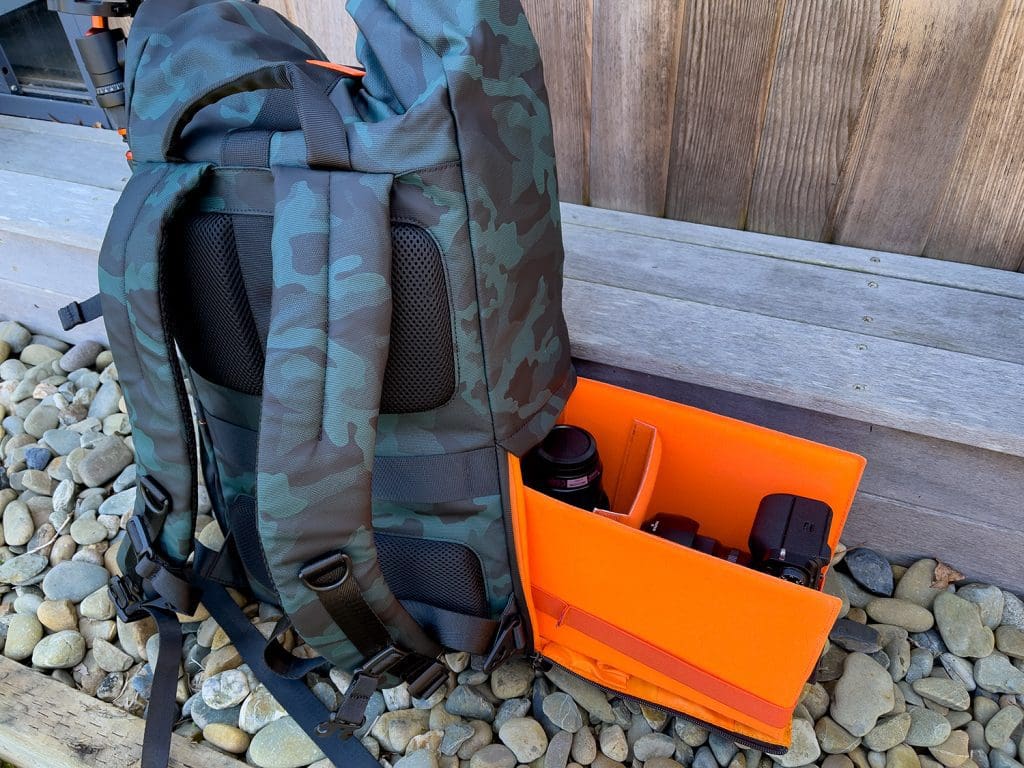
The design of the bag is based around two compartments, but all internal dividers are removable and if you wanted one single large compartment then you can do just that. It comes with a larger divider that sits above the removable side-access drawer and the drawer itself which you can configure according to your needs.
In practice I found the drawer feature to be the weakest part of the bag design. The benefit of side access is that you can remove equipment without fully taking the pack off, but the drawer design does not lend itself to this as it does not hold its shape well when removed and is difficult to push in and out. When testing the pack I tried several configurations and in the end I dispensed with the slide-out functionality completely and just used the side access interior space as a traditional pocket. It works much better this way, although you will definitely want to retain some of the cushioned interior dividers for extra protection. The double-zipper design of the side panel does tend to stick and I can't help thinking that a small loop on the bottom of the bag would greatly assist in opening and closing the pouch. It's also worth pointing out that the top edge of that side panel is not secured to the bag and will only protect against rain, not higher volumes of water e.g. from a wave if you were photographing on the coast.
Even with the flawed drawer design, this is still a great camera backpack and at just $90AUD including delivery represents ridiculously good value. The design is funky, with high visibility reflective accents, a great desert-camo design and numerous value-added features such as an anti-theft buckle and an RFID blocking pocket to keep your wallet in. Ignore the gimmicky drawer feature, use the lower section as a traditional side-access pocket and you have top-notch, rugged day-pack that is as at home in the great outdoors as it is in the city.
For some time now I've been using a combination of Notes apps and mind-mapping apps to get myself organised. Previously I used Evernote, but then I realised that Apple Notes did pretty much everything Evernote did, plus more beside, came free with the operating system and sync'd across all of my devices, so I cancelled Evernote and moved to Notes. To get my various projects (such as my YouTube channels and this site) organised I use mind-mapping tools - my favourite of which is MindNode. It's a cool solution, but the main problem is getting stuff from one system or app to another system or app. So I was intrigued when I learned about MilaNote, which does pretty much everything Notes and MindNode do, but is fully integrated.
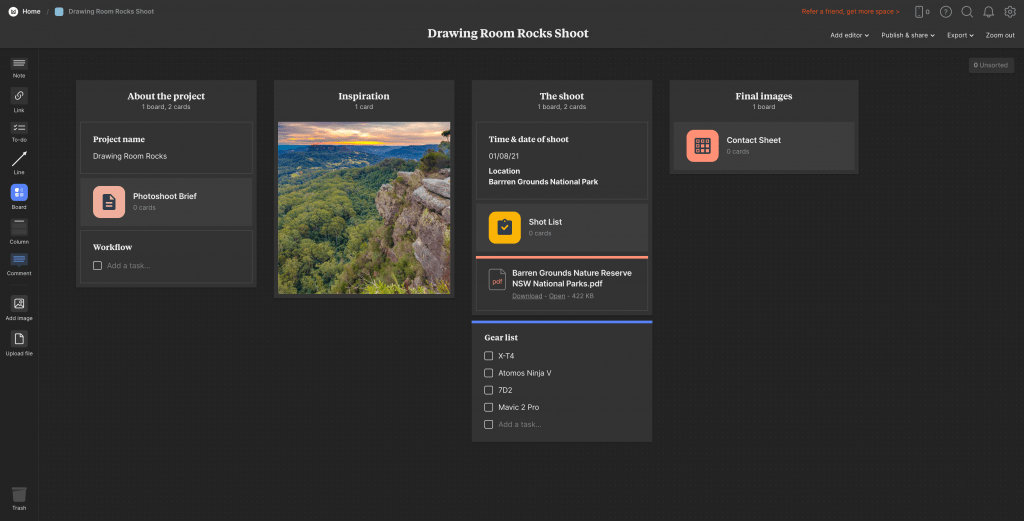
The first thing that strikes you about MilaNote is how slick the design is - it's an impressive web app utilising a paired-down and functional interface that gets out of the way when you need it to. You can theme it dark or light depending on your preference and then begin adding stuff using a simple drag-and-click methodology built around a block system. On the left of the screen is the main toolbar and on the right is your home screen onto which you build out your notes.
The core building block of your MilaNote library is the Board. Boards are freeform containers for any information you'd like to cluster together. For instance you could have a photo-shoot board, a holiday ideas board or an ideas board. The information you decide to add to the board is entirely up to you, but the developers have helpfully created a large variety of templates to cover many of the basic set-ups you might like to use. These include everything from mood boards and design briefs through to product launch plans and funding trackers.
Having a decent ND filter or two in your bag is pretty much essential if you're a landscape photographer, because they enable you to control exposure time without having to compromise your aperture or ISO settings. Traditionally those ND filters come in individual strengths and sold according to the number of stops of light that they block. That's fine, but light is constantly changing and you often find yourself switching ND filters in and out as the amount of natural light in the scene changes. All of which makes a variable ND filter, in which you can dial in the number of stops you require, a great idea.
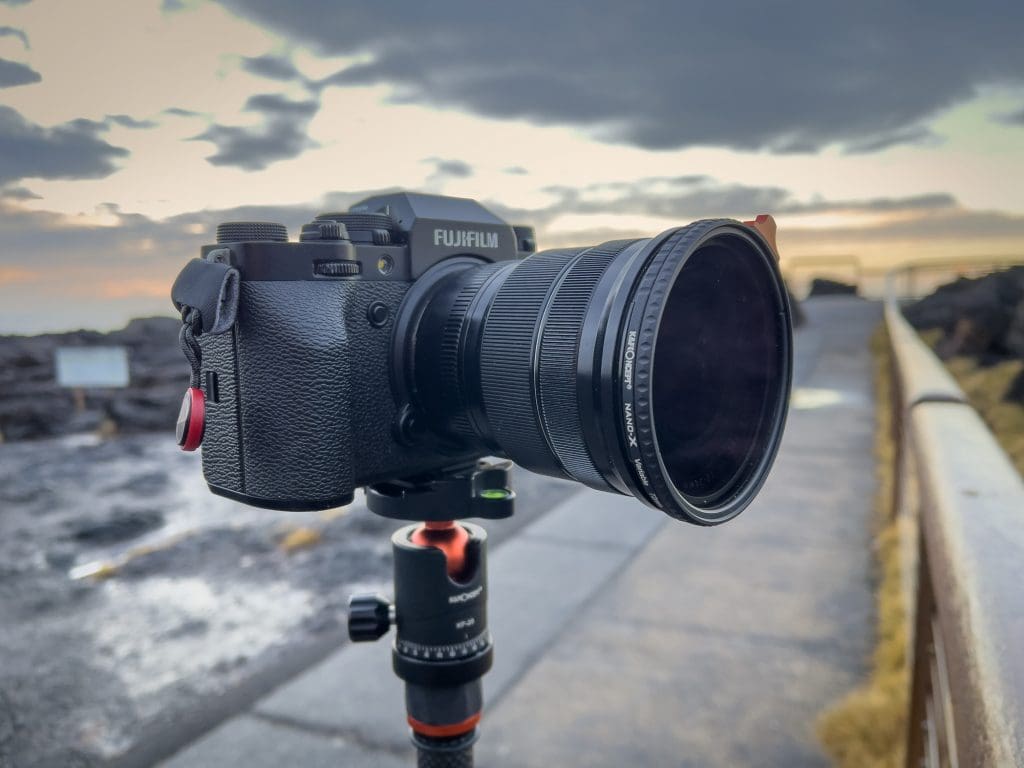
The K&F ND2-ND400 is a 9-stop variable ND filter. This means you can dial-in any ND 'strength' between ND2 (1-stop) and ND400 (9-stops). This variable design is accomplished by using two pieces of polarised glass sitting on top of each other. As you rotate the front piece of polarised glass the image becomes darker and darker until you reach the maximum number of stops for that filter.
Let's say you're shooting an image at f/8 that the camera has metered for one second with no ND filters on the lens. If you dial in the variable ND filter to its base ND2 the camera will now meter for four seconds, stretching out your exposure time without having to change ISO or aperture. If your naturally metered one second exposure is dialled in for ND400, the camera would meter for about eight minutes. Therefore with a variable ND like this one on your lens you have a huge amount of flexibility in getting the light hitting the sensor at exactly the levels you want.
I've had a couple of variable NDs over the year and I have to say that the K&F ND2-ND400 is the nicest I've used. The adjustment buckle is curved to fit the finger making it much easier to dial in the right ND number by rotating the filter in the same way that you would a circular polariser. It's also much slimmer than my old ND filters which means that even with my super-wide 10-24mm wide open, there's no vignetting from the edges of the filter.

When I tested it I didn't observe any colour cast from the filter and its Japanese-manufactured glass. I also great appreciate the scratch-resistant design because my filters always seem to suffer from scratches and dings from being taken on and off and thrown around in the camera bag. If you're a bit clumsy like me then you'll also appreciate the Nano coating which is resistant to finger-prints. The only drawback to these filters (and it's true of all variable NDs) is that if turn the dial past the marked end-point at ND400 the polarised glass will go out of alignment and you'll see heavy vignetting on either side of the frame. It doesn't hurt the filter in any way - in fact you can rotate it a full 360º if the mood takes you - but you just need to be aware of it when you're dialling in the number of stops.
If you've been frustrated by ND filters in the past and don't enjoy all the faffing around that comes with switching out the glass then a variable ND like this is the way to go. These K&F filters are reasonably priced and suffer from none of the drawbacks (such as a noticeable colour cast) of other entry-level filters. The K&F ND2-ND400 takes up virtually no room in the camera bag, can be purchased for lens threads between 62mm and 82mm and comes with a great little leather case to protect it when it's not in use.
I've never stressed too much about the labels on the backpacks I carry my photography gear around in and have found that cheap Chinese packs, such as those by Neweer and similar companies, are perfectly good, well designed and cheap. That being said, I had some insurance funds to spend at a camera store and it was while I was compiling the list of items I wanted to spend that insurance money on, that I looked at their range of backpacks. That lead me to the LowePro range and, in particular, their Protactic bags.
We photographers are very hard to please, particularly when it comes to camera bags, and we all have a list of features that we're looking for when we go shopping for a new one. Beyond the very basic requirement of simply keeping the camera equipment safe, everyone's list will be different with different features given different priorities. The list changes over time too because we get new gear or upgrade or change photographic styles or any one of a hundred other reasons. Here's what I was looking for in my new backpack:
After watching several hundred YouTube videos and weighing up the pros and cons of the different packs, I settled on the Protactic 450 AW II because it ticked all of those boxes. It's the most I've ever spent on a backpack, but I wanted to get something that would last me for a while and be flexible enough to adapt to whatever changes with my equipment.

Like all modern camera bags, the 450 has a soft organisation system secured by velcro to the base and sides of the bag. The first thing I did was take all of those out and arrange my stuff in the space, working out what I wanted where. Once I'd settled on the best layout, I put the inserts back in and then fine-tuned it to make sure everything was secure and that I was making the most of the available space.
By the time I'd finished I had my Fujifilm X-T4, 10-24mm, 100-400mm, 35mm, 18-55mm, 50-230mm, DJI Mavic 2 Pro, Mavic controller, Manfrotto mini tripod, Rode Video Mic Pro, K&F Square filter holders, Peak Designs slide strap and Insta 360 One R with selfie stick all stowed in the main compartment. On the inside panel are two clear pockets in which I have put my K&F filters, spare batteries and Rode Lav mic. Inside the top compartment is another pocket in which I have placed various hard items such as alum keys and pen knives because this is protected by a hard shell. There are two more side pockets and the laptop/iPad sleeve pocket inside that are currently empty. I think it's fair to say that the bag met my requirements regarding space.
In addition to the main bag LowePro also bundle various add-ons with the pack which include a tripod holder, a water bottle holder, an accessory bag and a large detachable waist strap. The add-ons can be fixed virtually anywhere on the pack using velcro loops giving a great deal of flexibility in arranging the exterior of the pack. The only one I'm using at the moment is the tripod holder which I've mounted on the side of the pack along with my awesome new lightweight K&F BA225 carbon fibre tripod. The bag also includes a rain cover which is permanently secured and tucked away in a little pouch on the base and is the AW (all weather) bit in the pack's name.

Of course being able to house my stupidly large collection of camera equipment is well and good, but how does it feel to wear on your back? I'm happy to say it feels great, thanks mainly to nice wide shoulder straps and a decent amount of ventilated soft padding in the back-bone of the pack.
The side panel access zippers work really well too. To access my camera, I simply slip the left strap off my shoulder, slide the bag around to my front, unzip and remove the camera and then slide it back. It feels pretty natural to do this and the equipment feels secure even with the single strap on thanks to those afore-mentioned wide straps.
As with all good backpacks, the shoulder straps have cross-straps so you can get the pack sitting nicely on your shoulders. These are great, but I'm a fat bastard and when I use them it accentuates my gut so much I look like Gimli son of Glóin. This is not a failing of this backpack however - the same thing happens to me with all of them.
I'm happy with my purchase. The LowePro feels hefty enough to survive the hostile environment I shoot most of my photos in and has room to spare for all of my equipment. If you're in the market for a large and sturdy camera bag with back panel and side access - I can highly recommend it.


