
0
$0.00
0 items
And the simple fact is that for those truly exotic locations, you really do need to be a competent outdoorsy type with a high level of fitness. At the extreme end of the scale you have people like Mark Adamus, Daniel Kordan, Paul Nicklen or Max Rive, who wouldn't cheapen themselves by pointing their smartphones at any common or garden location and instead adventure out for weeks into the arse-end of nowhere to photograph unique locations.
Those guys set the bar pretty high but, let's be honest here, if you're young and fit there's nothing stopping you from emulating them apart from your own ambition.
But what about your more regular schlubs, the average joes, the weekend warriors? Well, as Clint Eastwood said in Dirty Harry - "A man’s got to know his limitations."

As you age, your body deteriorates. Sometimes it doesn't matter how healthy a life you've lived, how well you've eaten and how much you've exercised - your body will laugh in the face of your efforts and flip you the bird.
My knees are completely ruined due to osteoarthritis and this makes hiking up hills and mountains problematic. Age, weight issues, general unfitness and joint problems are undoubtedly one of the biggest reasons photographers scale back their photographic ambitions.
Ultimately, it's all a question of being realistic and the key, as Clint advised us, is to not over-estimate your own abilities.
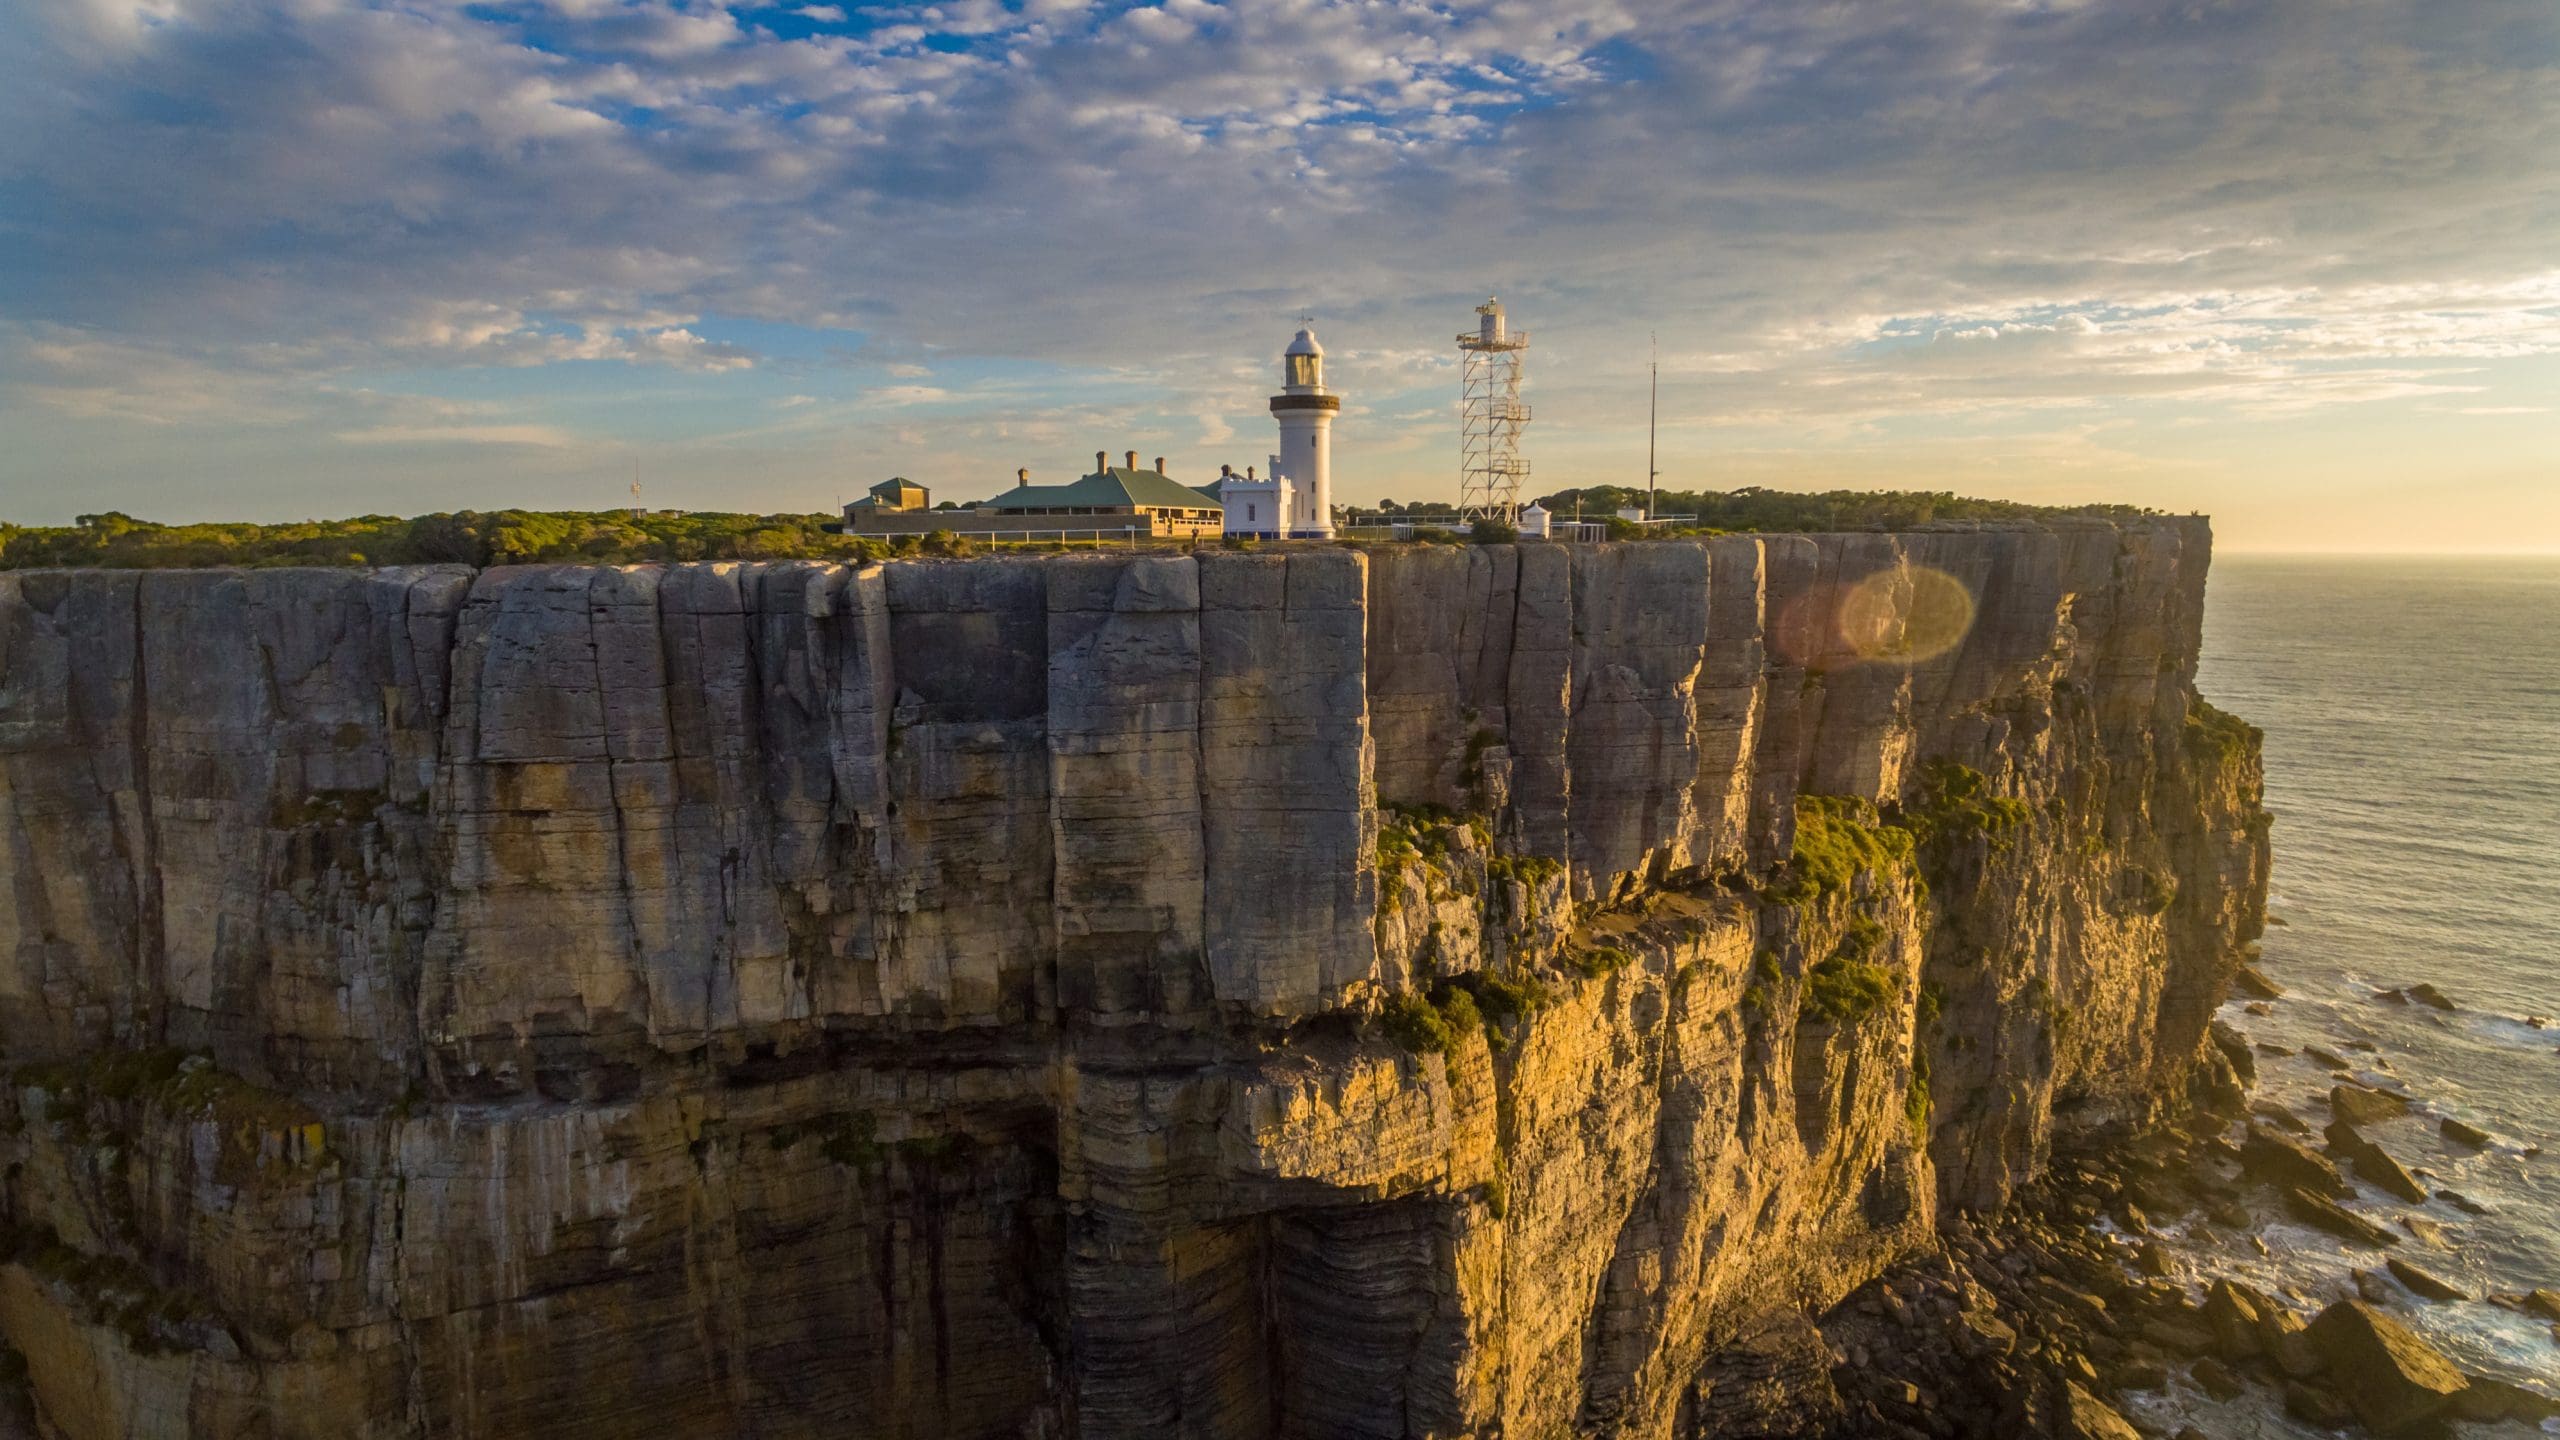
It's summer here in South Coast NSW and, even with CoViD raging through the region, the tourists have well and truly arrived. And I know full well that over the course of the next four weeks I'm going to see news reports about people getting lost and needing rescuing and, if previous years are anything to go by, some will die too. It's not just Instragammers chasing a selfie at a famous waterfall either, serious photography hobbyists get themselves into all sorts of strife down here too.
I'd love to snag some shots from the base of the waterfalls local to me, but I accept that my body's simply not up to the job anymore. I do an hour of hard cardio every single day, and have done for many years, but my knees are not up to the task and while I can do decent hikes on the flat, difficult terrain ruins me. What can I tell you? It is what it is.
If you've got a decent level of fitness and don't get out of breath reaching for the remote, then you'll undoubtedly be fine out on most marked trails. If you haven't gone on a decent walk in a while, then start small and work your way up. There are a few circular loops in the national parks here that are ideal for testing yourself out and you've undoubtedly got a few near you too.
In this country the parks organisations include information about the difficulty of the various tracks and an indication of the time it will take to walk there and back. These signs tend to overplay the difficulty, but I suppose this is preferable to underplaying it and having a load of hapless hikers get themselves into trouble.
Before you laugh at the difficulty ratings on these signs remember also that they need to cater to people of all ages and abilities and while you might be as nimble as a mountain goat, some of us are about as nimble as a mountain.
If general fitness levels are what's holding you back from exploring the landscape then you can of course do something about that. If the thought of joining a gym fills you with horror, then consider joining a local walking/hiking group. This has numerous advantages, not the least of which is that you'll be out in the very landscape you want to photograph. You will get fitter, you’ll be with experienced outdoorsy types and you’ll undoubtedly find new locations to photograph that you didn't know about.
You should also help yourself by wearing the right clothing and carrying the right kit. With a little bit of planning you can offset the issues caused by a well lived-in body. For instance, if you have dodgy knees like me, then I strongly recommend a good pair of walking poles, which give your knees welcome support.
Good boots can make a huge difference and, if you carrying a decent amount of gear, then get a good backpack with lumbar and chest straps. If you'd like to get serious about your landscape photography then consider trading in your trendy metrosexual man-sling cross-purpose techno-pack camo edition stuff-sack for something slightly less interesting but eminently more practical.
Do you need a laptop slot, RFID blocking pockets and airplane luggage straps when you're hiking through the middle of the bush? Or would an extra water bottle holder, padded shoulder straps, tripod tie-downs and a waist strap be more useful?
Remember to put on sun-cream, even in winter, wear a hat and pack enough water to stay hydrated for the duration. If you're travelling in isolated locations then a device such as an EPIRB or a Garmin Inreach would be a great idea.

In terms of camera gear, there's a reason carbon fibre tripods are now more popular than the metal versions - they're considerably lighter. Consider which lenses and accessories you're going to take too - you probably don't need to take the whole collection along.
When it comes to the actual walk, try and plan it so you don’t have to rush. Consider camping overnight so you can be closer to the scene earlier in the day. Remember to check the weather because obviously treking through gale-force winds is harder than through a light breeze.
If you're clever about your photographic hikes you might surprise yourself with what you can do and which locations you can reach.
Alright, that's all well and good if you have average or above fitness and mobility - but let's say that you're not fit or have some other impediment that greatly impacts how far you can walk.
Here are a few ideas to consider.
Drones
If you can't move very far then let the drone do the travelling for you. The only issue with this is that legally you're not supposed to fly beyond visual line of sight. And if that puts you off I should point out that it's also illegal to change your own lightbulbs in the state of Victoria, but I'm wondering how many people pay an electrician to come out and replace the light dome in the upstairs shitter?
In any case, drones give you the mobility your body might not. And if you want a perfect example of that, then check out the excellent photography of Jamien Hudson, a Perth-based photographer who has won international acclaim for his amazing drone photography despite being a quadriplegic.
Google Maps or Google Earth to research locations you can get to by car. There’s this myth that all the good spots are a hundred miles from the nearest tarmac, but that's just not the case. Spend some time researching interesting back-roads and play a few hunches and you could easily get lucky. There are plenty of amazing scenes right next to the road.
Planes, Trains and Automobiles
Consider other forms of transport - such as a scenic flight or a boat trip. You can take some incredible photographs from a light aeroplane or helicopter and cover a huge area in a short period of time. Boats can also open up access to areas that have not been photographed previously and if you don't fancy going motorised, a stand-up paddle or kayak can open up amazing locations to your camera lens.
Zoom
Never forget the power of a long lens. Using a good telephoto you can close the distance and photograph locations it would be impossible to reach on foot. You can also shoot from the top of tall buildings or skyscrapers.
When you put your mind to it - there are lots of options no matter how un-mobile you are.
So no you don’t have to be super-fit to be a landscape photographer, but you can absolutely get super-fit by doing landscape photography.
Remember too that the quality of a landscape photograph is not defined by the torture you had to endure to take it. You can spend two weeks backpacking through remote wilderness and still take a shitty photograph. Equally, you can take remarkable landscape photographs in your own backyard.
So I say, don't stress about it and embrace the possibilities around you.
While aerial photography was new to me when I got my drone, landscape photography was not. I've been taking photographs as a hobby for over 40 years now. Yes, I'm an old bastard - generation X and proud. I started with film cameras when I was a little kid, and learnt to process my own film and do my own prints. When digital cameras first arrived I was a tech journalist working on gadget magazines in the UK and I got to play with these gizmos back when they had the resolution of a potato. I've had point-and-shoots, DSLRs, mirrorless cameras and, more recently, drones. And when I got my first drone I applied many of the same principles I'd learnt from traditional landscape photography to my aerial shots.
So if you're dissatisfied with the images you're faced with when you pop that SD card into your PC and you'd like to create more interesting shots, then I have put together five solid tips to set you on the right path. But before we begin I'd just like to say that above all, remember to do your own thing - take inspiration from other drone photographers but try and create your own style.
Bomb shots are far and away the most popular kind of drone photograph. In fact I saw the winning shots in a recent drone photography contest and every one of the finalists photos were bomb shots. They're taken by pointing the drone's camera 180º straight down towards the ground and the reason they're popular is because they give a unique perspective on the landscape that is difficult to emulate with a regular camera. And if you want to take a good bomb shot, you need to look for two things - contrasts and patterns.
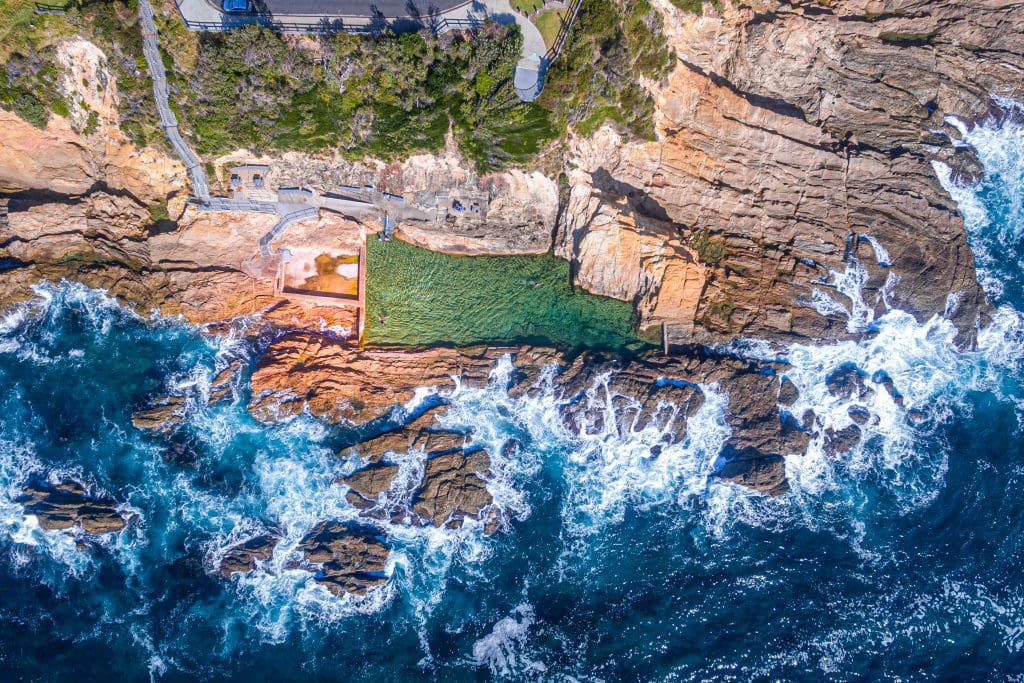
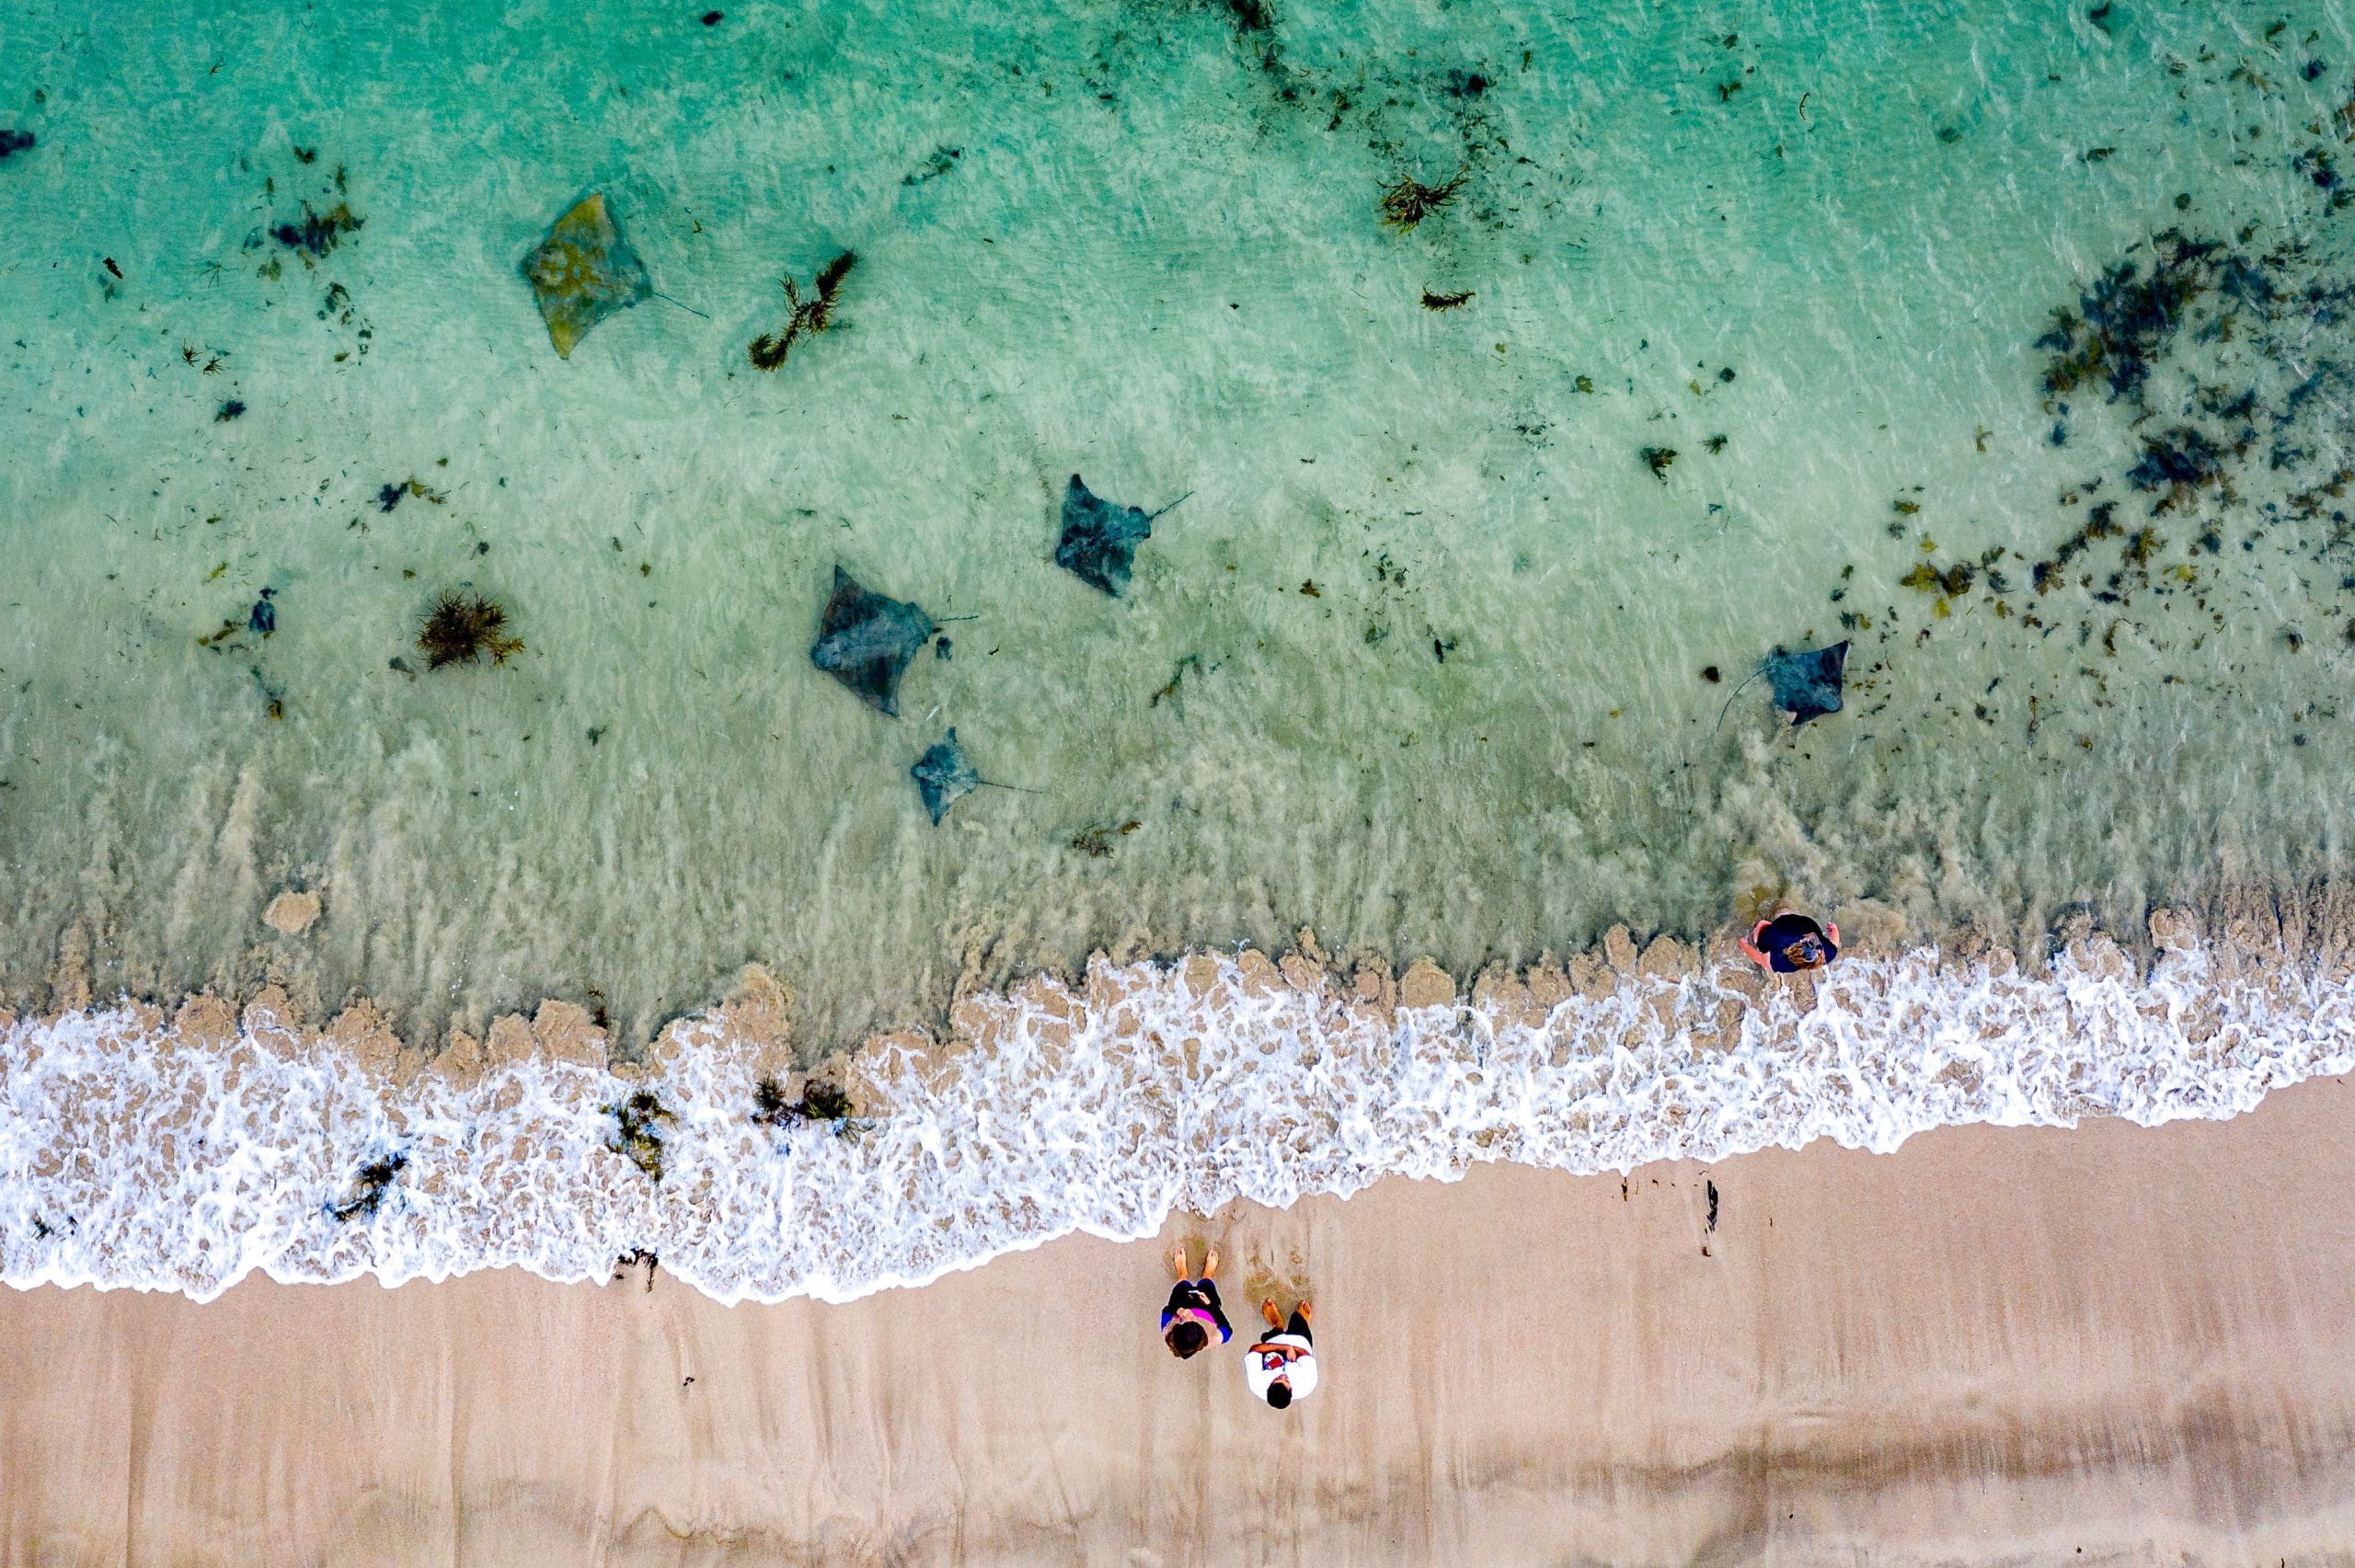
Contrasts might be the verdant green of a coastal forest and the white sand of a beach next to it. Or it might be where the urban landscape ends and turns into the natural landscape. Or it might be a single green garden in a parched landscape. Or it might be a single person in an empty vista. When you're flying over the land - keep an eye out for those contrasts and you've already got the makings of an interesting photograph.
Patterns always make for great bomb shots. For instance, look for the way a river estuary's tributaries appear from the air. Not close to any river estuaries? What about buildings? Haulage containers? Suburban roads? Also remember that some patterns and contrasts only become evident at certain times of the day. For instance a landscape might appear fairly boring, until the rising sign causes the trees to cast large shadows. So if you see something that has the makings of a great bomb shot, consider if it would work better at a different time of the day, or even a different time of the year.
Of course some patterns and contrasts do not become evident until you're at a specific height - so remember to experiment with the height of the drone over your chosen area and you might find the composition improves drastically when you get higher or lower. Consider also the rotation of the drone - get the angle just right in the air and you won't have to waste valuable pixels by cropping into your photo at a later stage. And remember also that you can always go back and try again if you don't nail it first time - it's just space on an SD card.
You may have seen an image and wondered how the photographer achieved the look. You may have wondered if it was all done in Photoshop. And the honest truth is that it could well have been 'retouched', but it also might be the case that the photographer was using some extra glass on the front of their drone's camera. And I'm talking specifically here about ND and polarising filters.
ND stands for neutral density and these are like sunglasses for your drone camera - just as you wear sunglasses to reduce the amount of light reaching your retinas, the ND filter's only purpose is to reduce the amount of light that's hitting the camera sensor. And why would you want to do that? Two main reasons - firstly because there's simply too much light for your drone to properly expose an image without having blown out highlights and secondly because you want to shoot a long exposure shot.
When the sensor's over-loaded in bright sunshine, you get those empty white areas of an image and they look that way because the sensor was over-loaded and incapable of recording any light or colour information. So you put an ND filter on the front, which reduces the amount of light reaching the sensor and hey-presto the sensor can properly read the light and colour of that part of the scene you're photographing. If you have a drone with controllable aperture, such as a Mavic 2 Pro, then ND filters are incredibly useful because they enable you to take photographs at the apertures you want, rather than the one that's forced on you by the brightness of the scene. I live in Australia and ND filters are virtually essential during daylight hours here, particularly during the summer months, because there's just too much light for the sensor to handle.
If you want to shoot a long exposure shot then you'll almost certainly need an ND filter to reduce the amount of light hitting the sensor enough to allow for a slow shutter speed. In bright sunshine you'll need at least an ND64 to get into slower shutter speeds, but an ND32 or ND16 might suffice at either end of the day. I use the PolarPro Cinema filters on my Mavic 2 Pro and they're colour-cast free and easy to use.

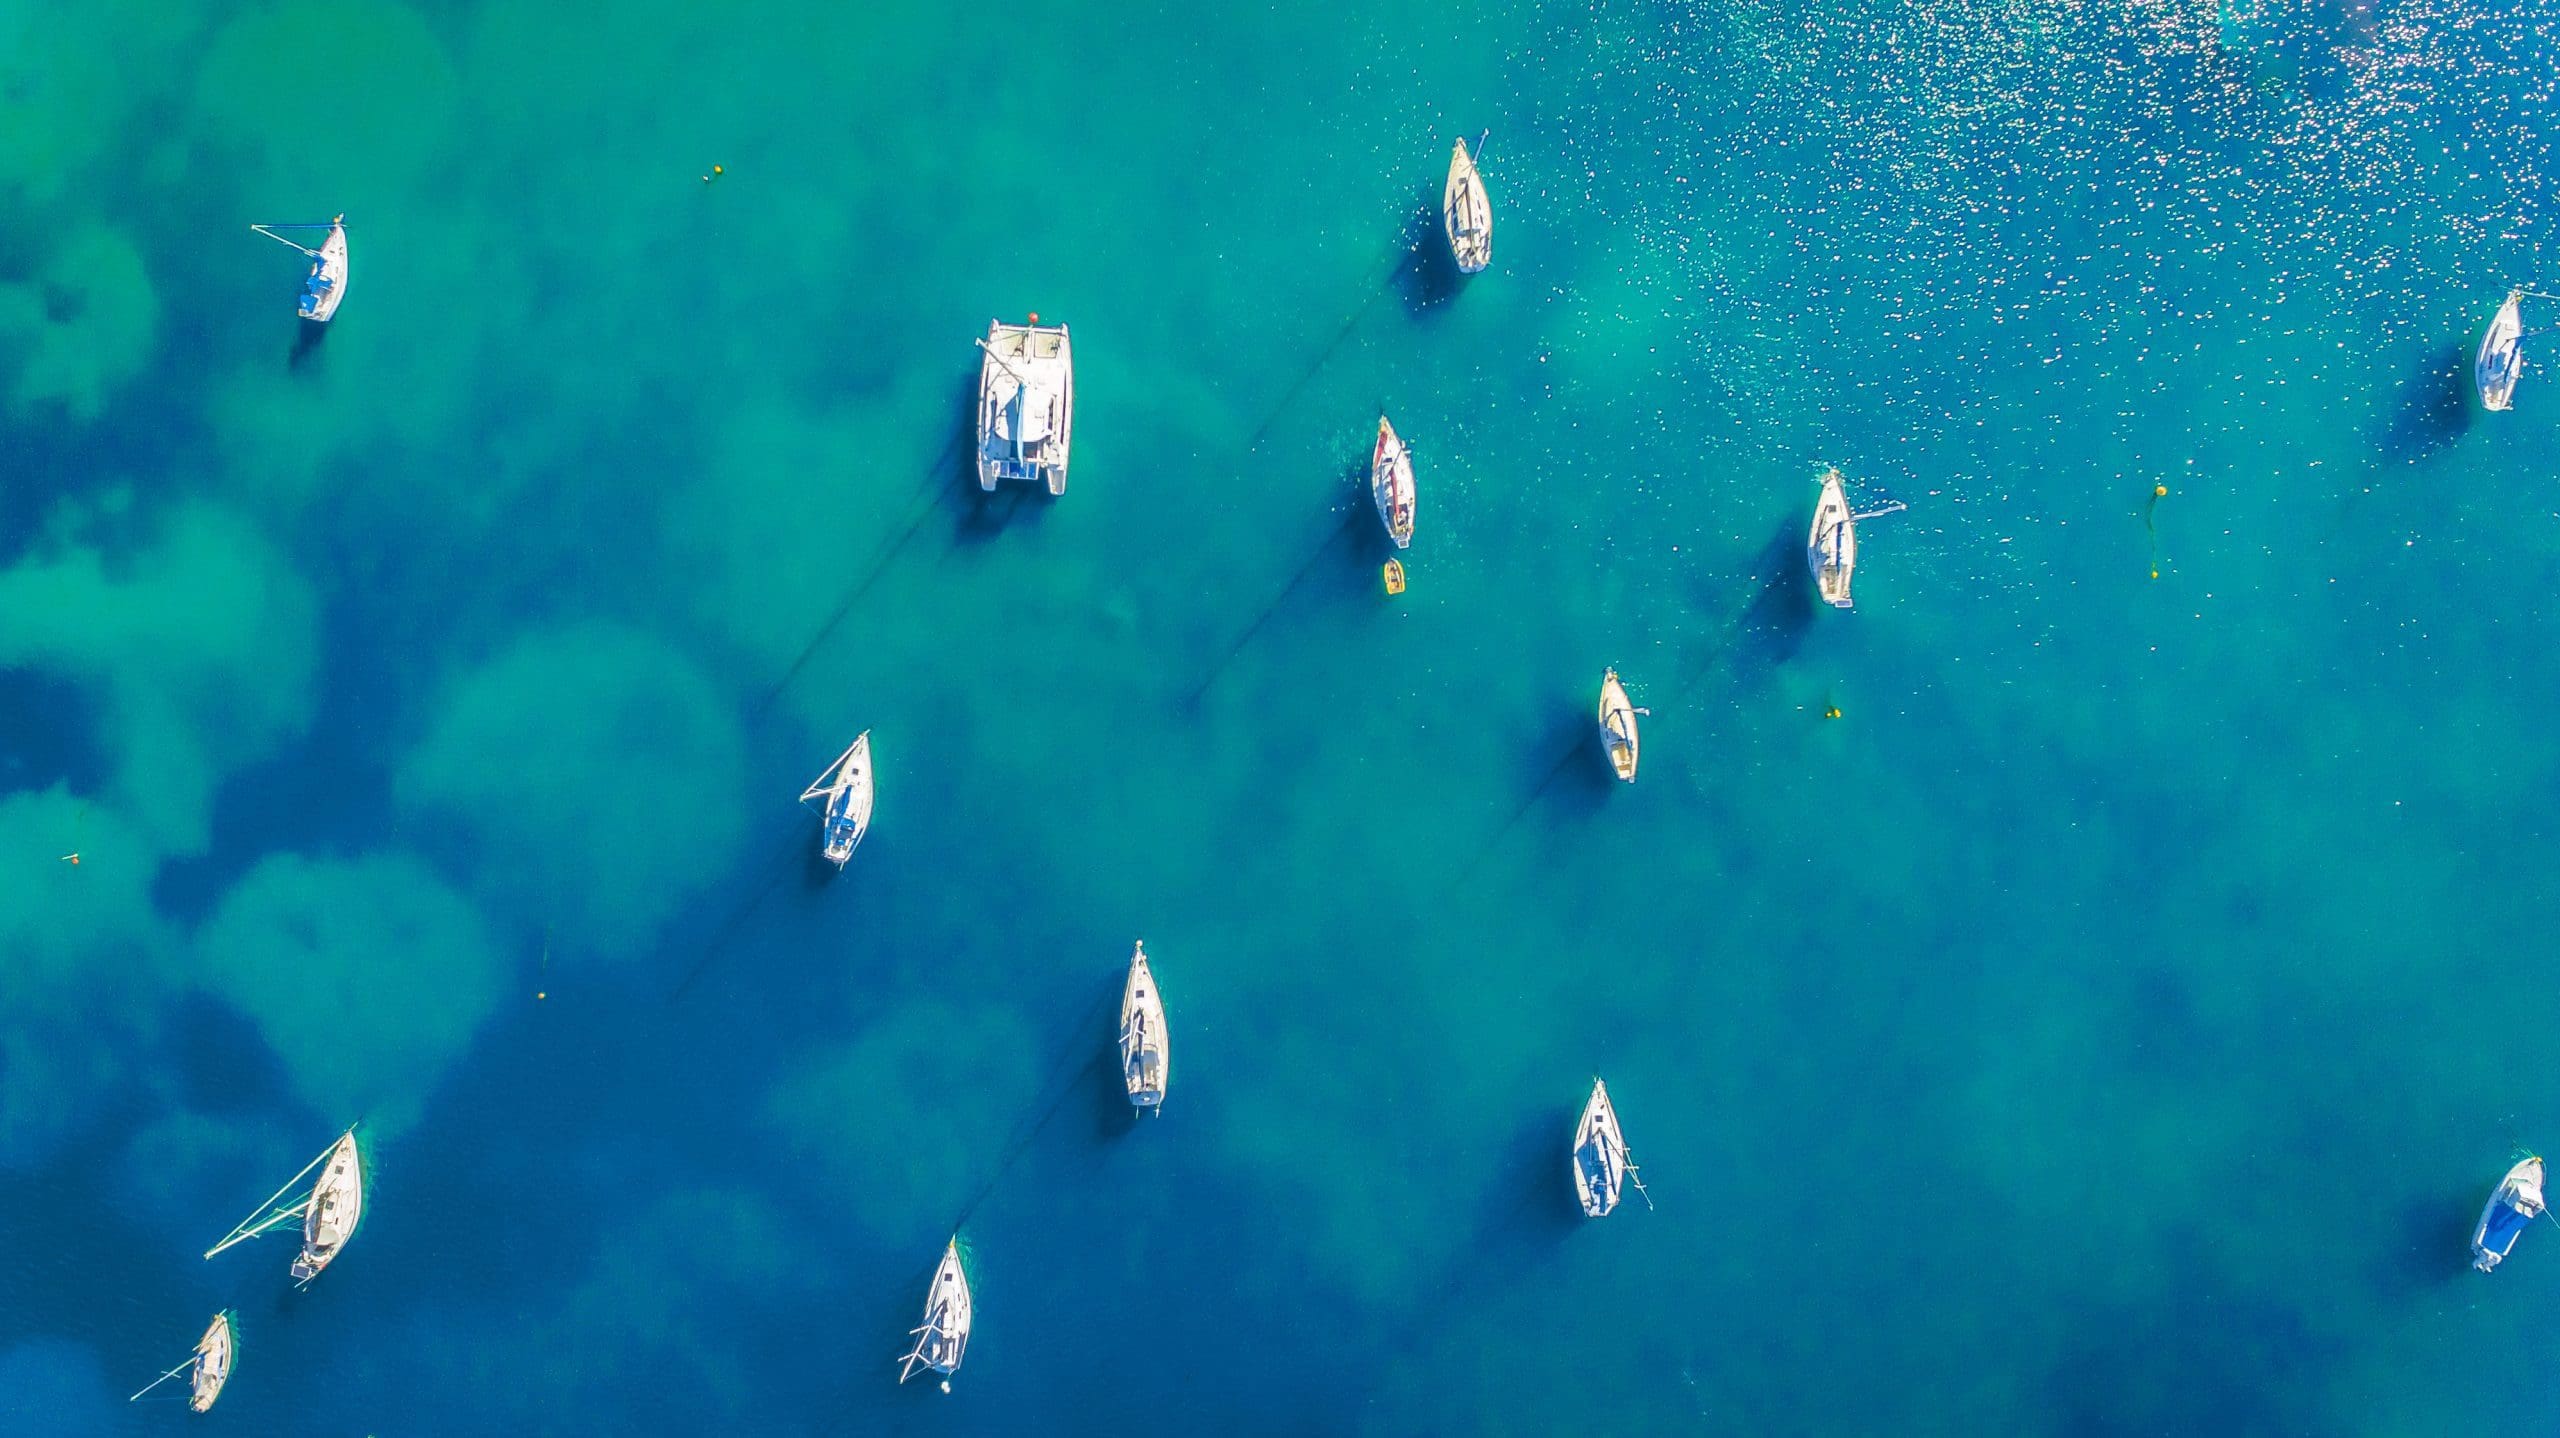
These are the secret weapon of the aerial photographer. These filters cut down on the amount of randomised light in a scene. What's random light? Reflections on water are an example or the haze you get in the air when the light hits molecules of water vapour or pollutants such as smoke. If you've got a pair of sunglasses with polarising lenses in them, then you can easily observe the effects that polarising filters have on a scene - they make colours pop, they darken blues and they cut down on the reflections on water. So if you regularly film at the coast or over any body of water then these filters can take away the reflective light on the surface of the water and reveal what's underneath. Ever seen an aerial photo with crystal clear water and wondered why the water never appears that good in your photos? Now you know.
The temptation when you have a drone is to put that thing into the air, push the stick up and send it right up to its maximum legal height. Get that real bird's eye view, right? Yes and no. The problem is that 120 metres up isn't always the best vantage point for a good photograph. In fact you don't have to get that drone very high at all, to take interesting photographs.
I've found that 30 metres up is often the sweet spot for cool landscape photographs since it gives you the aerial perspective but doesn't take you so far up into the stratosphere that you lose all the detail in the scene you're photographing. So instead of placing your drone alongside one of Elon Musk's starlink satellites, experiment with the view from much closer to the ground and play to your drone's ability to position the camera at otherwise unreachable locations.
And by raw, I don't mean, stark-bollock naked. No, no, no - RAW is a photographic file format and it can make the difference between an average photograph and a great one. Why? It's simple - dynamic range. Ok, so you're undoubtedly familiar with the venerable JPEG file format. This is a photo format that uses lossy compression to create smaller file sizes and if you shoot only with JPEGs then you bake-in the look of a photograph - the saturation, the amount of light and shadow and you also greatly impact what you can do with that photograph in post-processing. JPEG is what you should use when the photo is finished, not when it's being baked.

Back in the days of film, cameras exposed acetate to light to create a single exposure. And when you process that film you ended up with a negative. And you could take that negative to the dark room and, by using different amounts of light, different timings, different papers and various clever techniques such as dodging and burning, you could get more out of the image than if you were to simply expose and develop that shot. Negatives gave you the chance of producing a print that looked the way you wanted. And RAW files are the same - they are like digital negatives. They are called RAW files because they contain all the unmodified data received by your drone's sensor when that photograph was taken. They are not processed in any way, shape or form by the drone like a JPEG would be and for this reason when you look at an unprocessed RAW file it usually looks pretty crappy. All RAW files need to be processed and to do that you need to use an application such as Adobe Photoshop to interpret the image.
When you're developing a photo in the RAW format you get to decide which information the sensor captured makes it into the final image. For instance, you decide how much detail there is the shadows and how much dynamic range to include in the sky. You also get to control how much colour and saturation is evident in the landscape. If you're worried about post-processing your images then to begin with shoot in dual mode - both JPEG and RAW - that way you always have the baked-in JPEG version to fall back on. However post-processing RAW files is not difficult or indeed arduous - in fact in most instances it basically comes down to dropping the highlights and boosting the shadows. And once you've found some settings that work well for your image, you can use the same settings on the other images taken in the same location. Quite often I spend some time getting the first shot looking good and then simply copy the settings across to a whole bunch of other images. And the other great thing about RAW files is that any changes made are not permanent - if I decide later on that I want to bring out more detail in the shadows then I can just open up Photoshop or Lightroom and tweak the image with no loss of quality. It's like a musician going back to the original master tapes to produce a new edit of a song.
So let's think about the process of taking a shot with your drone. Whether you planned it out before-hand or are just flying around looking for cool stuff, at some point you see something that appeals to you and decide to take a photograph. The thing that appeals to you is the subject, but the problem is that the subject is often pretty boring without some context to explain it. So for instance if you decide to photograph a waterfall, the temptation is to fly your drone up to the waterfall, centre it in the frame and take your shot. But if some third party looks at that meat-and-potatoes image of yours, then they will start asking questions about it. For instance, how do they gauge the waterfall's size? How do they know what sort of a landscape it's in? How do they know what time of year it is? How do they know where the water goes after it's gone over the falls? All of these questions are about the context of the shot.
So instead of centring your subject slap-bang-wallop in the middle, consider putting it closer to one of the four edges of the frame and include some surroundings. Or put a person, perhaps yourself, in the shot so that someone who looks at it can easily gauge the size of your photo's main subject. Context isn't just about framing of course, because the context you need to include might be the time of day which in turn affects the colours of the image. So remember that the subject of a photograph is not the whole story and that by playing with how you position your subject, you can give the image a degree of context that takes it from being a simple snapshot to being something you'd print, frame and stick on your wall.
Something else has changed too. Consumer drones have managed to acquire a crappy reputation as intrusive, wildlife upsetting banshees used almost entirely, if you believe everything you read in community Facebook groups, for perving on middle-aged women while they're on the upstairs shitter.
In 2021, the authorities are also fully invested in the world of drones. Starting with some high profile prosecutions for crimes such as the infamous Bunnings snag stunt, they have slowly but surely brought the same level of interference, oversight, regulation, bureaucracy and taxation to the scene as every other facet of life in 21st century Australia. The clamp-down is now nearly complete, the drone-makers complicit in the authorities control methods, and flying a drone in 2021 is a very different experience from back in the day.
So here then, is my guide to buying and using a drone legally in Australia in 2021, in three parts - buying your drone, taking care of the legal side of things and flying it. Remember however that I am not a lawyer and none of the following constitutes legal advice.

The biggest players in the consumer drone market are DJI, Parrot, Autel and Skydio and of those DJI are far and away the top dogs with a massive 76% market-share. DJI drones are excellent, but these days the competition is excellent too and the Autel Evo 2, Parrot Anafi and Skydio 2 are every bit as good as DJI's Mavic. So before you buy, carefully consider what you're going to use the drone for. If you plan on filming yourself on downhill runs on a mountain bike then the Skydio 2 would be a far better choice than a Mavic Air for instance. If you're a film-maker then the 8K video mode on the Autel Evo 2 would be a great choice. You'll probably end up with a DJI, because it's the path of least resistance, but just be aware that there are other options.
Drones used to come in the same form factor, but these days you have way more options. And it's not a simple case of just choosing the size that appeals most to you, because they all have different uses. The DJI Phantom's form factor puts a lot of people off these days, but they are still popular drones due to their design. If you're hand-catching a drone because you're on something that's moving, such as a boat, then you will find the Phantom's large looped legs to be infinitely preferable to the slim body of a Mavic. Meanwhile the smaller foldable drones such as the Mavic, Evo and Anafi are of course great if you need to walk anywhere with them in a backpack.
However the size of drone you get also has a bearing on the red tape you'll face after you buy it. Governments around the world have adopted a sub-250g drone class which removes a lot of restrictions and paperwork that larger drones suffer from. Drone manufacturers like DJI produced models like the Mavic Mini which fell into this sub-250g weight class and which, here in Australia, can be flown in more places, more often and require much less paperwork.
Then we come to the model and this should be the principle factor that influences you to pick it. Ask yourself honestly what you are going to do with the drone and how you're going to go about that. If you're a travel YouTuber for instance, then the DJI Mavic range is an obvious choice, due to its flexible feature-set. However if you're more of a film-maker than an influencer then the 8K sensors and first-rate image quality on the newer Autel drones would be worth considering. If you're prepared to fore-go log video formats for the sake of world-class collision detection and advanced subject tracking then the Skydio drones are your best-bet. If you just want a drone for a bit of fun flying at the weekends then you really don't need the 4:2:0 10-bit 4K footage on the Mavic Pro or Air 2 and something like the Mavic Mini is a much more sensible option. My point is that you should be realistic about what you're going to do with the drone.
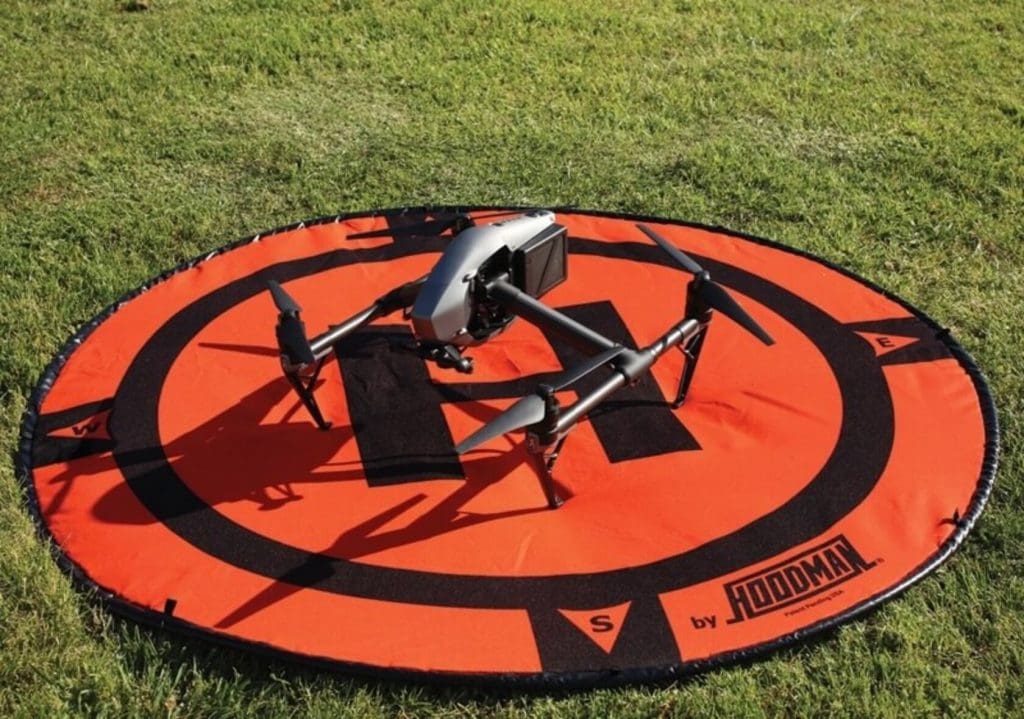
There are of course a huge number of after-market and manufacturer produced add-ons that you can get for your new drone, but very few are essential. Top of your list should be a couple of spare batteries. Flight time on pretty much all modern drones is about 30 minutes best-case and if you're out shooting video for the day then you'll need to switch out those batteries regularly. If you are shooting video then do invest in a set of ND filters to enable you to shoot at good apertures in bright sunlight. Sun-visors for your drone controller screen whether it's a mobile phone or a special screen are a great idea and make flying in broad daylight much safer since you can actually see what's on the screen. Foldable landing pads are great and mean you don't have to stress about hand-catching your drone. Buy a few V90 UHS-II SD cards too - Kingston, Lexar and Sony are great - Sandisk not so much.
Oh and while we're on the subject of after-market accessories - let's briefly mention DJIs Care. This is a $150 insurance policy for your DJI drone that covers you for accidental damage and offers a certain piece of mind that if you stuff it up badly and fly your new drone into a wall, you can get it replaced. If you only occasionally fly near or over water, then it's probably worth getting, particularly when you're new to flying drones. However since you need to send the damaged drone back to DJI under the terms and conditions, it's not as useful as it might seem. If you lose your drone in a remote location, or it gets stuck up a tree and you can't retrieve or you fly it into the ocean, then you're fucked. It also doesn't cover flyaways on most of the range.
Buy new and shop around because deals are coming up all of the time. If you're getting a DJI drone then there's no particular advantage in buying directly from them, but if you're buying from one of the other manufacturers then buying direct from them is probably going to be the only option. There are some good specialist drone shops too, like Rise Above here in NSW, and these guys are well worth a look because you get excellent support and someone local to speak to if things go wrong.
I would advise against getting a second-hand drone because it's easy to conceal crash damage and you really have no idea how many hours its flown for. It is possible to check things like flight hours on motors, but I trust those figures about as much as I would the surprisingly low mileage on a car-lot bargain previously owned by an old lady who just drove it to church on Sundays. If you buy new you have a manufacturer's warranty and, in the case of DJI, the chance to buy Care Refresh too. Also be very wary of second-hand batteries because, certainly in the case of DJI and its Mavic range, these are notorious for getting bloated and failing, sometimes when the drone's in use. I had a bloated Mavic battery pop its clips and nearly eject itself from the drone, so tread carefully.
When it comes to looking after your drone, always inspect it before you fly it. Make sure the props are correctly secured, and make sure the battery is properly seated. If you're not using your drone, do not keep the batteries permanently plugged into the charger as this will shorten their lifespan. Remember to rotate your batteries so that you get even usage across them all and at the first sign of battery damage or bloating, safety dispose of them and buy new because you do not want one failing in mid-air.
When it comes to actually flying your drone - remember to take baby steps - fly in beginners mode at first until you understand the controls. Learn to fly your drone by the sticks, looking at your drone and without relying on the life feed and you will able to fly much more confidently. Remember that all drones have Return to Home functions these days and should be used if you are concerned about it getting it back safely - but try not to rely to heavily on the automated modes.

There are unfortunately some legal requirements around using a drone which make purchasing and owning one a much less care-free experience than it used to be. Like your car, you will have to remember to take care of some licensing paperwork once a year and, also like a car, you'll have to take care of a few forms and pay some money to the government when you buy it new.
Will the feds come knocking on your door if you *don't* complete all this paperwork - probably not. Does it attract large fines if you are caught not doing the paperwork - yes. Ultimately it's pretty similar to a car - you'll be okay until your luck runs out. If you plan on selling photos or videos produced on your drone then you really have no option other than to fly legally because whoever you sell your stuff to is probably going to ask.
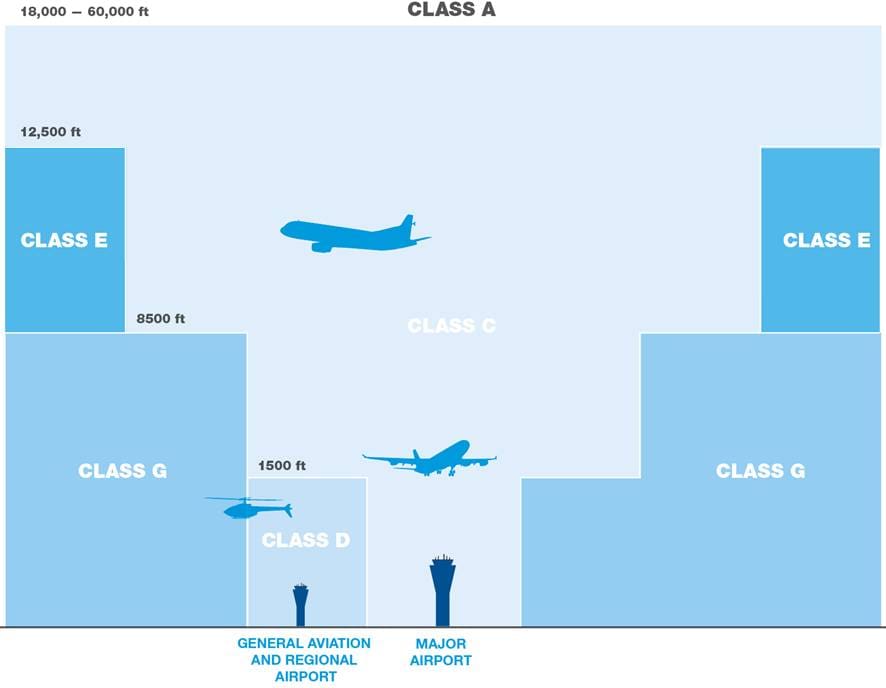
Control of the airspace over a country is typically administered by two organisations - the first is the military and the second is a department of the government who look after all the non-military aircraft. Here in Australia that organisation is the Civil Aviation Safety Authority or CASA for short. These guys used to purely concern themselves with actual aircraft like passenger jets, light aircraft and helicopters - but now they are in charge of drones too and I dare say they'd rather they weren't.
Drones represent a unique problem for CASA because while all other aircraft are flown by people who have a vested interest in doing things the right way, many drone users couldn't give a fuck about that and just want to have a bit of fun. So they've had to adapt to a changing world and the process has not been an easy one. Thanks to lobbying by commercial drone groups and by other government agencies and thanks in no small part to a tonne of bad press - CASA were backed into a corner and had to introduce official processes around drones. As I mentioned earlier, the men in black are unlikely to knock on your door and ask why your drone isn't registered, but if the shit hits the fan then you might regret not doing things the official way. And anyway - we live in Australia don't we - we're using to having every single facet of our lives registered and levied with a tax of some kind, so it's just one more on a very long list.

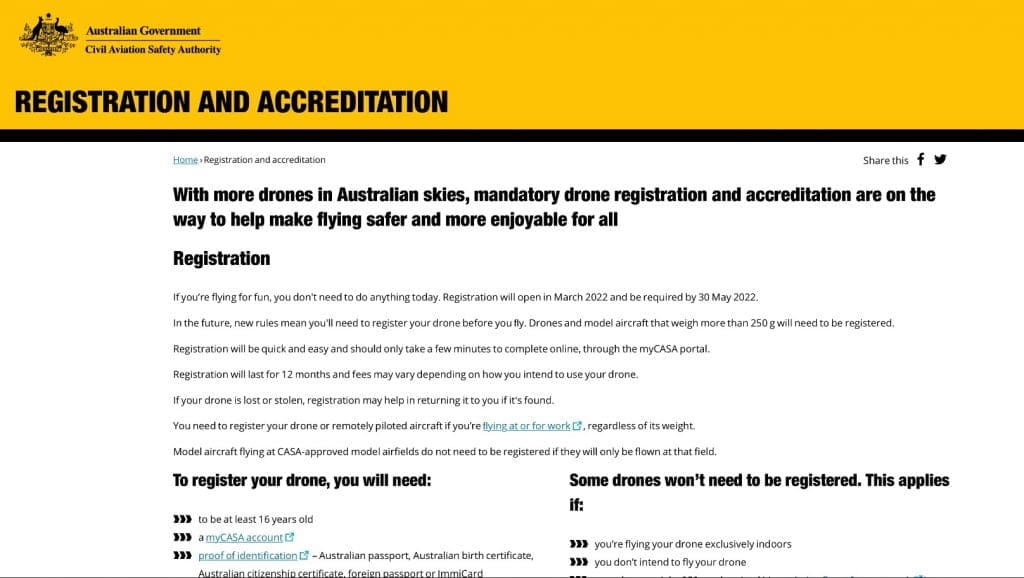
Alright - the first item on our list is operator accreditation. You need to get your operator accreditation if you are flying any drone that weighs more than 250g and for all drones if you are doing so for business purposes whatever weight they are. What kind of business purposes? CASA supply this list of examples:
- selling photos or videos taken from a drone
- inspecting industrial equipment, construction sites or infrastructure
- monitoring, surveillance or security services
- research and development
- any drone activities for your employer
At the moment this accreditation is free, but so was drone registration initially and now you have to pay, so bear that in mind. Operator accreditation is open only to people aged 16 and over and it is valid for three years.
So - to be crystal clear - if you own a Mavic Mini - which falls into the sub-250g category, or any other drone that weighs less than 250g like a homemade FPV drone, and you do not fly for business purposes then you do not currently need an operator accreditation certificate. Everyone else - tough shit. Sub-250g - just for fun - no operator accreditation required - literally everyone else - you need one.
Alright - so yes - you probably need an operator accreditation - sorry about that - blame the government. And in order to get this accreditation you need to jump through more hoops first! You need to create a MyCASA accoun, you need to apply for an Aviation Reference Number - more commonly referred to as an ARN and then you get to do a short online test. Still with me? Good!
Okay firstly need to create your MyCASA account - this is not the accreditation bit - just a login so you can manage all this official paperwork. Think of it as MyGov for your drone and you won't be too wide of the mark. Anyway - create a log-in, confirm your email address and then log-in.
If you do not have an ARN then you need to apply for one. Anyone that flies an aircraft (and yes, drones are officially classed as aircraft) needs an ARN - so if you ever plan on doing your pilots licence or whatever, then you can use your ARN for that too. When I applied for my ARN it took about a week to come through, but they may have speeded up the process these days with all the irate drone users flooding their no-doubt chronically under-staffed and poorly designed systems.
Once you have your ARN, you can log into MyCASA and click on the RPA Operator Accreditation box. Alright now comes the good bit - the test. What's in the test - a bunch of extremely easy questions related to the "standard operating conditions". The standard operating conditions are the rules that have been in place for many years now, such as going no higher than 120m and not flying your drone several kilometres over suburban housing estates to procure an under-cooked beef sausage in a bit of white bread from a large DIY store. In any case, it's probably an idea to familiarise yourself with the rules before sitting the test. Most of it's basic common sense stuff and no trigonometry is involved.
Alright. MyCASA account - tick. ARN - tick. Online test - tick. Once you've passed the test you can download your RPA Operator Accreditation certificate and, if you are flying a sub-250g drone for fun - then you're done. Yay!
Alright - so you've registered yourself - now you need to register your drone. If you own a Mavic Mini or any other drone under 250g and you're flying for fun you do not currently have to register your drone. That will undoubtedly change in the future, but right now sub-250g drones are not taxed if they are not used for business purposes. Got it? Cool.
Okay - as I record this in September 2021 - if your drone weighs *more* than 250g and you are flying for fun then you do not currently have to register your drone. If your drone weighs more than 250g and you are flying for business purposes then you need to register your drone now. Okay?
So that's the situation right now and that information is valid right up until the 30th of May 2022.
Hold on mate? What happens on the 30th of May 2022? Thanks mate, I'm glad you asked that question - on the 30th of May 2022 the rules are changing again. From the 1st of June 2022 onwards - all drones heavier than 250g will need to be registered.
That's right - no matter who owns them or whether they are being flown for fun or for business - all drones over the 250g weight bracket, must be registered after the 30th of May 2022. And yes, that means paying a registration fee which is currently $40 a year per drone. I predict that sales of Mavic Minis will skyrocket.
To register your drone you log into your MyCASA account, click on the link to register a drone and follow the prompts. If you sell your drone, you should remember to hop onto your MyCASA account and deregister it because if the person you sold it to flies it into Scott Morrisons' face while he's eating a cheeseburger at Engadine Maccers, then the feds will come looking for you.
Once a year you will have to renew your registration and pay $40 for the honour.
What will happen if you do not register your drone? Probably the same as if you don't register your car - nothing at all until the day the authorities ask to see your registration certificate at which point you'll be in the shit. I know quite a few folks who have no intention of registering their drones and the truth is (and I am not advocating for breaking the law) they'll probably be fine. We must all make our own decisions on this.
I've registered myself and my drone because I fly commercially, but even if I didn't I'd probably still register it because it beats constantly looking over my shoulder waiting for some arsehole to grass me up. Drones have a pretty crappy reputation at the moment and if CoVID has proved anything, it's that Aussies more than happy to dob in anyone they perceive to be breaking the law. So if you encounter someone who takes a dislike to your drone and to you and either calls the authorities or films you flying your drone and getting back in your car (as has happened to me!) then you might end up in the shit.
Alright, so you've completed all the tedious online forms, you've done the test and you've got all of your paperwork in order. You can now choof off and fly your drone wherever you goddman please. Right?
Of course you can't.
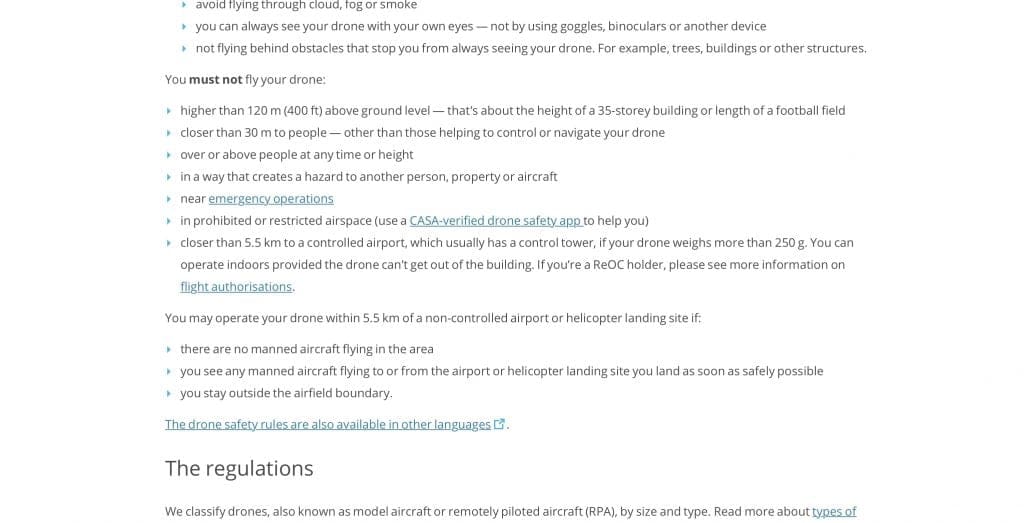
You are legally required to observe the standard operating conditions. These have been in place for many years and have not changed substantially during that period. I'm not going to go over them all, just point out five things that you should be aware of if you want to fly fully legally.
Don't shoot the messenger.
1. You must fly your drone in visual line-of-sight. That means you're supposed to be able to see your drone with your own eyes at all times. So if you send your drone up into the air, fix your eyes on your smartphone screen showing the live feed from your drone and proceed to zoom a few kilometres away using only the screen to navigate - that's illegal. It also means you can't fly the drone behind some obstacle (such as as building), or in fog or smoke. How would they prove that you flew beyond visual line-of-sight unless they witness you doing it in person and without any metadata stored in the videos or photographs? That's an interesting question, isn't it.
2. Secondly, you're supposed to fly during the day. Sounds pretty simple, right? But what is the official definition of day? Can you legally fly at sunrise and sunset? I am happy to answer that question for you.
Here's the actual text from CASA's visual flight rules regulations.
‘Night’ is that period between the end of the evening civil twilight and the beginning of the morning civil twilight. For all intents and purposes, first light should be construed as the beginning of civil twilight and last light as the end of civil twilight.
This means that you can legally put your drone in the air before sunrise and fly it after sunset. The actual timing will change over the course of the year, but if we take today by way of an example, morning civil twilight begins at 5:16am and sunrise is at 5:41am - so I have nearly half an hour before sunrise when I can legally fly my drone. And if we look at this evening then sunset is at 5:56pm, but civil twilight doesn't end until 6:22pm - so again I can legally fly my drone for just shy of half an hour after sunset. If it's a cloudy day and there's no sunset colour this means it's possible to shoot urban night scenes and be completely legal! I use the Lumy app on my iPhone to see the exact times of civil twilight and the SunCalc+ app on android does the same thing.
3. Thirdly, you're required to fly no higher than 120m. However that rule is 120m AGL (above ground level) - not sea level. So if you're up a 500m mountain for instance, you can legally fly your drone 620m above sea level. This can be quite handy when you want to get a bit of extra height in your shots and there happens to be a nearby hill or mountain! Do bear in mind of course that as you move over the slopes of the hill or mountain your height above ground level might exceed 120m, so remember to descend or ascend as required. Also, buildings don't count, so you can't fly your drone above the Sydney Sky Tower.
4. You are not allowed to fly closer than 5.5km from a controlled airport. This is a fairly common-sense rule as far as I'm concerned because I don't want my drone endangering any aircraft with people in them. However, there are a couple of points to be made here. Firstly the rule talks about 'controlled' airports - which are (usually) ones with control towers. Little grass-strip airfields are usually not controlled airports and you are allowed to fly within that 5.5km if there are no aircraft in the area and so long as you stay outside the airfield boundary. Secondly sub-250g drones can fly within the 5.5km radius of controlled airports although obviously not within the airfield boundaries. You should of course apply some common sense and not go endangering the safety of any aircraft.
5. While the laws do vary around Australia, you can photograph or film people in public and you can photograph or film them in their own property with your drone. You should of course respect people's privacy and not go filming people sun baking nude in their backyards, but if someone gets in your face and tells you it's illegal to photograph them, particularly when they are in public, then they are wrong. Even in WA where the Surveillance Devices Act 1998 prohibits the use of optical surveillance devices by a person to monitor or record someone engaged in private activity - they still make an exception for accidental photography.
6. There are regulations and laws prohibiting the use of drones near marine mammals and if you'd like to know more about this, check out my video on the subject which I'll link here. You are not supposed to get within 100m of a marine mammal such as a whale or dolphin, but research has shown they are highly unlikely to be bothered by a drone and so if one happens to surface near where you're filming, then be sure to video it as you move the drone away! As with everything else, simply try not to be a dick - for instance if a bird takes exception to your drone, then let them have the airspace and go fly somewhere else.
The first thing to understand is that once a drone is in the air, even if it's an inch off the ground, it falls under the control of Air Services Australia, not whoever owns the land. So while an organisation such as Parks Victoria might have a blanket ban on drones in all state parks, national parks and reserves across the entire state - as they do - that only prohibits you from taking off and landing on their land. Parks Victoria do not control the airspace above the park and there is nothing stopping you from taking off on public land nearby and then flying over the park. This applies to literally everywhere in Australia - airspace is controlled by Air Services Australia, not the owner of the land and all the no-drone signs in the world won't change that. My usual guidance about not being a twat still applies, but know your rights!
Drone use is also either banned outright or subject to a timetable of closures in certain areas and this is known as restricted airspace. An example of an area where recreational drone use is banned outright is most of Sydney Harbour. You can apply to fly there and professional media organisations regularly do, but you're unlikely to get permission if you just want to film the Opera house for your TikTok.
Far and away the best way of seeing if a particular location is in restricted airspace is to look at the o2kfly.com.au website. Not only does this show where the restricted airspace zones are, but it shows you if they are active. As I mentioned, some airspace is permanently restricted, but some zones operate on a timetable. An example of this is where I live in South Coast NSW. Here we have a large area of restricted airspace that covers most of the Shoalhaven LGA and is centred on the military airfield in Nowra. This cramps my style somewhat and means I can't fly my drone whenever I want. It's annoying as fuck, but fortunately the airspace is not active 24/7 - typically speaking it's not active at weekends and typically doesn't become active before 10am in the morning. So I can legally fly early mornings and at weekends. Just check 0K2Fly and you'll see instantly if you're good to go.
Today's drones are extremely capable and can fly well in most conditions except for heavy rain. If you get caught out and it does start to rain, bring the drone back as soon as you can as the motors don't do so well with water. Let it dry out fully before flying it again and remember to run the motors up and let them run for a few minutes before trusting your drone to the sky.
When it comes to wind you'd be surprised just how much your drone can handle. Anything short of very strong to gale force winds are probably going to be fine, but remember that the drone uses more battery power when fighting the wind and if you have to bring the drone home in in strong wind you may struggle to make it back before the battery is depleted. I tend to keep my drone on the ground in anything over 30kph winds, which is well inside the recommended maximum for my drone of 40kph, but I did get caught on one day, flew it in 50kph winds and it coped with it amazingly well. So have confidence in your drone as it is a capable machine.
Your drone may also suffer from heat and this is worth bearing in mind if flying during the summer months here in Australia. An over-heated drone is a dead drone, so be mindful of temperatures and perhaps fly early or late in the day when the temperatures are lower. Check your drone manual for the maximum rated temperatures - on my Mavic 2 Pro it's 40ºc. Do not try and recharge a hot battery - because you can damage it this way - let it cool first. You'll also pick up a fair amount of bug jam during the summer months, so remember to give your drone a good clean when you get home.
Well that's it guys - that's how to fly a drone here in Australia and to do it legally and safely. It's a lot to take in when you're new to this, but I hope this guide's put you a bit closer to understanding it all.
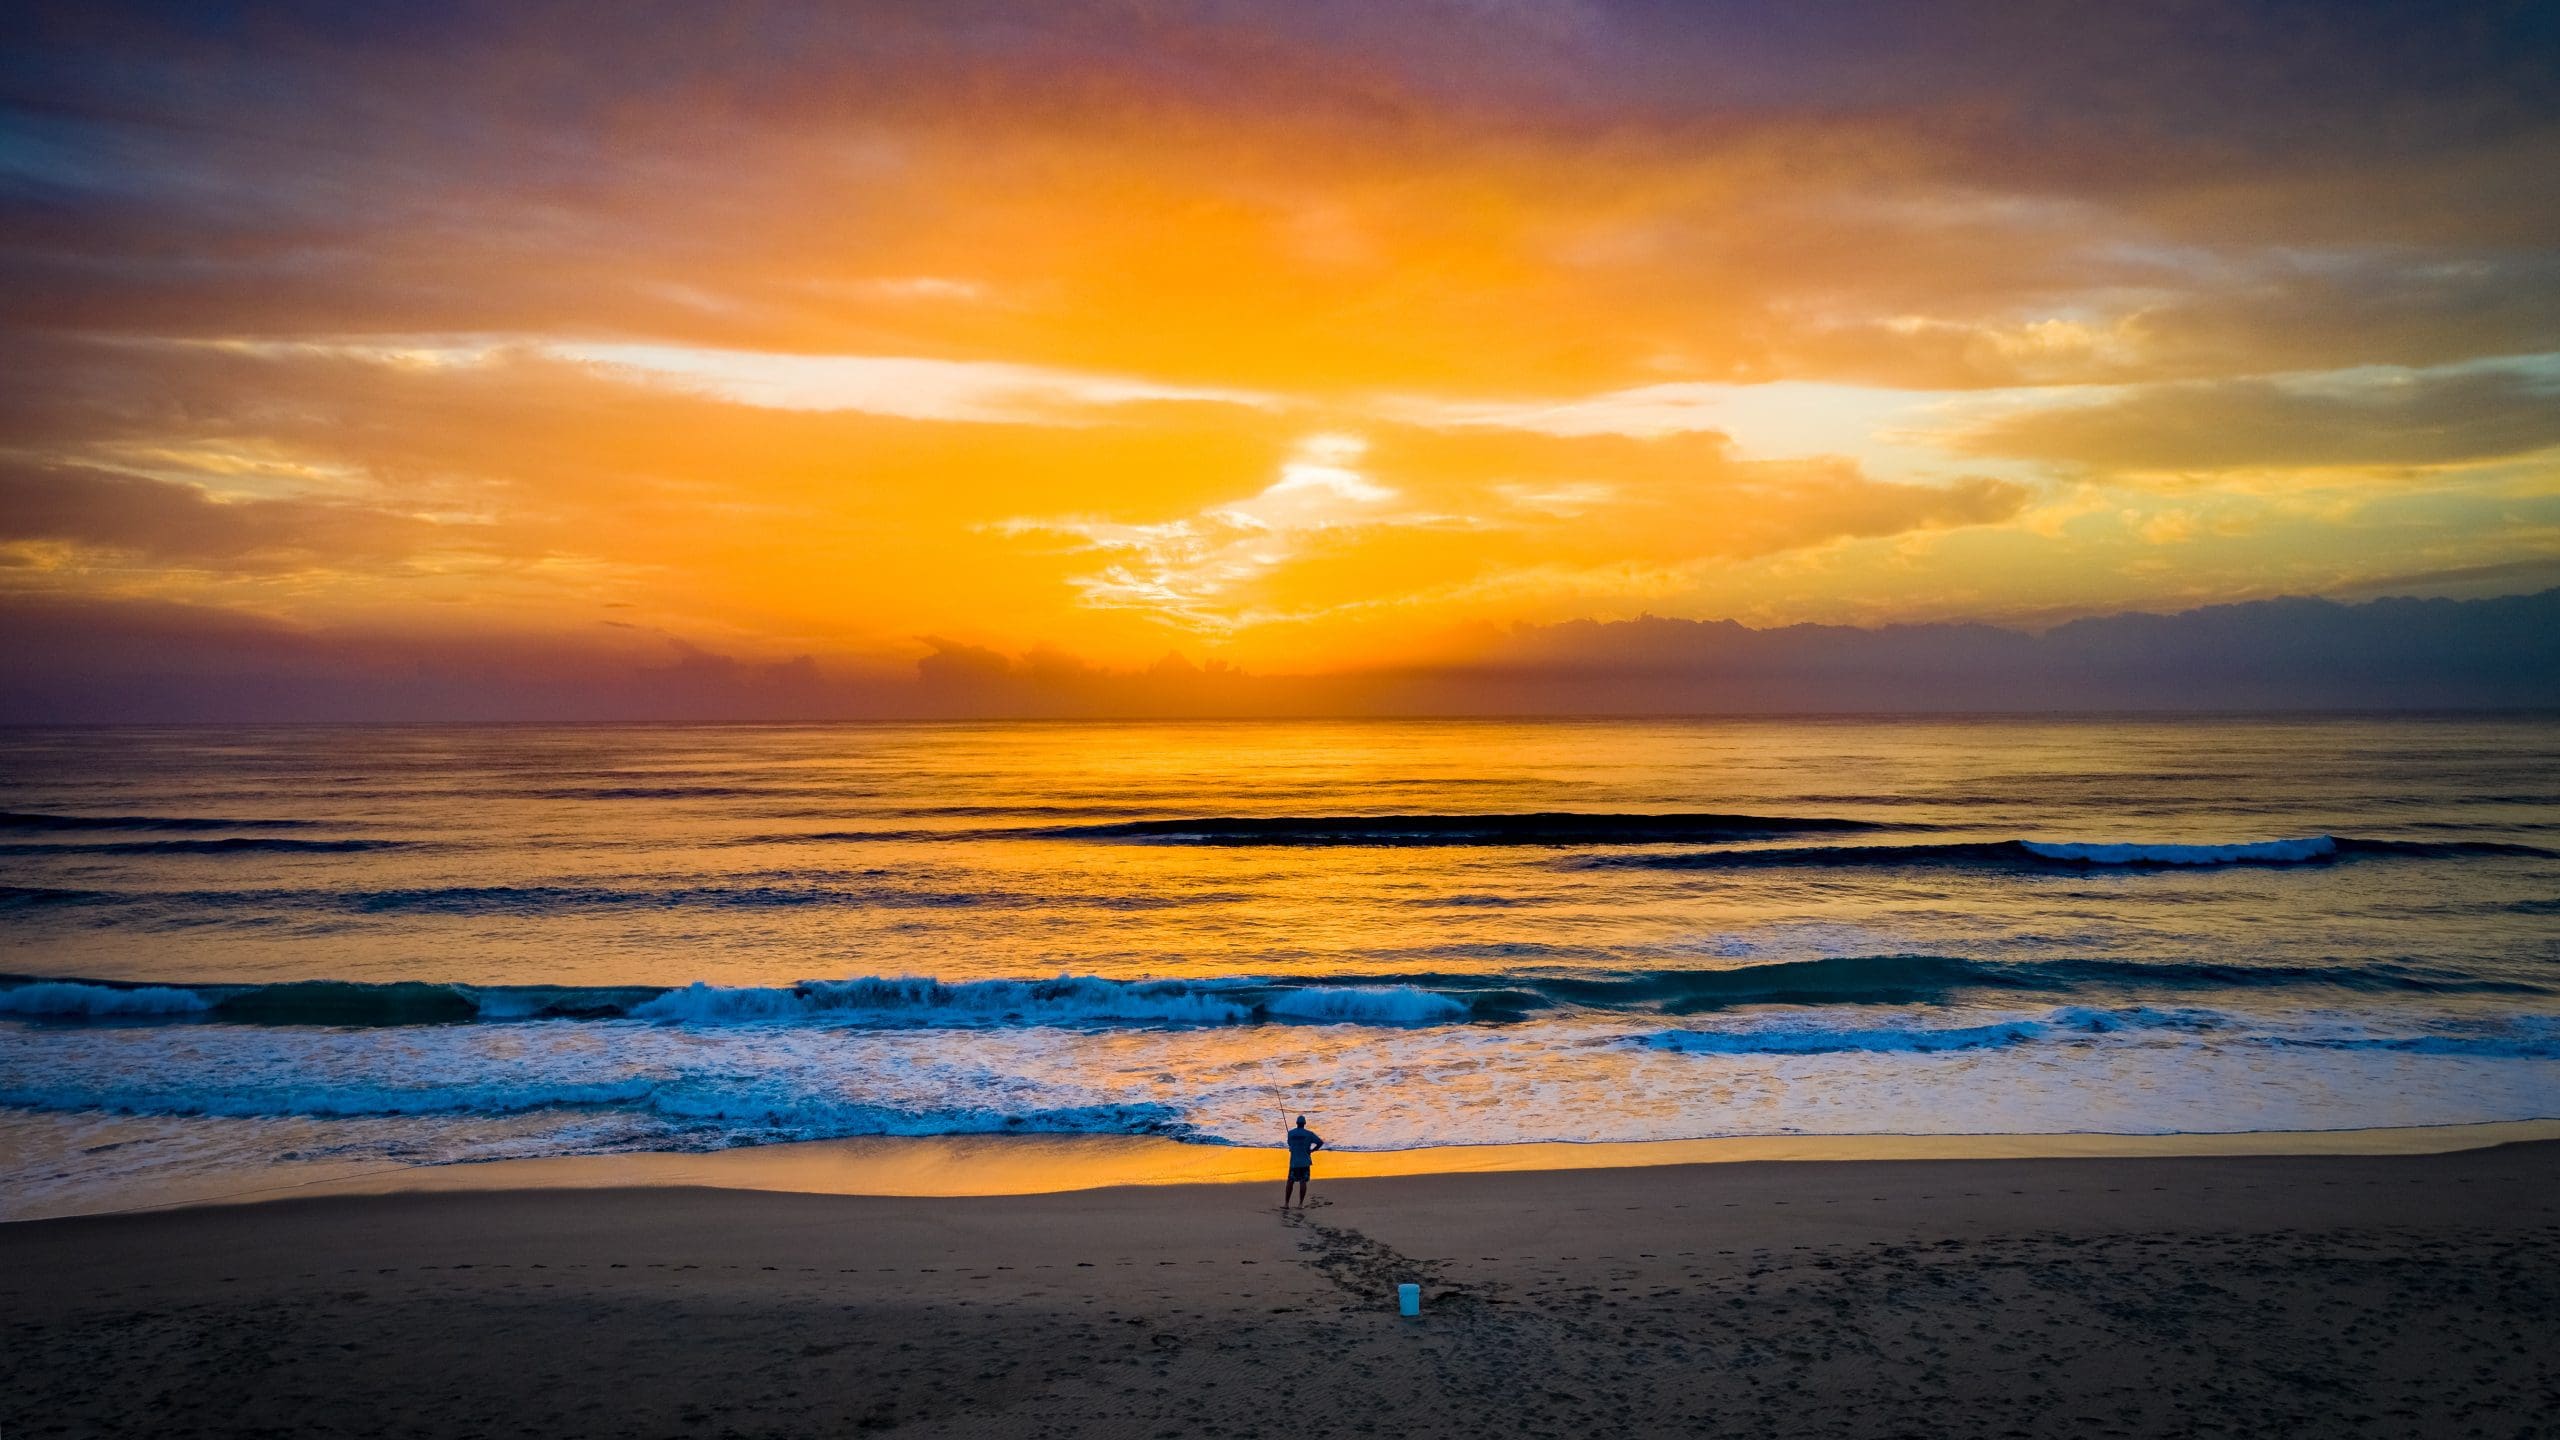
If you are sitting in your lounge room watching TV and you glance out of the window and see the clouds lighting up in shades of pink, red and orange – then stay seated, because you’ve missed it. To ensure you capture a decent photograph of a sunset you need to be out and on location at least 30 minutes before the sun sinks below the horizon.
Pick your location before-hand and try and decide where you’re going to put your tripod. This may mean you arrive an hour before sundown so that you can find some likely locations with all the visual elements you’ll need.
So if you’ve decided you’d like to try and snag some good sunset shots in a particular week – set the time aside, be ready, have your camera equipment ready to go, make sure the mosquito spray in on-hand and make sure you’re on location in plenty of time.
Do not place too much stock by the forecast as even on days when the sky shouldn’t, by rights, be lit up – you’ll often find the opposite. Commit to going out on specific days and go no matter how unpromising it looks (caveats below).
While there are methods you can use to predict a colourful sunset, none of them are foolproof and your best option is to simply get out as often as you can and let the law of averages work in your favour. Or as I like to say, you’re not going to catch a fish if you don’t go fishing. Obviously a completely clouded over sky is not going to produce any colour and you can stay at home. Similarly a completely cloud-less sky might not have enough visual interest to make a compelling sunset photograph. However if I’ve decided I’m heading out I go whatever the conditions and sometimes Lady Luck smiles on me. One thing you learn pretty early is that you pay for the good sunsets with all the awful ones!
On the technical side there are obviously some tools we can use to work out if there’s a chance of some colour in the sky. The most useful of these is a satellite image which shows you cloud cover. In order for there to be colour the sun needs to be able to back-light the clouds as it descends towards the horizon. If there are clouds all the way down to the horizon then the light cannot shine through and the clouds will not get back-lit. You may still get a cool shot of the sun shining through the cloud, but the colour palette is likely to be fairly simple – usually just one shade. What you need is a gap about 90km from your location, so check the satellite image and if the cloud looks clear that far out then you could be on to a winner.
I use the online weather website Windy.com prior to heading out to photograph the sunset. The desktop version is particularly good because it shows current and predicted levels of low, medium and high levels of cloud. From a photography perspective, low level cloud is usually bad, medium level cloud is usually ok and high level cloud is usually excellent. If you have just low cloud, then the sunset isn’t likely to be great, but if you have a mixture of medium and high level or just one or the other then the odds are better.
In terms of working out precisely where the sun is going to set, you can’t go past suncalc.net. Simply navigate to the location you’d like to photograph and you can see the direction of the sun at any time of the day.
The biggest issue with photographing landscapes at either end of the day is the reduced amount of light. Cameras these days cope well in low light environments and it’s entirely possible to photograph sunsets handheld, but if you want a crisp image it’s always best to use a tripod.
Having your camera on a tripod means you can keep the ISO at its lowest to ensure the highest quality image. It also means that you can set your exposures for any length you fancy. Really long exposures work particularly well as you get cloud movement and beautiful saturated colours.
If your camera is on one of the afore-mentioned tripods then you don’t have to worry too much about things like ISO – just set it to 50 or 100 or whatever your camera’s lowest number is. I photograph primarily in aperture priority mode, meaning that I choose the aperture (usually f/8 or f/11) and let the camera work out the exposure time based on it.
If I’m aiming for a more creative sunset shot, using foreground detail such as dune grass or a tree branch then I’ll often use a wide open aperture such as f/2. I can then set the focus on either the foreground or the background and get a dreamy soft-focus image that blows out the detail and accentuates the colour.
Sometimes of course, nature will place an interesting feature in front of your camera lens and you need to quickly change settings to capture it. For this reason I use the custom settings on my camera to have two main landscape setups – one with a low ISO for longer exposure shots and one with an automatic ISO for shorter exposures to capture things like pelicans that suddenly appear in the scene. I can quickly and easily flick between these two modes knowing that everything will be setup for me.
About 95% of the shots I take are bracketed. That means I take three shots, instead of one – one under-exposed (to ensure the highlights are correctly exposed), one over-exposed (to ensure the shadows are correctly exposed) and one normally exposed. Quite often I will simply use the single (middle) correctly exposed shot, but I like to have the option of using tone-mapping to capture the full range of light in a scene.
The light is often at its most extreme at the end of the day and while most recent DSLR cameras have a wide exposure range, they usually can’t capture all of the light in a single shot. With a bracketed shot you can combine them using a number of techniques or plugins to get the most out of the scene. I find the built-in Lightroom HDR does a very good job combining multiple exposures and often it is all I will use. Occasionally it fails to work (with heavy banding at the edge of objects) and I will use digital blending techniques instead.
However the point is that storage space is not an issue and you have nothing to loose by shooting bracketed.
Remember that you do not have to stand in one single place for the duration of a sunset. The temptation is to fire off exposure after exposure of the same view, particularly when the camera is on a tripod. Move around, move the tripod’s location, tilt the camera up or down, try putting the camera really low down, try placing it behind interesting foreground objects – increase your chances of getting a keeper by adding some variety to proceedings.
I often use three lenses using a single sunset shoot. I shoot with an extremely wide 10mm lens, I shoot with a 50mm prime and I shoot with a 70-250mm zoom. If you’re not getting interesting results with a particular lens then switch it out. I’ve found that some of my best shots have happened when I zoomed right into a scene and focused on one single element of it. Details that would otherwise have been lost in a large frame can take centre stage if you pull them right into the sensor. And of course, if you have a drone then get it up in the air and photograph that sunset view from an entirely new angle.
It’s very easy to get lost in a sunset and spend your whole time looking in a westerly direction. However you really need to get into the habit of looking over your shoulder occasionally. Quite often the light behind you will be better than the light to the front or something cool like a rainbow will have appeared.
Typically speaking the best colour hits about 10 minutes after sunset. That seems to be when the angle of the sun and the clouds works to produce the most vibrant colour palette. However it’s always worth sticking around for a while longer to see what happens. I’ve taken awesome shots as much as 45 minutes after sunset.
The biggest key to photographing good sunsets is simply to get out as often as you can. Get into the habit of going out. Go out when it’s cloudy, go out when it’s not, go out whether you’re in the mood or not. Go out often enough and you will get great shots.
I've been lucky enough to witness bioluminescent algal blooms on several occasions and have had camera to hand when it has occurred. Of all the photographs I've taken they are easily the most popular and generate more interest (and copyright theft) than anything else I've ever photographed. So I thought I'd give everyone the low-down on this amazing natural occurrence, from a photography perspective, in order to answer everyone's questions about it.
The main issue with photographing bioluminescent oceans is finding the algal blooms in the first place. I've had emails from people in places like Japan and America who admired my images and then asked me where and when it occurs. They seemed to believe that this was a regular occurrence, like the tides, that could be easily predicted and viewed from specific locations. Unfortunately that is most definitely not the case and far and away your biggest problem will be finding the algae in the first place.
There are some locations worldwide where bioluminescent algal blooms has been known to appear and visiting one of these locations is definitely the best way of maximising your chances of viewing it in the wild. It has been regularly seen in Puerto Rico, the Maldives and America (particularly Florida) and also in several hot-spots around Australia.
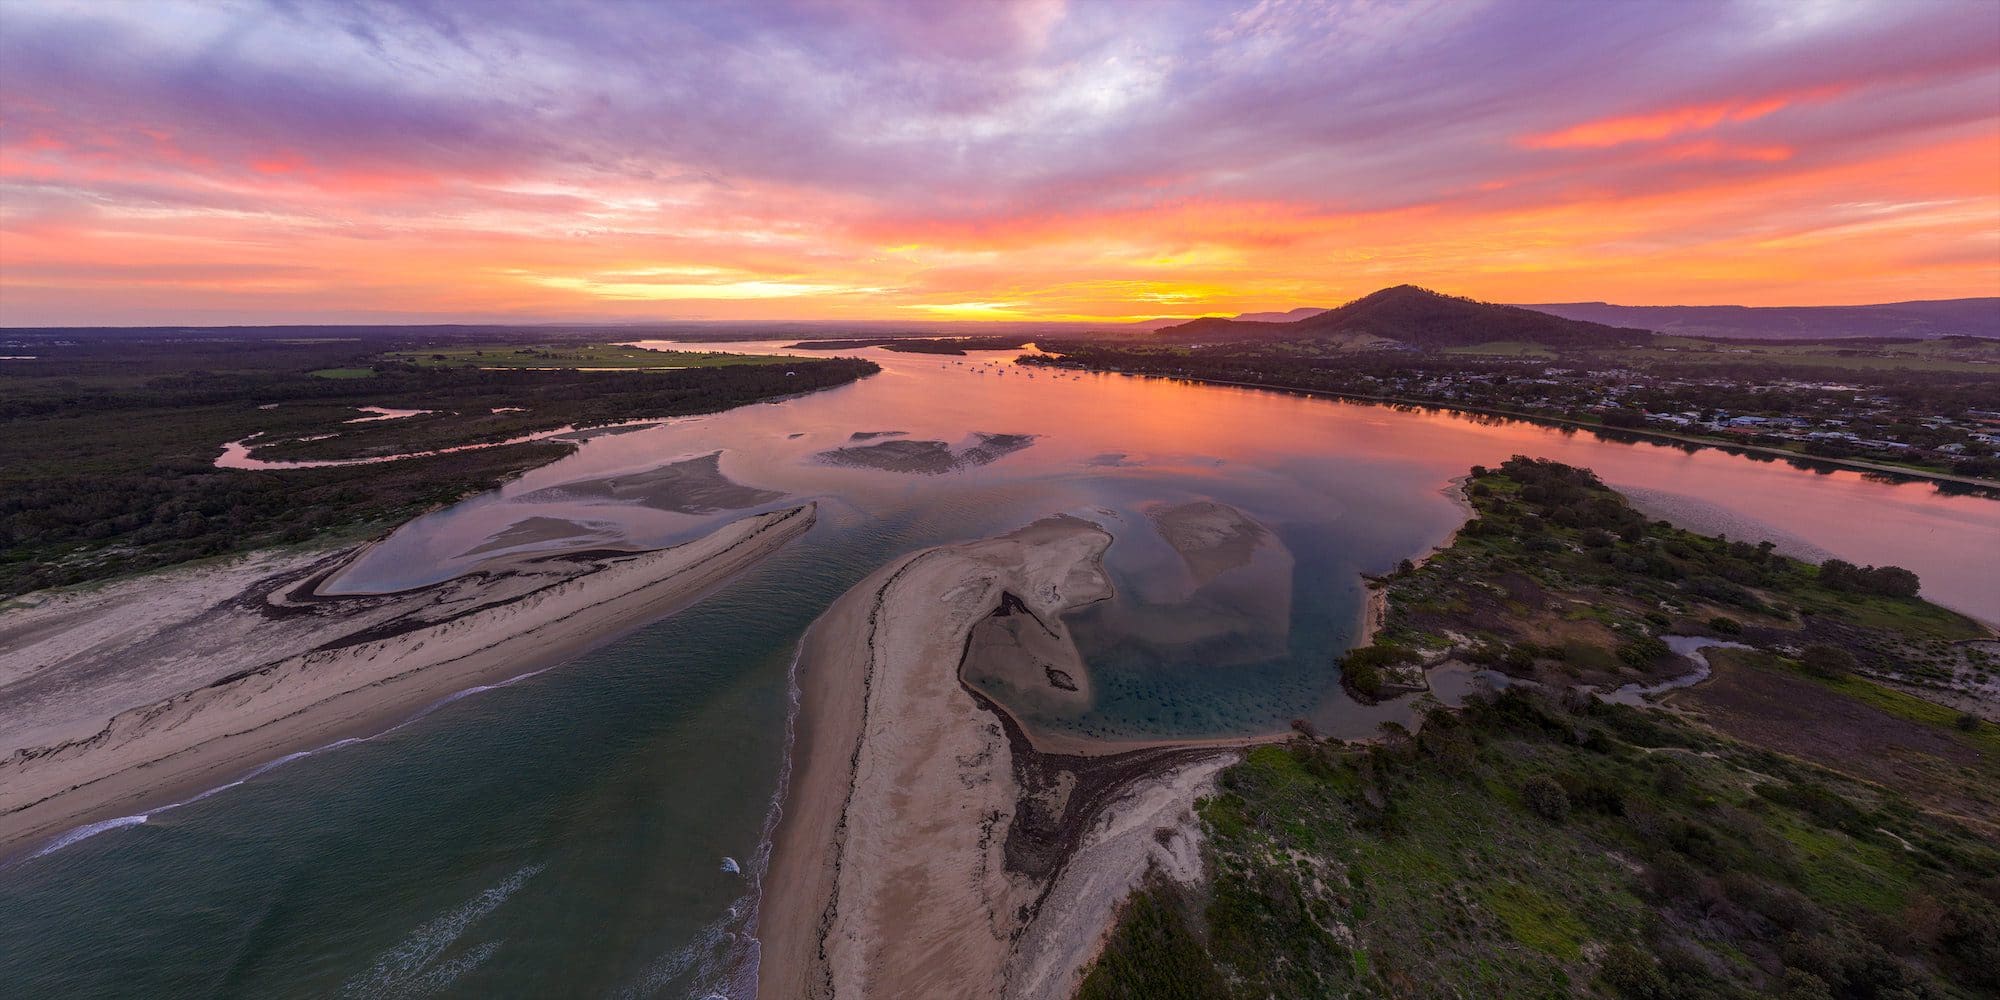
Here in Oz, the bioluminescence has been seen in Tasmania, Cairns, Port Lincoln, Port Phillip Bay and the Gippsland Lakes - but I'm lucky enough to live a very short drive away from one of the most reliable hot-spots - Jervis Bay.
The common link between these locations is that they are at the end of a tidal circulation area, in which flotsam and jetsom traditionally washes up. The dinoflagellates in the water accumulate and get deposited in these areas on an incoming tide. In the case of Jervis Bay, the natural circulation of the bay often leads to the depositing of ocean matter on the beaches on the southern side.
"The primary source of flow-agitated bioluminescence is dinoflagellates. These single-celled organisms are common members of the plankton—tiny marine plants, animals or bacteria that float on or near the ocean’s surface."
So to maximise your chances of seeing the bioluminescence, concentrate on an area where there has been more than one previous sighting. Do proper research though, because there is a lot of misinformation out there. For instance the tourist authorities in the Maldives (and several hundred tour operators and tourism websites) have been illegally using one of my photographs (taken in Jervis Bay here in Australia) for years, so don't believe everything you see online - particularly if you're expecting to see it in the Maldives!
In order to see those glowing blue waves you need to be on the right beach at night and that means doing a bit of homework during the high tide that same day. Walk along the beaches where there have been sightings before (as the daytime tide is coming in) and look for a red algal bloom in the water. It's not a dark red colour, more of a light purple, but it is very distinctive.
There are various theories on what causes the algal bloom. I've spoken to researchers on the subject (who have used my images in their scientific works) and the general consensus is that they are a sign of imbalances on the water. This means that when there is one showing of algal bloom, there could well be another not long afterwards, because the water simply does not recover that quickly. So if you hear of a sighting, it's well worth checking out the same location a couple of days after that too.

Note where you see the red algae and then return at night. Bear in mind that tide and wind can easily move the algal blooms and you should be prepared to walk along the beach searching for it. On one occasion I saw a red algal bloom in some rock pools at a particular beach during the day, but when I returned at night I had to walk 2km to the east before I found the bioluminescence.
Also bear in mind that dinoflagellates only bioluminesce when the water is agitated. Therefore if there are no waves (such as at a lake) then you probably won't see a thing. So grab a stick or chuck a rock in the water and see what happens. If you're at the beach then take off your shoes and walk through the water along the beach and your walking will trigger the lightshow. The algae also gets stuck to the plant-life and animal life and I've seen neon blue fish swimming through the water before.
Typically speaking the same rules that apply for any long exposure/low light photography apply here. That means you need to open the aperture up as much as possible (fast prime lenses are excellent), use a high ISO and expose for 10 seconds or more. I always experiment with my exposures,starting off with a relatively quick long-exposure of about five seconds and then balance exposure time and ISO to get as clean and colourful an image as possible. You'll definitely want to be shooting in RAW so you can get as much light information out of the shot in post.
With regard white balance, I find this much easier to handle in Lightroom and do not concern myself with getting it right on the beach. To the human eye, the algal blooms are actually a greeny/blue colour, but since most photographers typically use an automatic night-time white balance setting (which will be very cool) they look dark blue in most photographs. I prefer the blue colour myself and typically have my temperature set around the tungsten end of the scale at the 3100k mark.
Obviously you will be shooting all of this on a tripod but, in your excitement, remember to mix things up a bit. Try shooting from very low angles, instead of head height. Remember that you can also alter your perspective too - my best shots were taken in the ocean looking back on the beach - to keep the tripod steady I pushed it as hard I could down into the sand and, as the waves were only ripples, it stayed perfectly stable for the duration of the exposure.
Including humans in your shot is perfectly possible by light-painting them with a torch once you've exposed for the algae. Alternatively, try and include the night sky in your shots - my favourite bio shot is one I took showing the Milky Way arching overhead.
As photographers we often forget to drink in the scenes that we are photographing, so focused are we on capturing it in the best way possible. And since natural phenomenon such as bioluminescent algae are rare, it's entirely possible that you'll only see it once in your entire life. So remember to look up from the camera occasionally and take a few shots with your mind's eye for the memory bank in your head.
I certainly wouldn't consider myself a storm-chaser, but if nature decides to throw a bit of weather in my direction than I'm not averse to going out and photographing it. Consequently I've photographed quite a few storms over the years and have arrived at a technique I'm happy with that requires nothing too fancy in terms of either hardware or technique. I make a point of heading out when there's the best chance of colour or drama.
I quite often head to out to photograph the sunset and always check out the clouds before-hand to see if there's a chance of the setting sun back-lighting. I do this firstly by simply looking out of the window. From my back garden I look south-west and check out the clouds and look for a gap on the horizon which will enable back-lighting. I also look at the type of clouds - high level are best. Then I check out the satellite image (using Windy) to see if my assessment of the clouds was correct. Finally I check the weather for the location and see if it's going to be windy or if we're due for some precipitation.

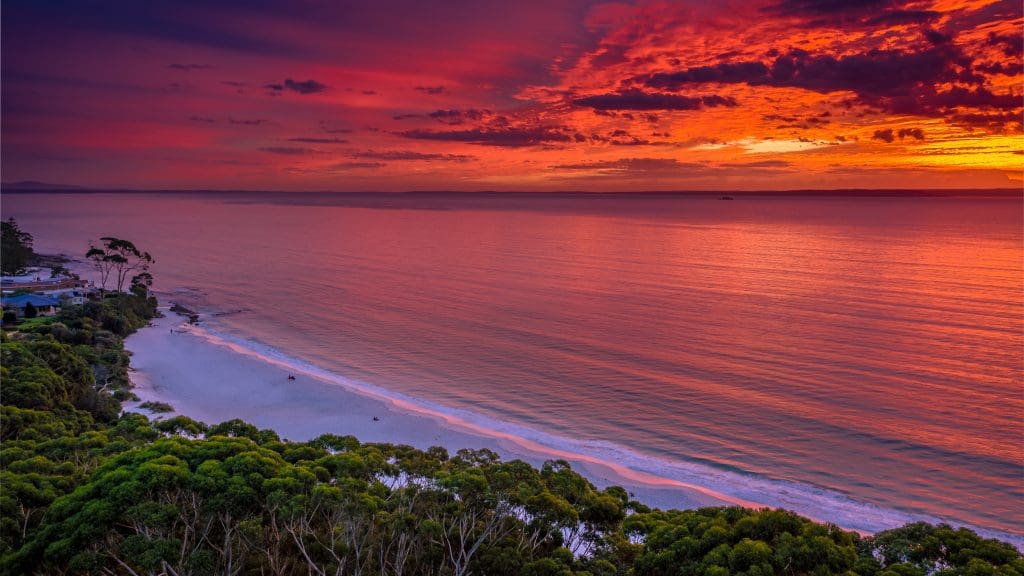
On the day I took this photo I didn't have to look at the sky for long to know that it was likely to be a great sunset. When I then checked the satellite image (which you can see on the left) I saw the line of electrical storms which stretched all the way down from Sydney to Eden. As I was checking my camera equipment I wondered if the sunset would coincide with the arrival of the storm at Gerroa and, as it turned out, it did.
In this particular case it was a happy coincidence that the line of electrical storms were making their run out to sea right on sunset at 5pm. However I suspect that a lot of people would have looked at the sky and checked out the forecast and decided not to go out and take photographs. I always try and making a point of heading out when the weather's bad because that's often when you get the most dramatic shots.
Because I was quite excited by the cloud cover and the impending storm I made sure I was on the beach a good hour before sunset. That gave me plenty of time to consider where I was going to go, to prepare myself and my kit, to find some good tunes to listen to, to make sure I had an SD card and a fully charged battery and to get set-up.
The photograph was taken at the very southern end of Seven Mile Beach in the holiday village of Gerroa. This is a location I am extremely familiar with - it's my go-to sunset spot and I've taken over 20,000 photographs there. I keep going back to Gerroa because it's one of the few places on the east coast where you can photograph the sun setting over the water. The beach here curves back around on itself and the land extends out at Black Head meaning you have lots of options in terms of the location of the sun. It's also, obviously, a photogenic location and, whatever the time of year, I always find something cool to photograph.
There are numerous places to situate yourself on Gerroa to capture great photographs, but in this particular instance, I was standing right next to little Crooked River just in front of the boat ramp. The storm was already very active and I didn't want to get too far onto the beach and leave myself without an escape route should things get too crazy with the electrical activity. I also knew that rain was coming and, while my camera is weatherproof, none of my lenses are, so I needed to know I could get under cover quickly when the rain front hit.
The bottom line is that this was a place I knew extremely well and, having solid knowledge of the location was instrumental in capturing the shot. If I had gone to a location I wasn't so familiar with I would be playing a guessing game, working out where best to position the camera.

Once I was set up on the beach and had the camera on the tripod I composed my image to include the seabirds on the low-tide sand bar. I check the hyperfocal distance for my chosen aperture, lens and camera in the Photopills app and then focused about 7 metres into the shot. Finally I turned off auto-focus and set the camera running its intervals.
The bottom line of storm photography is that you should aim to have your shutter open for as long as possible. I'm not talking about very long exposures (although they're fine too) but the frequency of shots. Every time your camera's shutter closes there is a chance an amazing bolt of lightning will strike and you'll miss it. One of the ways to avoid this (and to keep from hitting the shutter button) is to use an interval timer. My camera (a Canon 7D Mark II) has an interval timer built in but you can buy an intervalometer for next-to-nothing (around $12) to use with pretty much any DSLR. Obviously you'll want to put your camera on a tripod too and, since you'll probably be shooting fairly long exposures you should make sure it is as stable as possible. There are devices you can buy that detect lightning and fire the shutter automatically and I've heard these work fairly well, but I prefer to keep things as simple (and old school) as possible.
Finding the right image settings is often a case of trial and error because you need to account for the ambient light, the sun and the lightning bolts. In the box on the left you can see the EXIF data for my lightning shot. I was shooting in aperture priority mode because the light is constantly changing and it's easier to react quicker when you're just tweaking aperture. I set the aperture to f/19 because firstly I wanted a crisp shot and secondly I wanted to stretch out the exposure time. In this case, with the available light, the camera exposed the image for 1.5 seconds at f/19. I also kept the ISO as low as possible to reduce the noise levels.
The lens I use for 90% of my photographs is the 10-22mm EFS, but as you can see from the EXIF, this shot was taken on my 50mm prime (nifty-fifty) lens. The reason I switched from wide angle to narrow was that I could see the lightning striking in roughly the same area fairly consistently and I knew that I could get a much closer shot with the 50mm. The risk of narrowing your field of view is that you'll get a bolt off to the left or right of frame, but sometimes you have to take a chance. In this particular instance, these bolts of lightning hit about 30 seconds after I switched to the 50mm. As soon as I saw the image appear on the screen on the back of the camera, I knew it was a keeper. I carried on with the 50mm until the storm was upon me and then I switched back to the wide angle lens for the subsequent shots I captured as the storm headed out to sea.
I take a lot of bracketed shots and often combine them in Lightroom or Photoshop using HDR or tone-mapping techniques, but this particular photo is one single RAW shot, processed in Lightroom.
In terms of sliders, you can see what I did to the shot in the screenshot on the right. Highlights dropped to better define the lightning along with a bit of dehaze to make the lightning sit proud of the cloudy background. Everything else is fairly standard for a RAW shot.
Other tweaks were some targetted sharpening to just the edges of the lightning in the Detail tab and a small vignette in the Effects tab to draw the eye inwards. I made no changes to Tone Curve, HSL/Color, Split Toning or Calibration tabs.
I've often found that the best images are the ones that don't need a massive amount of tweaking and that was certainly the case with this shot, to which I applied my usual baseline RAW tweaks. The fact that I shot the image on my 50mm lens made a huge difference to image quality - it's such a high quality lens that good images just seem to fall out of the camera.
Thinking back to the evening of this storm I wondered if I would have done anything differently and the truth is that I wouldn't. I had about 25 minutes on the beach before the storm got to me and I captured some great shots in that timeframe and even shot some video. I was pleased with the way I set up, I was pleased with the composition I chose and I was pleased with the results.
The problem is that, unless you're flying a professional machine with a DSLR strapped underneath it, the modern drone does not have a very good sensor. For the most part, the sensors are small and exhibit heavy noise artifacts at anything above baseline ISO levels. You only start getting decent quality from drone/lens combinations once you head into DJI Zenmuse territory. Yes, drones are excellent during the day - great colour rendition and clarity - but in low light, at sunrise or sunset or heavy cloud, they suck.
There is however, a way of getting decent quality images from a consumer drone in low-light. You need to be a little bit organised and there is some post-processing involved afterwards, but it's not technically difficult. Here's the process.
Low light photography works best in drones in still air or very light winds. As soon as the drone has to start compensating for wind, it will be in constant motion and picture quality will degrade slightly as a result. Since we will be combining images later any movement between frames also results in reduced image dimensions. So having the drone as stable as possible is important. Perfect conditions are quite rare of course and all of these techniques still work perfectly well when there is wind.
The key to getting the best possible low light photographs with a drone is to shoot bracketed shots in RAW mode. Bracketed shots are a sequence of photos taken at a variety of exposure levels in order to capture as much of the dynamic light in the scene as possible and RAW images contain the unmodified sensor information that enables you to get the most possible information from each capture as possible. Typically bracketed shots are taken in sequences of three or five depending upon the circumstances. I would advise you to shoot in sequences of five because the end result will have a more subtle transition between the dark and light areas of the image.
The good news is that the ability to take bracketed shots is built into all the popular drone apps. In both the DJI and Litchi apps, it can be found in the photo settings section under the heading AEB. Simply select the five shot AEB option and when you press the shutter button on your remote or app the drone will quickly take five photographs at a variety of exposures instead of just one. If I am shooting towards the sun then I often take two sets of five AEB shots, one with automatic exposure and then one with the exposure meter centred on the sun.
If the conditions are good and wind levels are low then it's entirely possible (and sometimes more desirable) to manually bracket your shots using the apps histogram. To do this you simply need to set an exposure that correctly exposes the shadows in the image and then work your way through the dynamic range to ensure that you have frames in which neither the highlights or the shadows are clipped and in which you have a full range of image data in the mid-tones as indicated by a histogram with a smooth 'hill' shape.
If you have a fairly slow SD card in your drone then remember to give it time to take all of the images before you move its location or gimbal angle. Wait until the progress indicator has finished rotating on the shutter button before moving.


1 Shoot in AEB to capture a scene's full dynamic light range
2 Here is an example of an image I took with two sets of five images shot in AEB mode. If I had left the drone to meter automatically then the highlights would have been blown out (as per the lower set of five) so I manually set exposure for the setting sun to ensure I captured the full light range (as per the upper set of five).
3 Tone-mapping the bracketed shots in Photoshop
4 Before and after.
Once you've imported your photographs from the SD card onto your computer you can begin processing them. There are many options for combining bracketed images and I've tried pretty much every single one of them over the years, but for drone shots I feel that the best look is achieved by using HDR blending using one of Adobe's applications. In many cases the HDR blending in Lightroom is all you will need and you can achieve superior results using it. However you may want more flexibility and in that case the HDR blending in Photoshop is a good choice.
To blend your images to HDR in Lightroom, simply select all the exposures and either select Photo > Photo Merge > HDR or press Command or Ctrl+H. When the preview window appears I always deselect the ghosting option and auto-tone but I do leave auto-align enabled. Click the Merge button to begin the HDR rendering process.
If you're using Photoshop's HDR option, then you should first select your exposures, right-click and then Edit In > Merge to HDR Pro in Photoshop. Ensure that the HDR Pro window has 32-bit selected and click the Tone in Adobe Camera Raw button at the bottom of the screen. You can now post-process the image to your own personal tastes using the 32-bit image file which will generate a much more subtly processed image than the straight 16-bit HDR in Lightroom.
Remember when you are processing the image in Adobe Camera Raw that you have far more latitude with the sliders than you would with a single RAW image. For example, you can alter the overall exposure of the image to a far greater degree than you can with a single image but still retain full control over the shadows and the highlights using the global sliders or individual modifications using the brush, radial or graduated filters.
For a full walk-through of the whole process including the settings to use in your drone app, please check out my tutorial video below:


